
Owners manual


4
XTL
®
300
User Guide
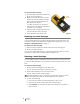
To insert the label cartridge
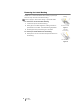
1 Press the label compartment release and
lift the cover. See Figure 6.
2 Make sure the tape and ribbon are taut
across the mouth of the label cartridge
and that the tape passes between the
label guides. See Figure 5.
To tighten the ribbon, turn the ribbon
rewind spool in the direction indicated by
the arrow on the cartridge.
3 Insert the label cartridge and press firmly
until the cartridge ‘clicks’ into place.
4 Close the label compartment cover.
Removing the Label Cartridge
You can design labels without a label cartridge inserted in the label maker. Just
remember to insert a compatible label cartridge before attempting to print. See
Using the Label Applications on page 13.
To remove the label cartridge
1 Press the label compartment release and lift the cover. See Figure 6.
2 Remove the label cartridge.
You can now create labels using any of the label applications. When you start a
new label, you will be asked to select a label cartridge to use.
Selecting a Label Cartridge
You can design any type of label when the label compartment is empty. Each time
you select a label application, you are asked to select the properties for your new
label.
To choose a label cartridge
1 Remove the label cartridge from the label maker.
You are warned that the label compartment is empty.
2 Select a label application from the Home screen.
You are asked to select a label cartridge.
The labels available for you to choose from are filtered to show only those
label cartridges appropriate for the label application you selected.
3 Do one of the following:
• Enter the part number of the label cartridge you wish to use.
• Scroll through the list of labels and select a specific label.
• Select Wizard. You are asked to select the properties for the label you
wish to create.
Press
and lift
Figure 6