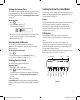
Contents About Your New Label Maker..................................................................................................................................5 Warranty Registration........................................................................................................................................................................5 Getting Started...........................................................................................................................................
Printing Options.................................................................................................................................................. 12 Printing Multiple Copies.................................................................................................................................................................... 12 Serializing Your Labels...................................................................................................................................
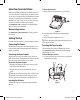
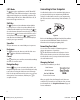
20 21 22 23 24 25 1 2 w w w. d y mo. c om 3 19 18 17 4 5 6 Settings Language 1,2...
About Your New Label Maker With your new DYMO LabelManager™ 450D label maker, you can create a wide variety of high-quality, self-adhesive labels. You can choose to print your labels in many different font sizes and styles. The label maker uses DYMO D1 tape cassettes in widths of 6 mm, 9 mm, 12 mm, 19 mm, or 24 mm. These tape cassettes are available in a wide range of materials. Visit www.dymo.com for information on obtaining labels and accessories for your label maker. Warranty Registration Visit www.
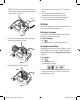
x The first time you use the label maker, remove the protective cardboard insert from between the print head and pinch roller. See Figure 4. Remove cardboard insert 4. Close the tape cassette cover and press A to turn on the power. The Tape Settings menu automatically appears immediately after inserting a new tape cassette. 5. Use the arrow keys to select the tape width of the tape cassette currently in the label maker and press H.
Setting the Current Time The default time format depends upon the language selection for the label maker. You can change the default time format by following the instructions in Changing the Time Format on page 12. To set the time 1. Press . 2. Select Set Time, and press H. The default time is displayed. Settings 3. Move the cursor over each setting (hours and minutes) and use the arrow keys to increase or decrease the value. 4. When finished, press H.
CAPS Mode The CAPS key toggles capitalization on and off. When CAPS mode is turned on, the CAPS mode indicator is shown on the display and all letters that you enter will be capitalized. The default setting is CAPS mode on. When CAPS mode is off, all letters entered appear in lower case. Connecting to Your Computer Your label maker can be used as a standalone label printer or you can print labels from your computer using DYMO Label Software.
To set the font 1. Press the key. 2. Use the arrow keys to move to the desired font and then press H. Adding Font Styles You can choose from many different font styles to apply to your text: Normal Bold Italic Outline Shadow 3D Adding Box and Background Styles You can further highlight your text by choosing a box, underline, or background style. You can also use label text stored in memory as background text on your label. See Storing Label Text on page 14 for information on storing text in memory.
To set the box style 1. Press the key. 2. Select a frame style and then press H. On multi-line labels, all lines are underlined. In box style mode, all lines are enclosed in one box style. To select a text background 1. Press the key. 2. Select Text Background and then press H. The first memory location is displayed. 3. Use the arrow keys to select the stored text you wish to use as a background and press H. Refer to Storing Label Text on page 14.
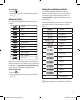
Currency Symbols The currency key also uses RACE to scroll through a number of currency symbols: € £ $ ¢ ¥ The order these symbols appear depends on the language you have selected. Adding Symbols The label maker supports the extended symbol set as shown in Figure 10. To add a symbol 1. Press . The first row of symbols shown in the table appears in the display. 2. Use the arrow keys to move to the desired symbol. The left and right arrows move horizontally along a row of symbols.
Adding Date and Time You can add the date and time to your labels. Changing the Date Format You can choose from 12 different date formats: 24/12/2004 12/24/2004 24/12/04 12/24/04 24 Dec 2004 Dec 24, 2004 (US default) 24 Dec 04 (EU default) Dec 24, 04 24 December 2004 December 24, 2004 24 December 04 December 24, 04 To change the date format 1. Press , select Set Date, and press H. 2. Use the arrow keys to select the date format and press H. The display shows the currently set date.
To print multiple copies of the label 1. Press . 2. Select Set # Copies and press H. 3. Press the up arrow key to increase the number of copies to print. 4. Press the down arrow key to begin decreasing the number of copies from 16. 5. Press H. 6. Press 1,2...n to begin printing. x You may notice a brief pause in printing between each label for more complex formats. When printing is finished, the number of copies to print returns to the default value of 1.
Once you select a barcode type, that setting remains until you select a different barcode type. To insert a barcode 1. Enter the text you wish to appear before the barcode on the label. (Optional) 2. Press . 3. Select Insert Barcode and press H. 4. Enter any text you wish to appear after the barcode. (Optional) 5. Press 1,2...n . To change the cutting option 1. Press . 2. Select Set Auto Cut and press H. 3. Select On or Off, and then press H. This setting will remain until you change it.
Storing Formats In addition to label text, you can store up to ten specific label formats you use frequently. This feature stores only the formatting information not the label text. Ten fields, which represent memory locations, are displayed. You can store new formats in any of the fields, however, if you select a location that is filled, the previous label format will be overwritten. To store the current format 1. 2. 3. 4. Press . Select Save and press H. Select Format and press H.
Troubleshooting Review the following possible solutions if you encounter a problem while using your label maker. Problem/Error Message Solution No display • Ensure the label maker is turned on. • Replace discharged batteries. Poor Print Quality • Replace batteries or attach power adapter. • Set Contrast to higher level. See Adjusting the Print Contrast. • Ensure tape cassette is installed properly. • Clean the print head. • Replace the tape cassette. Poor Cutter Performance Clean the cutter blade.
DYMO D1 Tape Cassettes Width: Length: Black/Clear 6 mm 7m S0720770 9 mm 7m S0720670 12 mm 7m S072 0500 19 mm 7m S0720820 24 mm 7m S0720920 Blue/Clear ___ ___ S0720510 45011 ___ ___ Red/Clear ___ ___ 45012 S0720520 ___ ___ S0720780 S0720680 S0720530 S0720830 S0720930 ___ S0720690 40914 S0720540 S0720840 S0720940 ___ S0720700 40915 S0720550 S0720850 45805 S0720950 53715 Black/Blue ___ S0720710 40916 S0720560 S0720860 S0720960 Black/Red ___ S0720720 40917 S072057
Documentation Feedback We are constantly working to produce the highest quality documentation for our products. We welcome your feedback. Send us your comments or suggestions about our user guides.
CONTACTING CUSTOMER SUPPORT Country United Kingdom Telephone Support 020 73 41 55 29 Fax Support + 31 20 581 93 80 Ireland 014 118 934 + 31 20 581 93 80 France 01 69 32 49 32 + 31 20 581 93 80 Nederland 020 581 93 86 020 581 93 80 België - Belgique 02 713 38 08 + 31 20 581 93 80 Deutschland 069 66 56 85 29 + 31 20 581 93 80 Österreich 01 599 14 20 12 + 31 20 581 93 80 Schweiz - Suisse 044 342 04 66 + 31 20 581 93 80 Sverige 08 632 00 57 + 31 20 581 93 80 Norge 22 97 17 10 + 31 2
931655 ©2007 DYMO A Newell Rubbermaid company DYMO bvba Industriepark-Noord 30 9100 Sint-Niklaas Belgium www.dymo.com LM450D_manual_UK_WEU.