
User guide


6
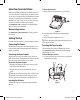
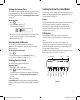
x The first time you use the label maker, remove the
protective cardboard insert from between the print head
and pinch roller. See Figure 4.
Figure 4
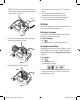
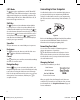
Insert the cassette with the tape and ribbon positioned 2.
between the guideposts. See Figure 5.
Figure 5
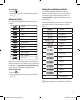
Press firmly until cassette clicks into place. 3.
Click !!
Figure 6
Close the tape cassette cover and press 4.
A to turn on the
power.
The Tape Settings menu automatically appears
immediately after inserting a new tape cassette.
Use the arrow keys to select the tape width of the tape 5.
cassette currently in the label maker and press H
.
Settings
You can set the language, current date and time, and the units
of measure you want the label maker to use.
Selecting a Language
You can select from a number of different language options.
By default, the language is set to English.
To select a language
Press 1.
Language
.
Use the arrow keys to select the language and press 2. H.
Setting the Current Date
The default date format depends upon the language selection
for the label maker. You can change the default date format
by following the instructions in Changing the Date Format
on page 12.
To set the date
Press 1.
Settings
.
Select 2. Set Date, and press H.
The default date is displayed.
Move the cursor over each setting (month, day, and year) 3.
and use the arrow keys to increase or decrease the value.
When finished, press 4. H.
Remove
cardboard
insert
LM450D_manual_UK_WEU.indd 6 16-08-2007 09:22:57