Date/Ti me Sta IMPORTANT! mper Please read ALL instructions carefully before operating. LOCK TIME DATE SHIFT M ALAR MODE RIT SECU E COD Y SET/ EDIT PRINT CT SELE Electronic Date/Time Stamper DYMO Tel: 800.426.7827 or 203.355.9000 Fax: 203.355.9090 www.dymo.com User Guide DYMO, AN ESSELTE BRAND © 2000 DYMO Corporation. DYMO is a registered trademark of the Esselte Corporation. GE MESSA FILE Part 47000-003 04.
Usage Tips To maintain your stamper at peak operating performance, please follow these guidelines: 1. Do not touch the printer head or belt when the unit is printing. This will cause the printer to malfunction and require servicing. 2. Immediately replace LCD display cell-battery if the BATT indicator lights up on the LCD. 3. If printer speed slows down, replace all 4 AA batteries. Operating the unit with low batteries will damage the printer. 4. Always cover the battery compartment before printing. 5.
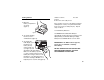
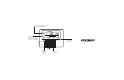
Getting Started shuttle to return to the start position. 4. The unit is now ready for use. 1. Open the battery compartment as shown. (figure 2) If the unit does not reset, verify that the print belt shuttle(bottom of unit) is not jammed and slides freely across belt (use ball point pen). Repeat steps 1-4 above. MA DE CHINA IN Low Cell Battery Detection figure 2 Your DYMO Electronic Date/Time Stamper automatically checks itself every hour to detect a low display battery (3-volt Lithium battery).
3. Apply a few drops of ink-pad ink onto the roll, then carefully insert the roll back into proper position inside the unit. Or simply insert a new Ink Roller (DYMO SKU 47001) 4. Replace the ink roll compartment door. Printer Error/Reset (P-RESET) If the AA batteries are weak or there is a printer error the LCD will start flashing P-RESET. The unit will not print while P-RESET is flashing. R INTE 4. Snap the battery door back into place. "AA" UM-3 1.5V ESE 3.0 VOLT "AA" UM-3 1.5V 5.
NOTE: If you go past the current year, you will need to press the LOCK button to cycle through the year 2189, and back up to the current year. 4. Once you are finished setting the Date and Time press the SET/EDIT button to return to normal display. 5. The Date/Time Stamper is now ready to print. The stamper will print the current date, time, and message as displayed. The IN message is printed by default. To select a different message press the SHIFT button to cycle through the 7 available messages. 1.
pattern press the ALARM MODE button to finish print programming and return to normal display. Auto-numbering Your Date/Time Stamper allows you to use either 4 or 6 digit auto numbering Follow the instructions below for setup: 1. Press and hold the PRINT SELECT button for 2 seconds, the DATE field will start flashing. 2. Press the PRINT SELECT button until either 4 or 6-digit auto-numbering is flashing and use the SET/EDIT button to turn the rectangle on. 3. Press the LOCK button to set the first digit.
Selecting which fields to print Stamper will emit a series of short beeps. To shut off the alarm, press ALARM MODE. Deactivating the alarm 1. Press ALARM MODE, then press LOCK so the "bell" icon will disappear. 2. Press ALARM MODE to return to normal display. Using the Security Code Setting the Security Code 1. Press and hold the Security Code button for 2 seconds. 2. Press LOCK to set the first digit, then SHIFT to move on to the next digit. Repeat this step until all digits are set. 3.
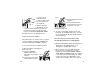
In program mode, allows you to change the value of all available fields. Date/Time Stamper LOCK SHIFT Press to change message to be printed. In program mode, allows you to navigate between the available fields. DATE TIME MESSAGE FILE ALARM MODE SECURITY CODE SET/ EDIT PRINT SELECT Press to select message to be printed. Press to display time alarm will sound. Allows you to set security code. Allows you to enter program mode. www.dymo.