Professional Labelmaker User Guide w US NZ AUS
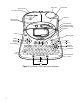
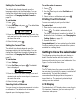
Auto-cutter USB Connector AC Power Connector LCD Display Label Exit Label cassette door release w w w. d Font Size/Style Font/Fixed Length Underline-Box/Align Symbols y mo. c om Power Manual Cutter Settings Memory Language Preview/Insert Settings Language 1 Q ? : 2 W A Tab CAPS Symbols Insert ! CAPS – 33 E Z + 4 R S 6/ 5 T D X Print Cancel 1,2...n Memory Preview Shift # 8@ B SPAC E Cancel , , .
US About Your New Labelmaker AUS NZ With your new DYMO ExecuLabel™ LM450 labelmaker, you can create a wide variety of highquality, self-adhesive labels. You can choose to print your labels in many different sizes and styles. The labelmaker uses DYMO D1 label cassettes in widths of 1/4” (6 mm), 3/8” (9 mm), 1/2” (12 mm), 3/4” (19 mm), or 1” (24 mm). Label cassettes are also available in a wide range of materials. Visit www.dymo.com for information on obtaining labels and accessories for your labelmaker.
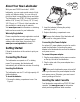
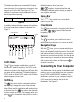
To insert the label cassette 1. Press and release the label cassette cover to open the label compartment. See Figure 3. CLICK! Figure 5 Figure 3 The first time you use the labelmaker, remove the protective cardboard insert from between the print head and pinch roller. See Figure 4. Remove cardboard insert 4. Press firmly until cassette clicks into place. When positioned correctly, you will hear the labelmaker wind the label ribbon into place. 5.
Setting the Current Date The default date format depends upon the language selection for the labelmaker. You can change the default date format by following the instructions in Changing the Date Format on page 10. To set the date 1. Press . Settings 2. Select Set Date, and press is displayed. . The default date To set the units of measure 1. Press . Settings 2. Use the arrow keys to select Set Units and press . 3.
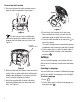
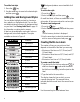
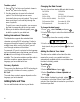
The display window can accommodate 16 uppercase characters. As you type more characters, they begin to scroll to the left. (See Figure 6.) The number of characters actually displayed can vary due to proportional spacing. The quick brown fox jumps over the lazy dog. Figure 6 In addition, feature indicators appear on the display to let you know when a feature is selected. See Figure 7.
To set the font 1. Press the key. 2. Use the arrow keys to move to the desired font and then press . Adding Font Styles Figure 8 You can choose from many different font styles to apply to your text: Refer to the ExecuLabel LM450 Quick Start Guide for installation instructions and the DYMO LabelMANAGER Software User Guide for information about designing and printing labels.
To set the font style 1. Press the key. 2. Use the arrow keys to move to the desired style and then press . Adding Box and Background Styles You can further highlight your text by choosing a box, underline, or background style. You can also use label text stored in memory as background text on your label. See Storing Label Text on page 13 for information on storing text in memory. A label can be underlined or enclosed in a box or background, but not both together.
Using Mixed Formats Adding Symbols You can apply different fonts and format styles to the text on a label by inserting format breaks to divide the label into blocks or sections of text. Each section is separated by a format break. You can add two format breaks, allowing you to apply three separate formats to a label. Alignment, underline, box styles, and background patterns cannot be mixed on a label.These styles are common to the entire label. To add a format break 1.
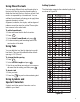
To add a symbol 1. Press . The first row of symbols shown in the table appears in the display. Symbols 2. Use the arrow keys to move to the desired symbol. The left and right arrows move horizontally along a row of symbols. The up and down arrow keys scroll vertically through the rows of symbols. To quickly see a row of symbols, you can press the letter corresponding to the row you want. 3. When you locate the desired symbol, press to add the symbol to your label text.
Changing the Time Format Printing Multiple Copies You can choose to show the time in 12-hour format or 24-hour format. To set the time format 1. Press , select Set Time, and press . You can print up to 16 copies of a label at one time. When printing multiple copies, a dotted cut-line is printed between each label. To print multiple copies of the label 1. Press . Settings 2. Use the arrow keys to select the time format (24 Hour Clock or 12 Hour Clock) and press Settings .
Printing a Fixed-Length Label Normally, the length of the label is determined by the length of the text entered. However, you may wish to make a label for a specific purpose that is a fixed length regardless of the length of the text. You can specify a fixed length for a label in 0.1” (2 mm) increments between 1.5” (40 mm) and 15.0” (400 mm). The preset fixed length is 4” (100 mm). Any change you make to the fixedlength setting remains in effect until you change it. To set the label length 1. Press + .
Aligning the Text When you print a fixed length label you can choose to align the text at the left, center, or right side of the label. For multi-line labels, all lines of text are aligned left, center, and right relative to each other. To align the text 1. Press + . Shift 2. Use the arrow keys to select the desired alignment and press . The alignment setting remains active until you reset the alignment.
formats in any of the fields, however, if you select a location that is filled, the previous label format will be overwritten. 4. Select a field and press . The word Name? appears in the field. 5. Enter a name for the format and press . Your label format is saved and you are returned to the label. Recalling Stored Labels and Formats You can easily recall labels and formats stored in memory to use at a later time. To recall labels or formats 1. Press . Memory 2.
Troubleshooting Review the following possible solutions if you encounter a problem while using your labelmaker. Problem/Error Message Solution No display • Ensure the labelmaker is turned on. • Replace discharged batteries. Poor Print Quality • • • • Replace discharged batteries or attach power adapter. Ensure label cassette is installed properly. Clean the print head. Replace the label cassette. Poor Cutter Performance Clean the cutter blade. See Caring for Your Labelmaker.
Documentation Feedback We are constantly working to produce the highest quality documentation for our products. We welcome your feedback. Send us your comments or suggestions about our user guides.
Contacting Customer Support The following table provides a list of telephone numbers to reach DYMO Sales and Support departments. You can also reach DYMO at www.dymo.com.
DYMO Corporation 44 Commerce Road Stamford, CT 06902-4561 (203) 355-9000 © 2005 DYMO Corporation. All Rights Reserved. 04/05 No part of this document may be reproduced or transmitted in any form or by any means or translated into another language without the prior written consent of DYMO Corporation. ExecuLabel is a trademark of DYMO Corporation. DYMO is a registered trademark of Esselte Corporation. All other trademarks are the property of their respective holders.