LM350 WEU.qxd 12-11-2003 09:02 Pagina 1 350 Electronic Labelmaker Page 3 User Guide Etiqueteuse Electronique Page 15 Guide D‘Utilisation Elektronische Labelmaker Pagina 27 Gebruikershandleiding Elektronisches Beschriftungsgerät Bedienungsanleitung www.dymo.
LM350 WEU.
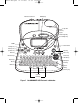
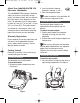
LM350 WEU.qxd 12-11-2003 09:02 Pagina 3 2. Insert the batteries following the polarity markings (+ and –). About Your LabelMANAGER 350 Electronic Labelmaker GB 3. Close the compartment door. The LabelMANAGER 350 electronic labelmaker allows you to create a wide variety of highquality, self-adhesive labels. You can choose to print your labels in many different sizes and styles. The labelmaker uses D1 tape cassettes in widths of 6 mm (1/4”), 9 mm (3/8”), 12 mm (1/2”), or 19 mm (3/4”).
LM350 WEU.qxd 12-11-2003 09:02 Pagina 4 5. Press firmly until cassette clicks into place. See Figure 5. Remove the protective cardboard insert from between the print head and roller. See Figure 4. 6. Close the tape cassette door. 2. Set the cassette switch for the size of the tape cassette that you are inserting. See Figure 4. Settings Selecting the Language You can select from a number of different language options. Remove Cardboard To select your language 1. Press the ON/OFF button. 2.
LM350 WEU.qxd 12-11-2003 09:02 Pagina 5 The previously selected style settings are also restored. Getting to Know Your Labelmaker The following sections describe each feature in detail. Become familiar with the location of the feature and function keys. See Figure 1 on page 2. Upper and Lower Case The CAPS key toggles capitalization on and off. When CAPS mode is turned on, the CAPS indicator is shown on the display and all letters that you enter will be capitalized.
LM350 WEU.qxd 12-11-2003 09:02 Pagina 6 To set the font style 1. Press the Style key. Formatting Your Label You can choose from a number of formatting options to enhance the appearance of your labels. 2. Use the arrow keys to move to the desired style and then press OK. The labelmaker remembers the last feature selection made so that each time you enter one of the feature menus described in this section, you are positioned at the last item selected from that menu.
LM350 WEU.qxd 12-11-2003 09:02 Pagina 7 To change the tab spacing 1. Press Settings. • Maximum of two lines on 3/8" (9 mm) and 1/2" (12 mm) labels • Maximum of one line on 1/4" (6 mm) labels 2. Use the arrow keys to select Set Tab Length and press OK. To create a multiple-line label 1. Type the text for the first line, and press Return. A new line character is placed at the end of the first line in the display, but will not print on the label. 3.
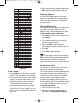
LM350 WEU.qxd Row 12-11-2003 09:02 Pagina 8 3. When you locate the desired symbol, press OK to add the symbol to your label text. Position in row Printing Options You can print multiple copies of the same label, print serialized and fixed-length labels, review label text and format, and adjust the printing contrast. Printing Multiple Copies You can print up to 16 copies of a label at one time. When the Auto-Cut feature is off, a dotted cut-line is printed between each label.
LM350 WEU.qxd 12-11-2003 09:02 Pagina 9 Aligning the Text When you print a fixed length label you can choose to align the text at the left, center, or right side of the label. For multi-line labels, all lines of text are aligned left, center, or right relative to each other. 3. Press Extra. 4. Use the arrow keys to select Incremental Print and press OK. 5. Press Print. Setting a Fixed Label Length Normally, the length of the label is determined by the length of the text entered.
LM350 WEU.qxd 12-11-2003 09:02 Pagina 10 ever, if you select a location that is filled, the previous label format will be overwritten. Using Labelmaker Memory The labelmaker has a powerful memory feature that stores text and formatting as follows: • Automatically stores the last 10 labels printed. • Allows you to store the text of up to 10 labels you use frequently. • Allows you to name and store up to 10 commonly used label formats. 3. Use the arrow keys to select a field and press OK.
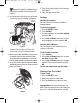
LM350 WEU.qxd 12-11-2003 09:02 Pagina 11 6. After cleaning the blade, press Cut to return the blade to its home position. You can also follow this procedure if the cutter blade becomes lodged in the forward position and will not move. To clean the print head Wipe the print head clean using the cleaning tool located inside the tape compartment lid.
LM350 WEU.qxd 12-11-2003 09:02 Pagina 12 Troubleshooting Review the following possible solutions if you encounter a problem while using your printer. Problem/Error Message Solution No display • Ensure the printer is turned on. • Replace discharged batteries. Poor Print Quality • Replace discharged batteries. • Ensure tape cassette is installed properly. • Clean the print head. • Replace the tape cassette. Poor Cutter Performance Clean the cutter blade. See Caring for Your Labelmaker. Printing...
LM350 WEU.