LabelManager 350D A versatile desk top label maker to create and store many labels User Guide www.dymo.com LM350D manual UK_WEU.
Contents About Your New Label Maker . . . . . . . . . . . . . . . . . . . . . . . . . . . . . . . . . . . . . . . . . . . . . . . . . . . . . 5 Warranty Registration . . . . . . . . . . . . . . . . . . . . . . . . . . . . . . . . . . . . . . . . . . . . . . . . . . . . . . . . . . . . . . . . 5 Getting Started . . . . . . . . . . . . . . . . . . . . . . . . . . . . . . . . . . . . . . . . . . . . . . . . . . . . . . . . . . . . . . . . . 5 Connecting the Power . . . . . . . . . . . . . . . . . . . . . . . .
Serializing Your Labels. . . . . . . . . . . . . . . . . . . . . . . . . . . . . . . . . . . . . . . . . . . . . . . . . . . . . . . . . . . . . . . 11 Setting a Fixed Label Length. . . . . . . . . . . . . . . . . . . . . . . . . . . . . . . . . . . . . . . . . . . . . . . . . . . . . . . . . . 11 Previewing Your Label. . . . . . . . . . . . . . . . . . . . . . . . . . . . . . . . . . . . . . . . . . . . . . . . . . . . . . . . . . . . . . . 11 Aligning the Text . . . . . . . . . . . . . . . . . . . . . . .
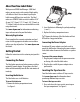
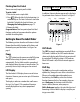
AC Power Connector LCD Display Tape Exit Font Key Styles/Fixed Length Key Box/Align Key Power Cutter Key Settings Key Memory Key Symbols Key Extra Key Print Key Cancel Key , Tab Key CAPS Key Arrow Keys with OK Key Backspace/ Clear Key .
About Your New Label Maker With your new DYMO LabelManager® 350D label maker, you can create a wide variety of high-quality, self-adhesive labels. You can choose to print your labels in many different sizes and styles. The label maker uses DYMO D1 label cassettes in widths of 1/4” (6 mm), 3/8” (9 mm), 1/2” (12 mm), 3/4” (19 mm), or 1” (24 mm). Label cassettes are also available in a wide range of materials. Visit www.dymo.com for information on obtaining tapes and accessories for your label maker.
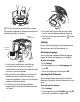
CLICK! CLICK! Figure 3 x The first time you use the label maker, remove the protective cardboard insert from between the print head and pinch roller. See Figure 4. Remove cardboard insert Figure 5 5. Press firmly until cassette clicks into place. Make sure the tape and ribbon are positioned correctly. 6. Close the tape cassette cover and press to turn on the power. Settings You can select the language and corresponding units of measure you want the label maker to use.
Power The button turns the power on and off. After two minutes of no activity, the power is switched off automatically. The last label created is remembered and displayed when the power is turned back on. The previously selected style settings are also restored. LCD Display The label maker’s LCD display shows a row of sixteen characters. However, you can enter up to 99 characters and spaces. The display is similar to a window that scrolls across the text. (See Figure 6.
Space Bar Adding Font Styles The Space Bar inserts one or more blank spaces in your text. You can choose from six different font styles to apply to your text: Backspace Normal Backspace removes the character to the left of the cursor. Shift+Backspace clears all label text and formatting. Vertical Cancel Outline The Cancel key allows you to exit from a menu without making a selection or to cancel an action.
The styles available are shown in Figure 9. DYMO Square Box DYMO Pointed Box DYMO Rounded Box DYMO Crocodile Box DYMO Scroll Box DYMO 3D Box DYMO Dots • Maximum of two lines on 3/8" (9 mm) and 1/2" (12 mm) labels • Maximum of one line on 1/4" (6 mm) labels To create a multiple-line label 1. Type the text for the first line, and press Return. A new line character ë is placed at the end of the first line in the display, but will not print on the label. 2. Type the text for the second line.
To change the tab spacing 1. Press Settings. 2. Select Set Tab Length and press OK. 3. Use the up and down arrow keys to increase or decrease the tab setting, and then press OK. To insert a tab 1. Enter your text. 2. Press the Tab key and continue entering text. Using Symbols and Special Characters Symbols and other special characters can be added to your labels. Adding International Characters The label maker supports the extended Latin character set using RACE technology.
2. Use the arrow keys to move to the desired symbol. The left and right arrows move horizontally along a row of symbols. The up and down arrow keys scroll vertically through the rows of symbols. To quickly see a row of symbols, you can press the letter corresponding to the row you want. 3. When you locate the desired symbol, press OK to add the symbol to your label text.
To preview your label 1. Press Extra. 2. Select Print Preview and press OK. 3. Select Text or Format. If you select Text, the text of the label scrolls across the display. If you select Format, the format selected displays briefly. Aligning the Text When you print a fixed length label you can choose to align the text at the left, center, or right side of the label. For two-line labels, both lines of text are aligned left, center, and right relative to each other. To align the text 1. Press Shift-Box/Align.
A list of ten fields, which represent memory locations, are displayed. Fields that contain formats display a name in the field. You can store new formats in any of the fields, however, if you select a location that is filled, the previous label format will be overwritten. 3. Select a field and press OK. The word NAME? appears in the field. 4. Enter a name for the format and press OK. Your label format is saved and you are returned to the label.
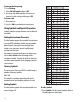
Troubleshooting Review the following possible solutions if you encounter a problem while using your label maker. Problem/Error Message No display Poor Print Quality Poor Cutter Performance Printing Too many characters Exceeded maximum number of characters in buffer. Too many lines Exceeded maximum number of lines allowed. Insert Tape Cassette Tape cassette missing or empty. Battery low Batteries almost discharged. Tape Jam Motor is stalled due to tape jam.
Documentation Feedback We are constantly working to produce the highest quality documentation for our products. We welcome your feedback. Send us your comments or suggestions about our user guides.
931763 ©2007 DYMO A Newell Rubbermaid Company LM350D manual UK_WEU.indd 20 Produced by: DYMO Stamford CT 06902 800-426-7827: www.dymo.