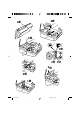
B➊ A➊ B➋ C➊ C➋ C ➌ D➋ ➠ D➊ 9000Bk3cover E➊ 2 30/7/1997, 5:29 pm
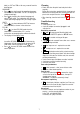
Introduction The Display The Dymo 9000 Electronic Labelmaker enables you to create a wide variety of high quality self-adhesive labels. These instructions describe how to use your Labelmaker in stand-alone mode; for PC-Link operation consult the relevant sections of the Dymo Label Software manual. The Labelmaker uses 6mm (1/4"), 12mm (1/2"), 19mm (3/4") 24mm (1") or 32mm (11/4") wide tape cassettes in a number of label colours. Labels can be tab-cut for easy removal from the backing tape.
+ or to move the cursor to • Press the beginning or end of the line of text. • When used in conjunction with certain function keys, use or to select options. or to • To insert characters into the text, use position the cursor under the character to the right of the insertion point, then type in the characters required. or to move the cursor to the start of the • Press previous or next line of a multi-line label. + or to move the cursor to the • Press beginning or end of the label.
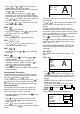
to select DENSITY – the currently selected • Press density is shown in the display. to step through and select from the • Press density options shown in the status bar: BOX The display shows the current selection, with six choices of box available on the status bar. • THICKNESS option only appears when box selection made. Offers 3 levels of box line thickness. JUSTIFY Choices are Left, Centre or Right alignment of text lines relative to each other, as shown in the display. Left justified is default.
• Press to select the label required and return to edit mode (the selected label will appear in the workspace) or: • Press ESC to cancel and return to the MEMORY options; press ESC again to cancel the MEMORY function and return to edit mode. To clear a label from the memory: • Press MEMORY ; STORE will flash. • Press until CLEAR flashes. • Press to select CLEAR, then use or to select the label to be cleared. to clear the selected label from the • Press memory.
label), or CUT and TAB cut for easy removal from the backing tape. LANGUAGE to step through the operating languages • Press available on the Labelmaker. The SET UP display will change accordingly . • Press to change to the selected language and return to edit mode. The Labelmaker will retain the chosen operating language until you change it again. UNITS to choose between UNITS of measure • Press INCHES or MM, as shown in the status bar.