Quick Start Guide LabelManager ® Wireless PnP
Copyright © 2013 Sanford, L.P. All rights reserved. No part of this document or the software may be reproduced or transmitted in any form or by any means or translated into another language without the prior written consent of Sanford, L.P. Trademarks DYMO, DYMO Label, and LabelManager are registered marks in the US and other countries. All other trademarks are the property of their respective holders.
Quick Start Guide This guide describes some of the features of your DYMO® LabelManager® Wireless PnP label maker. Read the following sections for information about using your label maker.
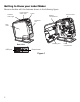
Getting to Know your Label Maker Become familiar with the features shown in the following figure.
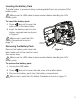
Inserting the Battery Pack The label maker is powered using a rechargeable lithium-ion polymer (LiPo) battery pack. Make sure the USB cable is disconnected before handling the LiPo battery pack. To insert the battery pack 1 Press and pull to open the side cover of the label maker. 2 Insert the battery pack into the battery compartment as shown in Figure 2. Make sure to read the LiPo Safety Precautions found on page 12.
Inserting the Label Cassette Your label maker uses DYMO D1 label cassettes. To insert the label cassette 1 Press and pull to open the side cover of the label maker. 2 Make sure the tape and ribbon are taut across the mouth of the cassette and that the tape passes between the label guides. See Figure 3. If necessary, turn the ribbon rewind spool clockwise to tighten the ribbon.
Connecting the Label Maker to your Computer The label maker connects to your computer through the USB connection located on the back of the label maker. To connect the label maker to your computer 1 Plug one end of the USB cable into the label maker. See Figure 5. 2 Plug the other end into an available, powered USB port on your computer. The label maker must be connected to a powered USB port.
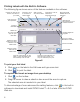
Printing Labels with the Built-In Software The following figure shows some of the features available in the software. Capture an area of the screen and insert on your label. Choose to print a horizontal or vertical label. Change the units of Add a border around the label. measure or language settings. Insert text from the Clipboard. Start advanced DYMO Label v.8 software. Manage the label maker on your wireless network. Create a new label. Select the font, size, and style for your label text.
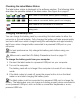
Checking the Label Maker Status The label maker status is displayed in the software window. The following table describes the possible states of the label maker. See Figure 6 on page 6.
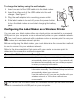
To charge the battery using the wall adapter 1 Insert one end of the USB cable into the label maker. 2 2 Insert the other end of the USB cable into the wall 1 charger. See Figure 7. 3 Plug the wall adapter into a working power outlet. 4 If the label maker is turned off, press the power button to turn the label maker on and start charging the battery pack.
To configure the printer on your wireless network 1 From within the built-in software, click . The Wireless Setup tool starts. Wireless status light 2 Follow the steps in the Wireless Setup tool. The wireless status light located on the top of the label maker turns solid blue when the label maker is successfully connected to a wireless network. See Figure 8. 3 After configuring the label maker as a wireless printer, disconnect the USB cable from your computer.
6 Do one of the following: • If this is the first DYMO label printer installed on the computer, click Yes when prompted by the software to add the label maker as a wireless printer. • If a DYMO label printer is already installed on the computer, choose Add Network Printer from the File menu. 7 Follow the instructions in the Add Network Printer tool. To add the wireless printer to a Mac OS® system 1 Download DYMO Label™ v.8.5 or later from the DYMO Web site at WirelessPnP.dymo.com.
For complete details on using the software, refer to the online Help or the DYMO Label User Guide.
Safety Precautions for Lithium-Ion Polymer Rechargeable Battery Pack Inaccurate handling of a lithium-ion polymer rechargeable battery pack may cause leakage, heat, smoke, an explosion, or fire. This could cause deterioration of performance or failure. This may also damage the protection device installed in the battery pack. This could damage equipment or injure users. Thoroughly follow the instructions below.
1-Year Warranty for Your DYMO Product Your electronic DYMO product is sold with a 1-year warranty from the date of purchase against defects in material and workmanship.
DISTRIBUTED BY: DYMO, ATLANTA, GA 30328 800-426-7827: WWW.DYMO.