
User guide


Configuring the Print Server
5
Installing the Software in Mac OS
To install the software in Mac OS
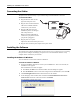
1 Insert the LabelWriter Print Server CD into your CD-ROM drive.
The CD icon appears on your desktop.
2 Double-click the CD icon, and then double-click the Mac folder.
3 Double-click Dymo LabelWriter Print Server Control Center.dmg.
The DYMO LabelWriter Print Server folder opens.
4 Drag the DYMO LabelWriter Print Server Control Center icon into the Applications
folder on your computer.
5 Double-click DYMO LabelWriter Print Server Control Center in the Applications
folder to open the Print Server Control Center.
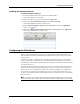
Configuring the Print Server
When you first install the print server, the server is automatically assigned an IP address. Every
time the software is launched, the IP address is displayed next to the server name in the Control
Center window.
By default, the server is configured to automatically get an IP address. If you are using the print
server on a small office or home network, we recommend that you configure the server to use a
static IP address. This will ensure that the computers connected to your network will always be able
to locate the print server.
By default, the static IP address for the print server is 192.168.1.100. You only need to change the
last three numbers. When assigning a static IP address, check your router to be sure that the IP
address you choose is not already in use. Refer to your router documentation for information on
how to do this. A good practice when adding a print server or other shared network device to a
network is to start with a number toward the top of the range, for example 192.168.1.250, and work
down from there.
Note
If you do not set a static IP address, write down the IP address that appears next to the server
name in the Control Center window. You will need this IP address to add the printer to your computer.