DYMO Label Software User Guide Version 7.
Equipment Information Description: LabelWriter Direct Thermal Printer Models: LabelWriter 300, 310, 320, 330, 330 Turbo, 400, 400 Turbo, Twin Turbo, Duo Certification This device has been tested and complies with the requirements of: UL 1950 EN60950: Low Voltage Directive Product Safety FCC Part 15 Class B EN55022: Radiated and Conducted Emissions B EN50082-1: Generic Immunity ESD, RF, and Transient Susceptibility Copyright © 2004-2006 DYMO Corporation. All rights reserved. Version 7.5 Revised 01/06.
Contents Chapter 1 Introduction . . . . . . . . . . . . . . . . . . . . . . . . . . . . . . . . . . . . . . . . . . . . . . . . . . . . . . . . . . . . . . . . . . . . . . . . . . . . . 1 Software . . . . . . . . . . . . . . . . . . . . . . . . . . . . . . . . . . . . . . . . . . . . . . . . . . . . . . . . . . . . . . . . . . . 1 Hardware . . . . . . . . . . . . . . . . . . . . . . . . . . . . . . . . . . . . . . . . . . . . . . . . . . . . . . . . . . . . . . . . . . 1 Labels . . . . . . . . . . . . . .
Chapter 6 Using the LabelWriter Printer with Other Applications . . . . . . . . . . . . . . . . . . . . . . . . . . 23 Add-In for Microsoft Word. . . . . . . . . . . . . . . . . . . . . . . . . . . . . . . . . . . . . . . . . . . . . . . . . . . 23 Additional Windows Application Add-Ins . . . . . . . . . . . . . . . . . . . . . . . . . . . . . . . . . . . . . . . 24 Printing Directly from Other Applications . . . . . . . . . . . . . . . . . . . . . . . . . . . . . . . . . . . . . . .
Chapter 1 Introduction Congratulations on purchasing a DYMO label printer. After just a short time, you will realize how many of your daily tasks will be simplified by using the label printer. Your label printer will help you to address letters; label file folders, CD/DVDs, video cassettes, packages, and name tags. With a little imagination, you will think of hundreds of ways to use the label printer to make your job easier and more efficient.
Introduction In its original packaging, the label shelf life is 18 months. When labels are used for short-term applications (envelopes, packages, and so on), fading is not a problem. When labels are used to label files in a file cabinet, fading is very gradual over many years. Labels applied to the edge of a notebook that is then placed on a shelf in the sun will show signs of fading within a few months.
Chapter 2 Getting Started DYMO Label Software is a general-purpose label printing program that is specifically designed to help you get the most benefit from your LabelWriter printer.
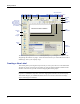
Getting Started New Open Save Print Paste Select Label Roll Label Files List (LabelWriter Twin Turbo) Menu Bar Main Toolbar Formatting Toolbar Buttons for Label and Tape Editor modes (if both a tape and a label printer are installed) Label Workspace Address Book Label Designer Rulers Helpful Links Address Book Panel Status Bar The first time you open DYMO Label Software, you are prompted to register the software. See "Registering the Software" on page 2.
Creating a New Label Choosing a Label File The first step is to choose a label file as the basis for your new label. To choose a label file 1 Select the arrow next to the Label Files drop-down list. A list of the most recently used label files appears. Click here to display the list of recently used labels. If necessary, click More to access all the pre-designed labels.
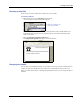
Getting Started To change the graphic 6 1 Double-click the graphic that appears on the label. The Graphic Settings dialog box appears. 2 Select File under Select Graphics Source. The Insert Image button changes to read Select File. 3 Click Select File. The File open dialog box appears listing the contents of the default Clipart folder. 4 Select the Miscellaneous folder and click Open. The contents of the Miscellaneous folder appear. 5 Select Comput1.bmp from the Miscellaneous folder.
Creating a New Label Changing the Return Address Next, you change the return address. To enter a return address 1 Click the text in the label’s upper-right corner. The flashing cursor appears where the default text had been. Flashing cursor 2 Enter the following text: COMPUTEK EUROPE B.V. Max Euwelaan 104 3046 MA ROTTERDAM The Netherlands 3 Click anywhere outside the text object. The new return address appears on the label. Changing the Recipient Address Next, you enter a recipient’s address.
Getting Started 2 Enter the following address. Elsbeth Meijjer Airportplein 7 NL-3045 AP ROTTERDAM The Netherlands Elsbeth Meijjer’s address now appears as the recipient’s address on the label. Changing the Font You may want to modify the font used for the recipient address or return address. To change the font 1 Click the recipient address object. The address text is highlighted. 2 Select Times New Roman from the Font drop-down list. 3 Select from the Formatting toolbar.
Creating a New Label Saving the Label Now that you have created your shipping label, you can save it as a label file. Saved labels will automatically appear in the Label Files drop-down list. To save the label 1 Click on the Main toolbar. The Save File dialog box appears. 2 Enter MyShip as the new name for the file and click Save.
Getting Started 10
Chapter 3 Using the Label Designer The Label Editor allows you to easily design labels for your specific needs using a simple-to-use Label Designer. You can also modify any of the pre-designed label files included with the software. The Designer allows you to change the appearance and content of labels. You can add or modify text (including addresses), barcodes, sequential numbers, date-time stamps, lines, rectangles, and circles or ellipses (Macintosh).
Using the Label Designer Address The address object is similar to the text object, but is designed to print information that changes with each label printed, such as names and addresses. Address objects can also display POSTNET barcodes. You can change the font settings (font, size, style, and so on) for text in address objects and control the text’s position. You can also apply special effects to the text. Address objects are by default variable text objects.
Creating a New Label File You can choose from many standard barcode symbologies, including Code 39, Code 128, Codabar, UPC A/E, EAN 8/13, ITF-14, POSTNET, PLANET, and Interleaved 2 of 5 barcodes.You can choose to include or exclude human-readable text (alphanumeric information) and specify the font settings for the text. You can also select the barcode size and position. See the online Help for more information about the barcode symbologies supported.
Using the Label Designer To open an existing label file 1 Click . The Open File dialog box appears. 2 Select the file you wish to open and click Open. The label opens in the label workspace. Adding an Object When you place a new object on a label, the new object displays certain default settings. For example, new address and text objects display text describing how to modify the objects.
Chapter 4 Working with Lists DYMO Label Software includes a built-in Address Book that allows you to maintain lists of addresses routinely used to generate labels. Additionally, if you have Mac OS version 10.2 or later, you can print labels using the addresses already stored in your Mac OS address book. You can also use the built-in Address Book to store information other than addresses.
Working with Lists Using the Address Book The Address Book is displayed in a panel at the bottom of the DYMO Label main window. You can display or hide the panel using the Address Book button on the Action bar. To display the Address Book Click or select Open from the Address Book menu. The last list file that was opened appears in the Address Book panel of the Main window. The first time you open the Address Book, the Sample List entries appear.
Creating a New List To insert address data into a label with multiple variable objects 1 Select the list entries you wish to print. The Pick Variable Object dialog box appears listing the objects available on the current label. 2 Select the object you want to link to the Address Book and then click OK. If the current label does not contain a variable object, you are prompted to open a label that does contain one of these objects.
Working with Lists Using the Mac OS Address Book (Macintosh) If you are running Mac OS version 10.2 or later, you can print addresses you already have stored in the Mac OS address book. However, unlike the built-in Address Book, you cannot add or change the addresses in the Mac OS address book from within DYMO Label Software. You must make changes using the Mac OS address book application. NOTE Make sure that your Mac OS Address Book My Card record contains your country of residence.
Chapter 5 Printing Labels Using Smart Paste The Smart Paste command allows you to quickly print multiple labels from a list created in a word processing, spreadsheet, or other similar program. The text and address objects can be used to print text from other applications. For the text object, you must select the Function as Variable Text Object setting on the Text Settings dialog box to copy text into this object. The address object is ready to use with Smart Paste by default.
Printing Labels Using Smart Paste NOTE The separator character may be different for countries other than the United States. When using Smart Paste, the list separator character is based on the Windows list separator (or regional setting) being used. For example, the following lines of text (delimited using commas): DYMO Corp., 44 Commerce Road, “Stamford, CT 06902” Esselte, 48 South Service Road,“Melville, NY 11471” will print two three-line labels: one for DYMO and one for Esselte. DYMO Corp.
Printing Multiple Labels Using Smart Paste However, the following three lines of text contain no blank lines. So, Smart Paste will print three one-line labels. Pencils Pens Erasers Printing Multiple Labels Using Smart Paste When you use Smart Paste to print multiple labels, the labels will be formatted using the font, size, and style currently selected for the text or address object receiving the text. You can use Smart Paste to print text from the clipboard or a file.
Printing Labels Using Smart Paste 4 Select Smart Paste, and then From File from the Edit menu. The File Open dialog box appears. 5 Navigate to and open the file you exported as CSV or text. A dialog box appears telling you how many labels will be printed. 6 22 Click Yes. The labels begin printing.
Chapter 6 Using the LabelWriter Printer with Other Applications This chapter describes how to use your LabelWriter printer with other application programs. The chapter covers: • • • • Printing labels from Microsoft Word using the Word Add-In. Printing labels using other Add-Ins for Windows applications. Using Merge Print from Database for database connectivity. Using the LabelWriter printer driver to print labels directly from other programs.
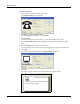
Using the LabelWriter Printer with Other Applications To start using the Word Add-in 1 Open Microsoft Word and type an address. 2 Click on the Word toolbar or select DYMO LabelWriter from the Tools menu. The DYMO LabelWriter dialog box appears with the address from your document automatically placed in the Recipient Address field. If your document contains more than one address and you want to make sure the Word Add-In uses the correct one, select the address in your Word document before you click .
Printing Directly from Other Applications If the LabelWriter tool button appears in your Outlook toolbar automatically, you can begin using the Add-In. If a tool button is not present, you’ll need to enable the Outlook Add-In from the Outlook Add-In Manager. To enable the Outlook Add-In 1 Choose the Options command from the Tools menu in Outlook. The Options dialog box appears. 2 Select the Other tab and then click Advanced Options. The Advanced Options dialog box appears.
Using the LabelWriter Printer with Other Applications 26
Chapter 7 Using the Tape Editor The DYMO Label Software Tape Editor is used to design and print labels on DYMO tape printers, such as the LabelWriter Duo or the LabelManager PCII. Using the Tape Editor, you can print text on your D1 tape labels in a variety of fonts, sizes, and styles. You can add borders, graphics, special characters, and barcodes. You can also add a date and time stamp to your labels. This chapter gives you an overview of creating and printing labels using the Tape Editor.
Using the Tape Editor New Open Save Print Paste Designer Toolbar Formatting Tape Settings Toolbar Toolbar Buttons for Label and Tape Editor modes (if both a tape and a label printer are installed) Address Book Rulers Status Bar Label Workspace Designing a Label In this section, we will show you how to print a label for a file folder tab using the Tape Editor. You can format the label text and then save the label for future use.
Designing a Label 2 Select 19 mm from the Tape Width drop-down menu. The text area of the main window changes in size based on the tape width you select. 3 Select Fixed At and enter 8.5 cm in the Label Length Fixed At text box. Notice that the size of the input area changes on the ruler. 4 Type 2005 Annual Budget Projections in the main window. As the line of text becomes too long for a fixed width label at the current font size, the font size will automatically decrease to fit the text on one line.
Using the Tape Editor Additional Formatting Features To further customize your labels, you can add borders, symbols, graphics, barcodes, and even date and time stamps. You can also choose to print the label vertically. Adding Borders You can choose to add one of several pre-defined borders to your label. When you add a border, it surrounds the text and may cause the text to decrease in size. To add a border 1 Place the cursor anywhere on the label.
Designing a Label The Symbol dialog box appears. 3 Choose the font that contains the special character you wish to insert from the Font drop-down list. The Symbol, Dingbats, and Wingdings fonts contain many unique characters you can add to your labels. 4 Select the symbol you wish to insert and click Insert. 5 Click Close to close the Symbol dialog box. The character you selected appears on the label in a size that matches the text font size.
Using the Tape Editor To add an outline effect to your text with a fill pattern 1 Highlight the text on your label to which you wish to apply an outline effect. 2 Select Font from the Format menu. The Font dialog box appears. 3 Select Outline under Effects. 4 Select a fill pattern from the Fill Pattern drop-down menu. 5 Click OK. The highlighted text now appears on the label with an outline effect. Adding a Date and Time Stamp You can choose to add a date and/or time stamp to the label.
Designing a Label Adding Graphics You can add a graphic to your label from the clipboard or from a file. If the graphic is in a file, the format can be BMP, JPG, PCX, PNG, TIF, WMF, or EMF. When inserted on the label, the graphic will be scaled automatically to the size of the surrounding text while maintaining the aspect ratio. To add a graphic from the clipboard 1 Copy the graphic to the clipboard from another application.
Using the Tape Editor 3 Type the text you wish displayed as a barcode in the Data field. 4 Select the type of barcode from the Symbology drop-down menu. 5 Select whether you want the actual text to appear above the barcode, below the barcode or not at all under Human Readable Text. 6 If you selected above or below, click the Font button to choose the font for the text. 7 Select the size of the barcode under Barcode Size. 8 Click OK to insert the barcode on the label.
Printing from Other Applications To successfully print to the DYMO LabelWriter Duo Tape printer, you need to set the correct page size, orientation, and margins for the tape cassette currently in the printer. Table 1 gives the paper size and margin settings for each of the label sizes supported by the DYMO Label printers. Table 1. LabelWriter Duo Tape Printer Page Size and Margin Settings Paper Height Paper Width Top Margin Bottom Margin Left Margin Right Margin Address Label 1” (24 mm) 3.
Using the Tape Editor 7 Select the label size you have loaded in the printer from the Paper size drop-down list. The width and height values should now match the values for that label size shown in Table 1. 8 Select Landscape under Orientation and click OK. 9 Click to print the label. Print Settings This section discusses several printer settings that may optimize your printing.
Print Settings To change the chain print setting 1 Select Options from the Edit menu. The Options dialog box appears. 2 Select one of the following: • Cut each label as printed — Automatically cuts each label after printing. • Print cut marks between labels — Prints labels in a continuous stream with dotted lines between each label for cutting. 3 Click OK to apply the new setting. Label Alignment As a label is printed, blank space is added at the beginning of the label and at the end of the label.
Using the Tape Editor The Options dialog box appears. 2 Select an alignment from the Label Alignment drop-down list. 3 Click OK to apply the new setting. Continuous Mode Printing Continuous mode printing prints multiple labels with no space between the labels. This is especially helpful for conserving label tape. Continuous mode printing is turned off by default. NOTE Continuous mode printing only applies to printing from other applications.
Print Settings The Advanced Options dialog box appears. NOTE You can also get to this dialog box by selecting Printer Setup from the File menu. 3 Select Enabled from the Continuous Paper drop-down list and click OK. The labels will now print continuously with no space between labels.
Using the Tape Editor 40
Chapter 8 Maintenance and Troubleshooting This chapter describes how to take care of your LabelWriter printer and offers suggestions for identifying problems that can occur when you using the printer. If you can’t solve a problem, this chapter also describes how to contact DYMO for technical support. Caring for the LabelWriter Printer The LabelWriter printer is designed to give you long and trouble-free service, while requiring very little maintenance.
Maintenance and Troubleshooting Performing a Printer Self-Test If you experience problems with broken characters or other print quality issues, you should perform a printer self-test. The self-test verifies that all elements of the print head are in working condition. To perform a self test for the LabelWriter 300 1 Turn off the printer using the switch on the back. 2 Press and hold down the form-feed button. 3 Turn on the printer and then release the form-feed button.
Obtaining Technical Support Contacting DYMO DYMO maintains an Internet Web site, www.dymo.com, that offers support for each printer. The following table provides a list of telephone numbers to reach DYMO Sales and Support departments. You can also reach DYMO at www.dymo.com.
Maintenance and Troubleshooting 44
Appendix A Technical Specifications This section gives the printer specifications for all the printers. You will also find information on DYMO’s Software Development Kit which will allow you to use the LabelWriter printer and software with your application. LabelWriter Printer Specifications 300 330 330 Turbo Print Method Direct Thermal Print Resolution 300 dots per inch (11.
Technical Specifications Tape Printer Technical Specifications LabelWriter Duo (Tape Printer) LabelManager PC II LabelPoint 350 Print Method Thermal Transfer Print Resolution 180 dpi (7.09 dots per mm) Print Speed 0.4" (10 mm) per second Maximum Print Height 0.71" (18.1 mm) 0.71" (18.1 mm) 0.71" (18.1 mm) 0.53" (13.54 mm) Maximum Media Width 0.95" (24 mm) 0.95" (24 mm) 0.95" (24 mm) 0.75" (19 mm) Interface USB 2.0; Full Speed Dimensions (WHD) 5.5" (18.3 cm) x 7.8" (19.8 cm) x 7.
Developer and SDK Information Developer and SDK Information DYMO provides various types of information designed to help developers create products that work with the LabelWriter printers and DYMO Label Software. Below are some notes for those interested in developing products that work with LabelWriter printers. • Keep in mind that LabelWriter printers use standard printer drivers. Therefore, printing to a LabelWriter is no different than printing on a laser printer, except that the pages are smaller.
Technical Specifications 48
Index A E adding barcodes 33 borders 30 date and time 32 graphics 33 special characters 30 special fonts 31 address book About 15 creating new 17 opening lists 17 rotating names 17 using Mac OS address book 18 address objects 12 placing new 14 alignment, label 37 EAN 8/13 13 ellipse objects 12 EMF 33 B barcode objects 12 placing new 14 barcodes, adding 33 BMP 33 F fonts, special effects 31 form-feed button 42 G graphic objects 12 placing new 14 graphics, adding 33 H help 2, 42 horizontal line objects
Merge Print from Database 25 Microsoft Access 25 Outlook 24 Outlook Express 24 Word 23, 25 multi-line text 20 printing chain printing 36 continuous mode 38 from a list 34 labels 8 multiple labels 21 vertically 34 O R objects about 11 address 12 barcode 12 counter 13 curved text 13 date-time 13 ellipse 12 graphic 12 horizontal line 12 placing new 14 rectangle 12 text 11 vertical line 12 opening address book lists 17 label files 5, 13 outline font 32 Outlook Add-In 23, 24 rectangle objects 12 placing new