Heavy Electric Utility Heater Model: EG5000P “USER’S MANUAL AND OPERATING INSTRUCTIONS” 4003667 CONFORMS TO/CUMPLE CON/ CONFORME TO UL STD.2021 CERTIFIED TO/CERTIFICADO A/ CERTIFIÉ TO CSA STD.C22.2NO.46 MODEL: EG5000P Before the first use of this heater, please read this USER’S MANUAL very carefully. This USER’S MANUAL has been designed to instruct you as to the proper manner in which to assemble, maintain, store, and most importantly, how to operate the heater in a safe and efficient manner.
IMPORTANT INSTRUCTIONS When using electrical appliances, basic precautions should always be followed to reduce the risk of fire, electric shock, and injury to persons, including the following: 1. Read all instructions before installing or using this heater. 2. This heater is hot when in use. To avoid burns, do not let bare skin touch hot sur faces. Keep combustible materials, such as furniture, pillows, bedding, papers, clothes, and curtains at least 3 feet (0.
CONTENTS OF USER’S MANUAL ITEM PRECAUTIONS - SAFETY GUIDE.......................................................... 1. DESCRIPTION..................................................................................... 2. SPECIFICATIONS............................................................................... 3. GENERAL SAFETY INFORMATION................................................ 4. LOCATING HEATER.......................................................................... 5. INSTALLATION............
3. GENERAL SAFETY INFORMATION 6. 7. 8. 9. All electrical power must be disconnected at the main service box, which must be locked before connecting, inspecting, cleaning or servicing the heater. This is an important precaution to prevent serious electric shock. This is heater is not suitable for use in hazardous locations containing explosive liquids or vapours. This heater has hot or arcing or sparking pads inside.
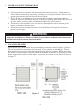
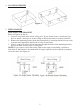
4. LOCATING HEATER Figure 3 5. INSTALLATION MOUNTING THE BRACKET Refer to Figures 4a and 4b. 1. Locate a wood stud in the wood ceiling joist. If you cannot locate a wood stud, you have to install a wood piece on the ceiling as this heater must be securely fastened. 2. Remove the mounting bracket from the heating unit by loosening bracket screws with a wrench and slipping the handle off over the screw heads. 3.
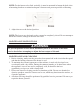
HANGING THE HEATER 1. Attach the heating unit to the mounting bracket. 2. Lift the heater up and into the mounting bracket. 3. Align the bracket screws with the keyhole slots in the mounting bracket. 4. If the heater is to be tilted it must be positioned in the keyhole slots - see figure 5. 5. Tighten the bracket screws with a wrench so the unit is securely suspended at horizontal or vertical level.
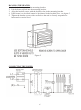
WARNING This appliance must be grounded! WARNING The appliance must connect to a current protection circuit or device at 50Amp or less before being connected to power supply! 1. Remove the screw from the front of the unit to connect the power to the heater. 2. Attach the cable connectors to the unit (See Figure 6) and slide the 10- gauge wire through the cable connector. NOTE: All wiring must be accordance to national and local electrical codes in the United States.
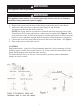
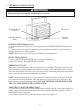
6. OPERATING INSTRUCTIONS WARNING The heater must be properly installed before it is used. Power Indicator (Yellow) Thermostat Caution Indicator (Red) Selection Switch SETTING THE THERMOSTAT 1) Rotate thermostat knob clockwise to high position, POWER INDICATOR will turn yellow. 2) After room reaches desired comfort level rotate thermostat knob counter clockwise until the thermostat to OFF position. NOTE: Heater will cycle on and off to maintain room temperature.
NOTE: For the heater to be tilted vertically, it must be mounted in bottom keyhole slots of mounting brackets to maintain adequate clearance and prevent possible overheating. 3. Adjust louvers to the desired position. NOTE: The louvers are designed so they cannot be completely closed. Do not attempt to defeat this feature; damage to the unit can result.
Warranty LIMITED WARRANTY: This limited warranty is extended to the original retail purchaser of this Forced Air/Convection/Radiant Heater and warrants against any defect in materials and workmanship for a period of one (1) year from the date of retail sale.GHP Group, Inc., at it’s option, will either provide replacement parts or replace or repair the unit, when properly returned to the retailer where purchased or one of our service centers as directed by GHP Group,Inc.
WARRANTY REGISTRATION IMPORTANT: We urge you to fill out your warranty registration card within fourteen (14) days of date of purchase. You can also register your warranty on the internet at www.ghpgroupinc.com. Complete the entire serial number. Retain this portion of the card for your records. GHP Group, Inc. 6440 W Howard St Niles, IL 60714-3302 Tel: (877) 447-4768 www.ghpgroupinc.com SAVE THIS CARD! Place Postage Stamp Here GHP Group, Inc.
Calefactor eléctrico resistente de uso generalModelo: EG5000P “MANUAL DEL USUARIO E INSTRUCCIONES DE FUNCIONAMIENTO” 4003667 CONFORMS TO/CUMPLE CON/ CONFORME TO UL STD.2021 CERTIFIED TO/CERTIFICADO A/ CERTIFIÉ TO CSA STD.C22.2NO.46 MODELO: EG5000P Antes de utilizar por primera vez este calefactor, lea muy atentamente este MANUAL DEL USUARIO.
INSTRUCCIONES IMPORTANTES Al usar electrodomésticos, siempre se deben respetar las precauciones básicas para reducir el riesgo de incendio, choques eléctricos y lesiones personales, incluidas las siguientes: 1. Lea todas las instrucciones antes de instalar o usar este calefactor. 2. Este calefactor se calienta cuando está en uso. Para evitar quemaduras, no toque las superficies calientes con la piel descubierta.
CONTENIDO DEL MANUAL DEL USUARIO ARTÍCULO PRECAUCIONES - GUÍA DE SEGURIDAD ........................................... 1. DESCRIPCIÓN.................................................................................... 2. ESPECIFICACIONES.......................................................................... 3. INFORMACIÓN GENERAL SOBRE SEGURIDAD......................... 4. UBICACIÓN DEL CALEFACTOR . .................................................. 5. INSTALACIÓN........................................
3. INFORMACIÓN GENERAL SOBRE SEGURIDAD 6. Se debe desconectar la alimentación eléctrica y bloquear la caja de servicio eléctrico antes de conectar, inspeccionar el calefactor, limpiarlo o realizarle mantenimiento. Esta es una precaución importante para evitar choques eléctricos graves. 7. Este calefactor no es apropiado para utilizarlo en ubicaciones peligrosas que contengan líquidos o vapores explosivos.
4. UBICACIÓN DEL CALEFACTOR Figura 3 5. INSTALACIÓN MONTAR EL SOPORTE Consulte las figuras 4a y 4b. 1. Localice un montante de madera en la viga del techo de madera. Si no puede localizarlo, debe instalar una pieza de madera en el techo porque el calefactor se debe sujetar de forma segura. 2. Retire el soporte de montaje de la unidad calefactora; para esto, afloje los tornillos del soporte con una llave y deslice la manija por afuera y por encima de las cabezas de los tornillos. 3.
COLGAR EL CALEFACTOR 1. Fije la unidad calefactora al soporte de montaje. 2. Eleve el calefactor y colóquelo en el soporte de montaje. 3. Alinee los tornillos del soporte con las ranuras tipo bocallave del soporte de montaje. 4. Si se desea que el calefactor esté en posición inclinada, se deben utilizar las ranuras tipo bocallave para posicionarlo correctamente; consulte la figura 5. 5.
ADVERTENCIA Este electrodoméstico debe estar conectado a tierra. ADVERTENCIA Antes de conectar este electrodoméstico al suministro de alimentación, la unidad debe estar conectada a un circuito o un dispositivo de protección de corriente de 50 A o menos. 1. Quite el tornillo del frente de la unidad para conectar la alimentación al calefactor. 2. Fije los conectores de cables a la unidad (consulte la figura 6) y deslice el cable de calibre 10 a través del conector de cables.
6. OPERATING INSTRUCTIONS ADVERTENCIA The heater must be properly installed before it is used. INDICADOR DE ENCENDIDO (amarillo) TERMOSTATO INDICADOR DE PRECAUCIÓN (rojo) SELECTOR AJUSTAR EL TERMOSTATO 1) Gire la perilla del termostato en el sentido de las agujas del reloj a la posición máxima, el INDICADOR DE ENCENDIDO se iluminará en color amarillo.
NOTA: Para poder inclinarlo en sentido vertical, el calefactor debe estar montado en las ranuras tipo bocallave inferiores de los soportes de montaje con el fin de mantener un espacio libre adecuado y prevenir posibles recalentamientos. Figura 8 Girar 3. Ajuste las rejillas a la posición deseada. NOTA: Las rejillas están diseñadas para que no se puedan cerrar por completo. No intente hacerlo porque puede dañar la unidad.
GARANTÍA GARANTÍA LIMITADA: Esta garantía limitada se extiende al comprador minorista original de este calefactor de aire forzado/convección/radiante, que está garantizado contra defectos de materiales y mano de obra por un período de un (1) año a partir de la fecha de la venta minorista (garantía de por vida solo para el quemador con boquilla de bronce). GHP Group, Inc.
REGISTRO DE LA GARANTÍA IMPORTANTE: Lo instamos a que complete la tarjeta de registro de la garantía dentro de los catorce (14) días de la fecha de compra. También puede registrar la garantía por Internet en www.ghpgroupinc.com. Complete el número de serie. Conserve esta parte de la tarjeta para su constancia. GHP Group, Inc. GHP Group, Inc. 6440 W Howard 8280 Austin Ave. St Niles, Grove, IL 60714-3302 Morton IL 60053-3207 Tel: 1 (877) 447-4768 Tel: (877) 447-4768 www.ghpgroupinc.com www.ghpgroupinc.
GUIDE DE L’UTILISATEUR Chaufferette utilitaire électrique Modèle EG5000DG 4003667 CONFORMS TO/CUMPLE CON/ CONFORME TO UL STD.2021 CERTIFIED TO/CERTIFICADO A/ CERTIFIÉ TO CSA STD.C22.2NO.46 MODEL: EG5000P Avant d’utiliser cet appareil de chauffage pour la première fois, veuillez lire très attentivement ce GUIDE D’UTILISATION.
INSTRUCTIONS IMPORTANTES Lors de l’utilisation d’un appareil électrique, les mesures de sécurité de base devraient toujours être respectées afin de réduire les risques d’incendie, de décharge électrique et de blessure. Les mesures suivantes en font partie: 1. Lisez toutes les instructions avant d’installer ou d’utiliser le radiateur. 2. Le radiateur est chaud lorsqu’il est en fonction. Pour éviter les brûlures, ne laissez pas la peau nue entrer en contact avec les surfaces chaudes.
ARTICLE TABLE DES MATIÈRES PRÉCAUTIONS - GUIDE DE SÉCURITÉ................................................ 1. DESCRIPTION..................................................................................... 2. CARACTÉRISTIQUES TECHNIQUES............................................. 3. INFORMATIONS GÉNÉRALES RELATIVES À LA SÉCURITÉ.... 4. EMPLACEMENT DU RADIATEUR.................................................. 5. INSTALLATION................................................................................
INFORMATIONS GÉNÉRALES RELATIVES À LA SÉCURITÉ 6. Toute l’alimentation électrique doit être coupée et le panneau électrique principal doit être verrouillé avant d’exécuter une inspection, un nettoyage ou un entretien du radiateur. Cette précaution permet d’éviter des décharges électriques graves. 7. Ce radiateur n’est pas adapté aux endroits dangereux tels que définis par la National Fire Protection Association (NFPA) aux États-Unis.
EMPLACEMENT DU RADIATEUR INSTALLATION Figure 3 INSTALLATION DU SUPPORT Consultez les figures 4a et 4b. 1. Repérez une poutre en bois dans la solive de plafond. Si vous ne trouvez aucune poutre en bois, vous devez installer un morceau de bois au plafond afin de fixer solidement le radiateur. 2. Pour retirer le support de fixation du radiateur, desserrez les vis à l’aide d’une clé et glissez la poignée sur les têtes de vis. 3.
INSTALLATION DU RADIATEUR 1) Fixez le radiateur au support de fixation. 2) Soulevez le radiateur pour l’aligner dans le support de fixation. 3) Alignez les vis du support avec les encoches en trou de serrure du support de fixation. 4) Si le radiateur doit être pivoté, l’angle utilisé doit correspondre aux encoches en trou de serrure, comme illustré à la figure 5. 5) Serrez les vis du support avec une clé pour que l’appareil soit solidement suspendu à l’horizontale ou à la verticale.
AVERTISSEMENT Cet appareil doit être relié à la terre! AVERTISSEMENT The appliance must connect to a current protection circuit or device at 50Amp or less before being connected to power supply! 1. Retirez la vis située à l’avant de l’appareil afin de raccorder la chaufferette à l’alimentation électrique. 2. Fixez les connecteurs à l’unité. Voir Figure 6. Faites glisser le fil de calibre 10 dans le connecteur.
DIRECTIVES DE FONCTIONNEMENT AVERTISSEMENT la chaufferette doit être installée correctement avant d’être mise en marche. Voyant De Mise En Marche (Jaune) Thermostat Voyant D’avertissement (Rouge) Interrupteur RÉGLAGE DU THERMOSTAT 1) Tournez le bouton du thermostat dans le sens horaire jusqu’à sa position maximale; le voyant de mise en marche s’allumera.
DIRECTIVES DE FONCTIONNEMENT NOTE: Pour incliner l’appareil, vous devez vérifier que celui-ci est bien installé dans les trous en forme de poire du support. Cette installation assure le dégagement minimal requis du plafond afin d’éviter les risques de surchauffe. 3. Ajustez les volets de l’appareil pour orienter le débit d’air chaud. NOTE: Les volets sont conçus de façon à ce qu’ils ne puissent pas se fermer complètement. Ne modifiez pas cette fonction; des dommages à la chaufferette pourraient survenir.
GARANTIE GARANTIE LIMITÉE : Cette garantie limitée n’est offerte qu’à l’acheteur initial de cet appareil à air pulsé/appareil à convection/radiateur et assure qu’il sera exempt de défauts de matériaux et de fabrication pour une période d’un (1) an à partir de la date d’achat (seule la buse en cuivre du brûleur bénéficie d’une garantie à vie). À sa discrétion, GHP Group, Inc.
ENREGISTREMENT DE LA GARANTIE IMPORTANT : Nous vous invitons à remplir votre carte d’enregistrement de garantie dans les quatorze (14) jours suivant la date de votre achat. Vous pouvez également enregistrer votre garantie par Internet au www.ghpgroupinc.com. Veuillez entrer le numéro de série complet. Veuillez conserver cette partie de la carte pour vos dossiers personnels. GHP Group, Inc. 6440 W Howard St Niles, IL 60714-3302 GHP Group, Inc. 6440 W. Howard St. Tél.