
Full Product Manual

11
ASSEMBLY INSTRUCTIONS
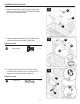
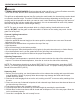
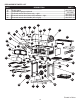
16. Attach temperature gauge (Z) and temperature
gauge nut bezel (A1) to lid and rebox assembly
(B) using pre-assembled nut .
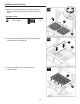
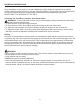
17. Attach lid handle assembly (C) to lid and rebox
assembly (B) using two M6x12 bolts (AA).
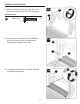
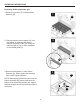
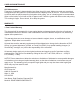
18. Thread crank handle (F) into lid and rebox
assembly (B). Secure with one cotter pin (FF).
Repeat for remaining crank handle (F).
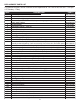
Hardware Used
Hardware Used
16
B
A1
Z
M6x12 Bolt
x 2
AA
M6x12 Bolt
Qty. 27
M6x20 Bolt
Qty. 14
M5 Shoulder
Bolt
Qty. 8
M8 Washer
Qty. 2
M8 Nut
Qty. 2
Wheel Axle
Sleeve
Qty. 2
Hinge Bolt
Qty. 2
M6 Lock Nut
Qty. 3
M5 Lock Nut
Qty. 8
M6x30 Bolt
Qty. 2
AA
BB CC DD EE
GG HH II
JJ
LL
Wrench
Qty. 1
Cotter Pin
Qty. 7
FF
KK
17
B
AA
C
Cotter Pin
x 2
FF
M6x12 Bolt
Qty. 27
M6x20 Bolt
Qty. 14
M5 Shoulder
Bolt
Qty. 8
M8 Washer
Qty. 2
M8 Nut
Qty. 2
Wheel Axle
Sleeve
Qty. 2
Hinge Bolt
Qty. 2
M6 Lock Nut
Qty. 3
M5 Lock Nut
Qty. 8
M6x30 Bolt
Qty. 2
AA
BB CC DD EE
GG HH II
JJ
LL
Wrench
Qty. 1
Cotter Pin
Qty. 7
FF
KK
18
B
F