
Use and Care Manual


11
CC
BB
DD
A
C
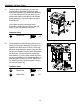
Hardware Used
CC
BB
M6
M6
Plain Washer
x2
x2
DD
M6
Wing Nut
x2
Spring
Washer
B
C
AA
BB
DD
CC
M6
Spring
Qty. 2
M6
Qty. 2
M6x16
Bolt
Qty. 18
Washer
EE
M6x35
Bolt
Qty. 4
Washer
FF
M6
Wing Nut
Qty. 2
GG
M3x10
Bolt
Qty. 4
HH
M6x12
Flat Bolt
Qty. 8
Shoulder
Bolt
Qty.4
II
Qty. 1
Wrench
AA
BB
DD
CC
M6
Spring
Qty. 2
M6
Qty. 2
M6x16
Bolt
Qty. 18
Washer
EE
M6x35
Bolt
Qty. 4
Washer
FF
M6
Wing Nut
Qty. 2
GG
M3x10
Bolt
Qty. 4
HH
M6x12
Flat Bolt
Qty. 8
Shoulder
Bolt
Qty.4
II
Qty. 1
Wrench
AA
BB
DD
CC
M6
Spring
Qty. 2
M6
Qty. 2
M6x16
Bolt
Qty. 18
Washer
EE
M6x35
Bolt
Qty. 4
Washer
FF
M6
Wing Nut
Qty. 2
GG
M3x10
Bolt
Qty. 4
HH
M6x12
Flat Bolt
Qty. 8
Shoulder
Bolt
Qty.4
II
Qty. 1
Wrench
CC
BB
DD
A
C
Hardware Used
CC
BB
M6
M6
Plain Washer
x2
x2
DD
M6
Wing Nut
x2
Spring
Washer
B
C
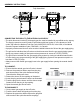
ASSEMBLY INSTRUCTIONS
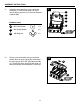
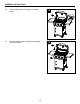
9. Attach the hood handle (A) to the grill body
assembly (C) with two M6 wing nuts (DD),
two M6 spring washers (CC) and two M6 plain
washers (BB).
9
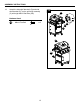
10. Remove pre-assembled wing nut and plain
washer from the temp gauge (B), then attach
the temp gauge (B) to the grill body assembly
(C). Secure the temp gauge (B) with wing nut
and plain washer removed earlier in this step.
10
Hardware Used
BB M6 Plain Washer x 2
CC M6 Spring Washer x 2
DD M6 Wing Nut x 2
B
A
CC
DD
BB
C
C