Heavy Electric Utility Heater Model: EG10000DH “USER’S MANUAL AND OPERATING INSTRUCTIONS” MODEL: EG10000DH Before the first use of this heater, please read this USER’S MANUAL very carefully. This USER’S MANUAL has been designed to instruct you as to the proper manner in which to assemble, maintain, store, and most importantly, how to operate the heater in a safe and efficient manner. Please keep this manual for future reference. CONSUMER : Retain this manual for future reference.
IMPORTANT INSTRUCTIONS When using electrical appliances, basic precautions should always be followed to reduce the risk of fire, electric shock, and injury to persons, including the following: 1. Read all instructions before installing or using this heater. 2. This heater is hot when in use. To avoid burns, do not let bare skin touch hot surfaces. Keep combustible materials, such as furniture, pillows, bedding, papers, clothes, and curtains at least 3 feet (0.
CONTENTS OF USER’S MANUAL ITEM PAGE # PRECAUTIONS - SAFETY GUIDE.................................................. 1. DESCRIPTION........................................................................... 2. SPECIFICATIONS...................................................................... 3. GENERAL SAFETY INFORMATION ........................................ 4. LOCATING HEATER................................................................. 5. PRE-INSTALLATION ..........................................
GENERAL SAFETY INFORMATION 6. All electrical power must be disconnected at the main service box, which must be locked before connecting, inspecting, cleaning or servicing the heater. This is an important precaution to prevent serious electric shock. 7. This heater is not suitable for use in hazardous locations containing explosive liquids or vapours. This heater has hot or arcing or sparking pads inside. Do not use it in areas where gasoline, paint or flammable liquids are used or stored. 8.
PRE-INSTALLATION 5
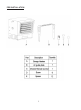
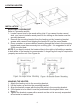
LOCATING HEATER Figure 3 INSTALLATION MOUNTING THE BRACKET Refer to Figures 4a and 4b. 1. Locate a wood stud in the wood ceiling joist. If you cannot locate a wood stud, you have to install a wood piece on the ceiling as this heater must be securely fastened. 2. Remove the mounting bracket from the heating unit by loosening bracket screws with a wrench and slipping the handle off over the screw heads. 3.
ADJUSTING AIR FLOW DIRECTION Figure 5 1. To turn the unit when it has been installed with a single lag bolt (as shown in Fgure 4a), simply turn the entire heater as needed. The unit cannot be turned horizontally if it has been installed with 2 lag bolts. 2. To tilt the unit vertically, loosen the bracket screws (see Figure 5). NOTE: For the heater to be tilted vertically, it must be mounted in bottom keyhole slots of mounting brackets to maintain adequate clearance and prevent possible overheating. 3.
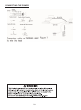
CONNECTING THE POWER Heater’s thermostat External thermostat Selection Switch (Heater’s thermostat, External thermostat) 2 4 3 External thermostat If you will use an external temperature control (external thermostat) to control the heater, please follow below diagram: 1. Make sure that the heater's temperature control knob (thermostat knob) is turned fully clockwise. 2. Connect the wire according to below wiring diagram.
CONNECTING THE POWER 3. The external temperature control (external thermostat) should be in accordance with the requirement of UL or CSA standard. 4. The lead wire of external temperature control (external thermostat) can not less than 14AWG. TO PROTECT THE HEATING ELEMENT When starting the heater, turning the temperature control clockwise slowly to terminal, the unit starts the fan first then starts the heating element.
CONNECTING THE POWER 10
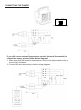
OPERATING INSTRUCTIONS WARNING The heater must be properly installed before it is used. Check that the garage heaters outlet grill is not covered or obstructed in anyway, and make sure the power to the unit is switched on. The fireplace control functions can be accessed in two (2) ways: • Using the touchpad control panel, located in the upper right-hand corner of the fireplace behind the sliding control panel cover. • Using the multifunction remote control unit. 1.
OPERATING INSTRUCTIONS 4. DOWN Control Button: This button is used to decrease temperature or timer settiing. It adjusts the temperature range between 10°C--35°C(50°F--95°F) in 2°F (/1°C) increments. 5. UP Control Button: This button is increasing temperature or timer setting. It adjusts the temperature range between 10°C--35°C (50°F--95°F) in 2°F (/1°C) increments. 6. Timer Button: This button controls the Timer ON/OFF and 8 settings from 1hour to 8 hours.
MAINTENANCE MAINTENANCE AND CLEANING 1. Before cleaning, make sure the power has been turned off at the circuit breaker panel and that the heating element of the heater is cool. 2. To maintain the external appearance of the heater, the unit occasionally needs to be wiped with a dry duster. During the summer months, or at other times when the appliance is not in use and is completely cold, it should be the wiped over with a damp cloth. 3. Do not use abrasive clearing powders or furniture polish.
Warranty LIMITED WARRANTY: This limited warranty is extended to the original retail purchaser of this Forced Air/Convection/Radiant Heater and warrants against any defect in materials and workmanship for a period of one (1) year from the date of retail sale.GHP Group, Inc., at it’s option, will either provide replacement parts or replace or repair the unit, when properly returned to the retailer where purchased or one of our service centers as directed by GHP Group,Inc.
WARRANTY REGISTRATION IMPORTANT: We urge you to fill out your warranty registration card within fourteen (14) days of date of purchase. You can also register your warranty on the internet at www.ghpgroupinc.com. Complete the entire serial number. Retain this portion of the card for your records. GHP Group, Inc. 6440 W Howard St Niles, IL 60714-3302 Tel: (877) 447-4768 www.ghpgroupinc.com SAVE THIS CARD! Place Postage Stamp Here GHP Group, Inc.
14
Calefactor eléctrico resistente de uso general Modelo: EG10000DH MANUAL DE INSTRUCCIONES MODELO: EG10000DH Antes de utilizar por primera vez este calentador, lea este MANUAL DEL USUARIO atentamente. Este MANUAL DEL USUARIO ha sido diseñado para instruirle la forma adecuada de ensamblar el calentador, brindarle mantenimiento, guardarlo y lo más importante: cómo hacerlo funcionar de manera segura y eficaz. Conserve este manual para referencia futura. CONSUMIDOR: Conserve este manual para referencia futura.
INSTRUCCIONES IMPORTANTES Al usar electrodomésticos, siempre se deben respetar las precauciones básicas para reducir el riesgo de incendio, choques eléctricos y lesiones personales, incluidas las siguientes: 1. Lea todas las instrucciones antes de instalar o usar este calefactor. 2. Este calefactor se calienta cuando está en uso. Para evitar quemaduras, no toque las superficies calientes con la piel descubierta.
CONTENIDO ARTÍCULO PÁGINA PRECAUCIONES - GUÍA DE SEGURIDAD..................................... 1. DESCRIPCIÓN.......................................................................... 2. ESPECIFICACIONES................................................................ 3. INFORMACIÓN GENERAL SOBRE SEGURIDAD.................... 4. UBICACIÓN DEL CALEFACTOR.............................................. 5. INSTALACIÓN............................................................................ 6.
INFORMACIÓN GENERAL SOBRE SEGURIDAD 6. 7. 8. 9. Se debe desconectar la alimentación eléctrica y bloquear la caja de servicio eléctrico antes de inspeccionar el calefactor, limpiarlo o realizarle mantenimiento. Esta es una precaución para evitar choques eléctricos graves. Este calefactor no es apropiado para utilizarlo en ubicaciones peligrosas tal como las define la Asociación Nacional de Protección contra Incendios (NFPA, por su sigla en inglés) de Estados Unidos.
PRE-INSTALACIÓN
UBICACIÓN DEL CALEFACTOR INSTALACIÓN Figura 3 MONTAR EL SOPORTE Consulte las figuras 4a y 4b. 1. Localice un montante de madera en la viga del techo de madera. Si no puede localizarlo, debe instalar una pieza de madera en el techo porque el calefactor se debe sujetar de forma segura. 2. Retire el soporte de montaje de la unidad calefactora; para esto, afloje los tornillos del soporte con una llave y deslice la manija por afuera y por encima de las cabezas de los tornillos. 3.
AJUSTAR LA DIRECCIÓN DEL FLUJO DE AIRE 1. Para girar la unidad, cuando esta se ha instalado con un solo tirafondo (como se muestra en la figura 4a), simplemente gire todo el calefactor según sea necesario. La unidad no se puede girar en sentido horizontal si se instaló con 2 tirafondos. 2. Para inclinar la unidad verticalmente, afloje los tornillos del soporte (consulte la figura 5). Figura 5 NOTA: Las rejillas están diseñadas para que no se puedan cerrar por completo.
CONEXIÓN DE LA ALIMENTACIÓN Termostato del Termostato calefactor externo Interruptor de selección (termostato del calefactor, termostato externo) 4 3 externo Si utiliza Termostato un control de temperatura externo (termostato externo) para detener o activar el calefactor, siga los puntos de atención que se detallan a continuación: 1. Asegúrese de que la perilla de control de temperatura del calefactor (perilla del termostato) esté totalmente girada en el sentido de las agujas del reloj. 2.
CONEXIÓN DE LA ALIMENTACIÓN 3. El control de temperatura externo (termostato externo) debe cumplir con los requisitos de UL o las normas de CSA. 4. El cable principal del control de temperatura externo (termostato externo) no puede ser de un calibre inferior a 14 AWG. PARA PROTEGER EL ELEMENTO CALEFACTOR Cuando encienda el calefactor, gire el control de temperatura en el sentido de las agujas del reloj lentamente, hasta el final; la unidad primero arrancará el ventilador y luego el elemento calefactor.
CONEXIÓN DE LA ALIMENTACIÓN NEGRO BLANCO Figura 7 23 VERDE (o de cobre sin revestimiento)
INSTRUCCIONES DE USO ADVERTENCIA Antes de su uso, el calefactor se debe instalar correctamente. Revise que la parrilla de salida del calefactor de garaje no esté tapada ni obstruida de ninguna manera, y asegúrese de que la unidad esté encendida. El calefactor de garaje se puede acceder de dos maneras: usando el panel de control táctil o usando la unidad de control remoto multifunción. Pulse el botón apropiado para poner en marcha el calefactor de garaje: 1.
6. Botón de temporizador: Este botón controla el ENCENDIDO/APAGADO y la configuración de 8 tiempos desde 1 hora hasta 8 horas. Cuando el temporizador se encienda por primera vez, lo hará con la configuración de tiempo más baja (1 hora). Cada vez que se pulse el botón del temporizador, el tiempo aumentará 1 hora hasta la configuración más alta (8 horas). Una vez que haya transcurrido el tiempo, todas las funciones del calefactor de garaje se apagarán automáticamente. 7.
INSTRUCCIONES DE MANTENIMIENTO MANTENIMIENTO Y LIMPIEZA 1. Antes de realizar una limpieza, asegúrese de que la alimentación haya sido desconectada en el panel de interruptores de circuito y de que el elemento calefactor esté frío. 2. En cuanto al mantenimiento del aspecto externo del radiador, solo se necesita repasar, de vez en cuando, la superficie utilizando un paño seco.
GARANTÍA GARANTÍA LIMITADA: Esta garantía limitada se extiende al comprador minorista original de este calefactor de aire forzado/convección/radiante, que está garantizado contra defectos de materiales y mano de obra por un período de un (1) año a partir de la fecha de la venta minorista (garantía de por vida solo para el quemador con boquilla de bronce). GHP Group, Inc.
REGISTRO DE LA GARANTÍA IMPORTANTE: Lo instamos a que complete la tarjeta de registro de la garantía dentro de los catorce (14) días de la fecha de compra. También puede registrar la garantía por Internet en www.ghpgroupinc.com. Complete el número de serie. Conserve esta parte de la tarjeta para su constancia. GHP Group, Inc. GHP Group, Inc. 6440 W Howard 8280 Austin Ave. St Niles, Grove, IL 60714-3302 Morton IL 60053-3207 Tel: 1 (877) 447-4768 Tel: (877) 447-4768 www.ghpgroupinc.com www.ghpgroupinc.
Radiateur électrique robuste à usage général Modèle: EG10000DH GUIDE D’INSTRUCTION MODÈLE: EG10000DH Avant d’utiliser cet appareil de chauffage pour la première fois, veuillez lire très attentivement ce GUIDE D’UTILISATION. Ce GUIDE D’UTILISATION vise à vous fournir la méthode appropriée pour as-sembler, entretenir, entreposer et, plus importante encore, pour utiliser l’appareil de chauffage de façon sûre et efficace. Veuillez le conserver pour pouvoir vous y reporter ultérieurement.
INSTRUCTIONS IMPORTANTES Lors de l’utilisation d’un appareil électrique, les mesures de sécurité de base devraient toujours être respectées afin de réduire les risques d’incendie, de décharge électrique et de blessure. Les mesures suivantes en font partie: 1. Lisez toutes les instructions avant d’installer ou d’utiliser le radiateur. 2. Le radiateur est chaud lorsqu’il est en fonction. Pour éviter les brûlures, ne laissez pas la peau nue entrer en contact avec les surfaces chaudes.
TABLE DES MATIÈRES ARTICLE PAGE # PRÉCAUTIONS - GUIDE DE SÉCURITÉ........................................ 1. DESCRIPTION. .......................................................................... 2. CARACTÉRISTIQUES TECHNIQUES ..................................... 3. INFORMATIONS GÉNÉRALES RELATIVES À LA SÉCURITÉ 4. EMPLACEMENT DU RADIATEUR ........................................... 5. INSTALLATION ......................................................................... 6.
INFORMATIONS GÉNÉRALES RELATIVES À LA SÉCURITÉ 6. 7. 8. 9. Toute l’alimentation électrique doit être coupée et le panneau électrique principal doit être verrouillé avant d’exécuter une inspection, un nettoyage ou un entretien du radiateur. Cette précaution permet d’éviter des décharges électriques graves. Ce radiateur n’est pas adapté aux endroits dangereux tels que définis par la National Fire Protection Association (NFPA) aux États-Unis.
PRE-INSTALLATION
EMPLACEMENT DU RADIATEUR Figure 3 INSTALLATION INSTALLATION DU SUPPORT Consultez les figures 4a et 4b. 1. Repérez une poutre en bois dans la solive de plafond. Si vous ne trouvez aucune poutre en bois, vous devez installer un morceau de bois au plafond afin de fixer solidement le radiateur. 2. Pour retirer le support de fixation du radiateur, desserrez les vis à l’aide d’une clé et glissez la poignée sur les têtes de vis. 3.
AJUSTEMENT DE LA DIRECTION DE L’AIR 1. Si le radiateur a été fixé avec un seul tire-fond, comme illustré à la figure 4a, il est possible de le tourner horizontalement au besoin. Par contre, s’il a été installé avec deux tire-fonds, il ne peut être tourné de cette manière. 2. Pour pivoter le radiateur verticalement, dévissez les vis du support (voir la figure 5).
BRANCHEMENT DE L’ALIMENTATION Thermostat du Thermostat radiateur externe Interrupteur de sélection (thermostat du radiateur, thermostat externe) Si vous désirez Thermostat externeutiliser un thermostat externe pour commander le fonctionnement du radiateur, veuillez porter attention aux points suivants : 1. Assurez-vous que le bouton du thermostat du radiateur est tourné au maximum en sens horaire. 2. Connectez le fil conformément au schéma de câblage ci-dessous.
BRANCHEMENT DE L’ALIMENTATION 3. Le thermostat externe doit respecter les normes UL ou CSA. 4. Les fils de connexion du thermostat externe doivent avoir un calibre d’au moins 14 AWG. PROTECTION DE L’ÉLÉMENT CHAUFFANT Pour démarrer le radiateur, tournez lentement le bouton de réglage de température en sens horaire : le ventilateur s’allumera d’abord, suivi de l’élément chauffant.
BRANCHEMENT DE L’ALIMENTATION 36
INSTRUCTIONS DE FONCTIONNEMENT AVERTISSEMENT Le radiateur doit être correctement installé avant d’être mis en fonction. Panneau de commande Revise que la parrilla de salida del calefactor de garaje no esté tapada ni obstruida de ninguna manera, y asegúrese de que la unidad esté encendida. El calefactor de garaje se puede acceder de dos maneras: usando el panel de control táctil o usando la unidad de control remoto multifunción. Pulse el botón apropiado para poner en marcha el calefactor de garaje: 1.
6. Botón de temporizador: Este botón controla el ENCENDIDO/APAGADO y la configuración de 8 tiempos desde 1 hora hasta 8 horas. Cuando el temporizador se encienda por primera vez, lo hará con la configuración de tiempo más baja (1 hora). Cada vez que se pulse el botón del temporizador, el tiempo aumentará 1 hora hasta la configuración más alta (8 horas). Una vez que haya transcurrido el tiempo, todas las funciones del calefactor de garaje se apagarán automáticamente. 7.
INSTRUCTIONS D’ENTRETIEN ENTRETIEN ET NETTOYAGE 1. Avant de nettoyer le radiateur, veillez à couper l’alimentation sur le panneau à disjoncteurs et à laisser refroidir les éléments chauffants. 2. Pour maintenir l’apparence externe du radiateur, il suffit de l’épousseter à sec à l’occasion. Vous pouvez profiter de la période estivale ou de tout autre moment où le radiateur n’est pas utilisé et est complètement refroidi pour passer un linge humide sur l’appareil. 3.
GARANTIE GARANTIE LIMITÉE : Cette garantie limitée n’est offerte qu’à l’acheteur initial de cet appareil à air pulsé/appareil à convection/radiateur et assure qu’il sera exempt de défauts de matériaux et de fabrication pour une période d’un (1) an à partir de la date d’achat (seule la buse en cuivre du brûleur bénéficie d’une garantie à vie). À sa discrétion, GHP Group, Inc.
ENREGISTREMENT DE LA GARANTIE IMPORTANT : Nous vous invitons à remplir votre carte d’enregistrement de garantie dans les quatorze (14) jours suivant la date de votre achat. Vous pouvez également enregistrer votre garantie par Internet au www.ghpgroupinc.com. Veuillez entrer le numéro de série complet. Veuillez conserver cette partie de la carte pour vos dossiers personnels. GHP Group, Inc. 6440 W Howard St GHP Group, Inc. Niles, IL 60714-3302 6440 W. Howard St. Niles, États-Unis Tél.