
Installation Guide

18
INSTALLATION
WARNING
In the connection process, make sure:
• the regulator inlet connector mates with the cylinder valve outlet properly, safely and rmly, and;
• the LP gas hose does not come in contact or remain in contact with the rebox.
CONNECTING THE LP TANK
1. The knob on the LP tank must be closed. Make sure that the knob is turned clockwise to a
full stop. The cylinder supply system must be arranged for vapor withdrawal.
2. Check that the control knob on the control unit is turned off.
3. Remove the protective cap from the LP tank valve and coupling nut.
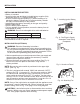
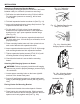
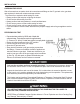
4. Hold the regulator in one hand and insert the nipple into the valve
outlet. Be sure the nipple is centered in the valve outlet. The coupling
nut connects to the large outside threads on the valve outlet. Use
care – do not cross thread the connection. (Fig. 20).
5. Hand-tighten the coupling nut clockwise until it comes to a full
stop. Firmly tighten by hand only. Do not use tools.
To Disconnect: Fully close the tank valve by turning clockwise.
Turn the coupling nut counterclockwise until the regulator assembly detaches.
Gas must be turned off at the supply cylinder when the heater is not in use.
WARNING: A qualied service technician must connect heater to gas supply. Follow all
local codes.
CAUTION: Avoid damage to regulator. Hold gas regulator with wrench when connecting into gas
piping and/or ttings.
CAUTION: Use pipe joint sealant that is resistant to gas (Propane or Natural Gas).
WARNING: Do not overtighten gas connections.
CAUTION: When the LP-gas supply cylinder is not disconnected from the heater, the heater and
the cylinder must be stored outdoors, in a well ventilated space, out of the reach of children, and must
not be stored in a building, garage or any other enclosed area.
Fig. 20