
Installation Guide


21
OPERATION
THERMOSTAT GAS CONTROL
1. STOP! Read the safety information on the previous page.
2. Turn off all electric power to the appliance.
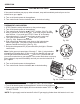
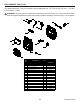
3. Turn control knob clockwise to "OFF" position. (See Fig. 22b)
4. Wait (5) minutes to clear out any gas. Then smell for gas, including
near the oor. If you smell gas, STOP! Follow “B” in the safety
information above. If you don’t smell gas, go to the next step.
5. Turn knob counterclockwise to the "PILOT" position.
(See Fig. 23b) Depress control knob.
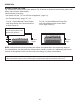
6. With control knob depressed, push down on the ignitor button
until the pilot lights. The pilot is visible centered below the
plaques, behind the front grill. (See Fig. 24)
7. Keep control depressed for (30) seconds after pilot lights. Release
control knob.
Note: If pilot goes out repeat steps 3 through 7. Wait (1) minute before
attempting to light pilot again. If after several tries the pilot still goes out,
turn the gas control knob clockwise to the "OFF" position and call
your service technician or gas supplier. If the control knob does not pop up
when released, stop and immediately and call your service technician or
gas supplier.
8. Turn on all electric power to the appliance.
9. Turn control knob counter clockwise to desired setting.
1
2
3
4
5
O
F
F
P
I
L
O
T
1
2
3
4
5
O
F
F
P
I
L
O
T
Fig. 22b
Fig. 23b
Fig. 24 - Pilot Flame Location
LIGHTING INSTRUCTIONS
If the control knob does not pop up when released, stop and immediately and call your service
technician or gas supplier.
8. Turn on all electric power to the appliance.
9. Turn control knob counter clockwise to the desired setting.
TO TURN OFF GAS TO APPLIANCE
1. Turn off all electric power to the appliance if service is to be performed.
2. Push in gas control knob slightly and turn clockwise to "OFF" or " " position.
DO NOT FORCE.
NOTE: The gas supply must be turned off at the LP-gas supply cylinder when this heater is not in use.