
User Manual

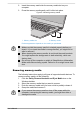


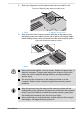
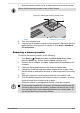
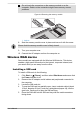
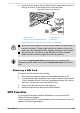
Table Of Contents
- Table of Contents
- Chapter 1 Legal, Regulatory, and Safety
- Copyright, Disclaimer and Trademarks
- Regulatory Information
- FCC information
- California Prop 65 Warning
- Export Administration Regulation
- EU Declaration of Conformity
- VCCI Class B Information (Japan Only)
- Canadian regulatory information (Canada only)
- Canadian Notice
- Following information is only valid for EU-member States:
- REACH - Compliance Statement
- Following information is only for Turkey:
- Following information is only for India:
- Video Standard Notice
- OpenSSL Toolkit License Issues
- FreeType License Issues
- ENERGY STAR® Program
- Disposing of the computer and the computer's battery
- General Precautions
- Safety Icons
- Chapter 2 Getting Started
- Chapter 3 The Grand Tour
- Chapter 4 Operating Basics
- Chapter 5 Utilities and Advanced Usage
- Chapter 6 Troubleshooting
- Chapter 7 Appendix
- Index

7. Seat the memory module cover in place and secure it with the screw.
Ensure that the memory module cover is firmly closed.
Figure 4-7 Seating the memory module cover
1
2
1. Screw 2. Memory module cover
8. Turn your computer over.
9. Connect the AC adaptor and turn on the computer. Make sure that the
added memory is recognized. To confirm it, click Start -> dynabook
PC Information.
Removing a memory module
To remove the memory module, do the following:
1.
Click Start ->
(Power) and then click Shut down while holding
down the SHIFT key. Ensure that the Power indicator is off.
2. Remove the AC adaptor, all cables, and peripherals connected to the
computer.
3. Close the display panel and turn the computer upside down.
4. Loosen the screw securing the memory module cover in place. Note
that the screw is attached to the cover in order to prevent it from being
lost.
5. Slide your fingernail or a thin object under the cover and lift it off.
6. Push the latches away from the module in order to release it. A spring
forces one end of the module up at an angle.
7. Grasp the module by its edges and remove it from the computer.
If you use the computer for a long time, the memory modules and the
circuits locating close to the memory modules will become hot. In this
case, let them cool to room temperature before you replace them. Or
you will get burnt if you touch any of them.
User's Manual 4-18