
Owner`s manual


PS 112 | 212
7
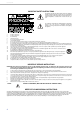
1 POWER ON/OFF INDICATOR (POWER)
The POWER LED lights green if the mains switch
is ON and the mains cord is connected correctly.
2 M
AINS SWITCH (ON/OFF)
Mains switch for switching the unit‘s power
ON or OFF. The POWER LED lights after
turning the power ON. If the mains cord is
correctly connected, mains voltage is
present and the LED does not light upon
power-on, please contact your local dealer.
3 M
AINS CONNECTOR (MAINS IN)
The PowerSub receives its power
supply via the lockable MAINS IN con-
nector. Only the provided power cord
may be used. Connect the PowerSub
only to a mains network, which corre-
sponds to the requirements indicat-
ed on the type plate. Press the yellow
button at the plug to disconnect the
power cord.
4 L
IMIT INDICATOR (LIMIT)
Brief blinking of the LIMIT LED indicates that the
power amplifier of the PowerSub is operated at its
limits. Short-term blinking is uncritical, because the
integrated limiter compensates minor distortion. Constant
lighting of the LED indicates that the sound is negatively af-
fected. Reducing the output volume is strongly recom-
mended.
5 V
OLUME CONTROL (VOLUME)
Level control for adjusting the power amp’s
overall amplification. Setting the control be-
tween 0 dB and +6 dB is recommended to
avoid signal distortion in signal sources (e.g.
mixer).
6 P
OLARITY INDICATOR (180°)
The 180° LED lights yellow if the Polarity switch is
pressed and the signal polarity is inverted.
7 P
OLARITY SWITCH (PHASE)
Select 0° (button not pressed) if the sig-
nal polarity should not be inverted. Select
180° (button pressed) to change the signal polarity by
180°.
8 O
UTPUT CONNECTOR FOR MID/HIGH AUDIO SIGNAL (MID/
HIGH OUT)
The upper band of the Power-
Sub‘s integrated crossover (filter
frequency 120 Hz) is available at
this XLR output connector. The
level of the output signal is inde-
pendent of the setting of the level
control VOLUME (”Pre Fader”).
9 I
NPUT CONNECTOR FOR AUDIO SIGNAL (LINE IN)
Electronically balanced input for
the connection of a line level signal
source such as mixer, signal proces-
sor, etc. Establishing a connection
is possible via phone or XLR-type
plugs. Whenever possible, balanced
signal feed is always preferable to
guard against potential noise or HF-interference.
CAUTION: Before making any connections or discon-
nections, make sure to set the level control
VOLUME to the counterclockwise stop.
10 O
UTPUT CONNECTOR (LINE THRU)
The output connector provides the
LINE IN signal for ”carrying through“
the input signal. The level of the out-
put signal is independent
of the set-
ting of the level control VOLUME
(”Pre Fader”).
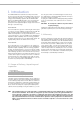
Number PS 112 PS 212
1 Power on/off indicator (POWER)
2 Mains switch (ON / OFF)
3 Mains connector, lockable (MAINS IN)
4 Limit indicator (LIMIT)
5 Volume control (VOLUME)
6 Polarity indicator (180°)
7 Polarity switch (PHASE)
8 Output connector (XLR) for mid/hi audio signal (MID/HIGH OUT) Output connectors (XLR) for left or right mid/hi audio signal (MID/HIGH OUT L or
MID/HIGH OUT R)
9 Input connector (XLR or phone) for line level audio signal (LINE IN) Input connectors (XLR or phone) for left or right line level audio signal (LINE IN
LEFT or LINE IN RIGHT)
10 Output connector (XLR) for line level audio signal (LINE THRU) Output connectors (XLR) for left or right line level audio signal (LINE THRU LEFT or
LINE THRU RIGHT)