ADSL Router/Modem Quick Setup Guide RTA770W
ADSL Router Quick Set-up Guide Important This Guide is intended to get you started quickly. We have made the factory default setting of this router suitable for New Zealand 1. All you need is to follow through the steps we describe here. This Guide should be read in conjunction with the RTA77x Series ADSL Router User’s Manual 2. It is provided as a PDF file on this CD. To view or print the User’s Manual, go to the previous menu ADSL Router (RTA770W) and click the View User Manual button.
1 Default Configuration for New Zealand This router is shipped with the following factory default settings. Router IP address 192.168.1.1 Subnet mask 255.255.255.0 VPI 0 VCI 100 Connect mode PPPoA VC-MUX NAT enabled DSL line mode auto select G.DMT / T1.
ADSL Router Quick Set-up Guide Choose from your connection options: 1. Ethernet (for standalone computer or multiple computers, Operating System independent) The router comes with a built-in 4-port network switch. Up to 4 computers can be connected to the router directly. If you require more connections to more computers, purchase another network hub and connect it to the router to provide for more connections. Only one Ethernet cable is provided.
4 Get your computer ready for networking The description below assumes you are connecting the router via Ethernet. If you are connecting the router via USB, refer to Chapter 2 - USB Driver Installation on page 4 of the User’s Manual on CD. You have two options. Following option (1) is simplest. This is the Windows default network setting. OPTION 1. CONFIGURE COMPUTER TO GET IP ADDRESS FROM DHCP If your computer is already configured to obtain an IP address automatically (from a DHCP server), do nothing.
ADSL Router Quick Set-up Guide Windows 98/ME: 1. From Control Panel, double click Network. Scroll down to highlight TCP/IP -> (your network card). Click Properties. 2. Select the IP Address tab. Specify 192.168.1.x (x is a number you pick between 2 and 254). This is the IP address you assign to the computer. Subnet Mask is 255.255.255.0. 3. Select Gateway tab. Enter the router’s IP address 192.168.1.1. Click Add. If your ISP specifies DNS server addresses, go to the tab DNS Configuration.
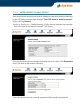
STEP 2 ENTER INTERNET ACCOUNT DETAILS Enter your Internet account User Name & Password in the exact format as specified by the ISP. Make sure the page displays "Your DSL router is ready to connect" before clicking Connect. See Q2 in Section 10 – Troubleshooting, if after several minutes the message "Your DSL router is not ready to connect" still shows. Once connected the screen changes to display the on-line time. Click Disconnect only if you wish to disconnect manually.
ADSL Router Quick Set-up Guide 6 Configuration for PPPoE service Follow this procedure ONLY if your ISP specifies the service as PPPoE. Caution - do not set your router to PPPoE mode if your ADSL service is PPPoA. It will not connect. Reset to factory default will restore router to PPPoA mode. From the Quick Start menu click on Quick Setup to configure for PPPoE. 1. Untick the Auto Scan Internet Connection box. VPI and VCI shall be set to 0 and 100 respectively. Click Next for the next page. 2.
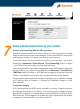
7 Some advanced functions of your router Firewall, port forwarding, DMZ & traffic restrictions By default a preset firewall is invoked to block all incoming requests including Ping from the Internet to your private network. In the reverse direction all requests sent from your network can freely pass through to the Internet. If you want servers on your network accessible to Internet users, set up port forwarding in Advanced > Virtual Servers > Port Forwarding.
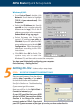
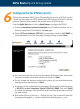
ADSL Router Quick Set-up Guide To set up IP extension, go to Advanced > Internet. Click on the "modify icon" under Edit: The next screen displays VPI and VCI as 0 and 100. Do not change these numbers. Go Next. Select PPPoA VC MUX or PPPoE LLC/SNAP. If your ISP did not specify PPPoE you can assume it is PPPoA. Go Next. On the next screen untick Enable NAT, and tick PPP IP extension as illustrated. Go Next.
Enter your Internet account user name and password. Go Next. The new configuration is displayed. Click Apply to confirm changes. The router will restart itself to activate the new setting. You will notice all NAT or firewall settings disappear from the Advanced menu hereafter. Now follow Step 2 of Section 5 – Getting On-line.
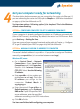
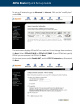
ADSL Router Quick Set-up Guide (default http://192.168.1.1 ). You will be prompted to enter the router’s administrative user name and password. By default, user name and password are both admin. 2. Go to Wireless > Basic. It is recommended that you use a SSID of your choice. Next, pick a desired channel. Wireless clients will scan all channels and settle on the same channel as the router. Click Apply. 3. Setup wireless client stations according to the vendor’s instructions.
9 Tips for security This Dynalink series of Broadcom chipset powered routers are highly powerful, secure and stable devices. To ensure that you get the maximum benefit from your Dynalink router Dynalink makes the following strong recommendations: Do: Change and keep secret your router’s admin user name and password. This will ensure that no unauthorised changes can be made to your settings and will prevent any unauthorised changes to the embedded code.
ADSL Router Quick Set-up Guide 10 11 Indicator lights There are 8 indicators on the front panel. Every time the router is powered on or reset, the DIAG light will come on indicating self-test is in progress. INDICATOR STATUS DESCRIPTION PWR Off Solid Power off. Power on. DIAG Off Flashing Solid Power off, or initial self-test OK. Firmware uploading or updating. Initial self-test failed. The unit is faulty. LAN1 - LAN4 Off Flashing Solid Power off, or no Ethernet link is present.
3. Disable any personal firewall or virus checker temporarily. If you are using Internet Explorer, go to Tools–Internet options-Security. Reset security level of all 4 icons to default. You can revert to your customised settings after configuring the router. 4. If previously the computer had a dialup modem, check browser setting. For example in Internet Explorer, go to Tools–Internet options–Connections, and select Never dial a connection.
ADSL Router Quick Set-up Guide If (A) fails but (B) shows a response, this is probably a DNS problem. Go to Procedure (2) of Section 4. Enter the router’s IP (192.168.1.1) as DNS. If both (A) & (B) show a response, your router is actually on line. The problem may be with your browser setting. Try returning any custom settings of the browser to default. If you have a personal firewall, disable it to see if it makes any difference. Also you may try shutting down the computer and restarting. Q3.
If the wireless client is already installed on the computer, an alternative is to go to the DOS prompt, type ipconfig /all. The MAC address is shown under physical address as a group of 6 double digits. Q8. Can a wireless link suffer from radio interference Other wireless devices and appliances on site may share the same 2.4 GHz band. If undesirable effects are observed, try switching the router to a different channel. Alternatively, switch the other devices to use a different channel. Q.
Warranty Dynalink warrants this product against defects in materials and workmanship for a period of twelve months from the original date of purchase. We will, at our discretion, repair or replace the faulty unit, free of charge, provided it is returned to us with proof of purchase from an authorised dealer within the warranty period. Return delivery after repair will be paid for by Dynalink.