
Wireless Modem Router User's Manual
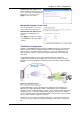
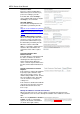

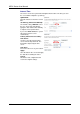
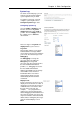
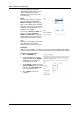
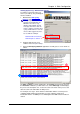
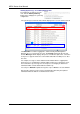
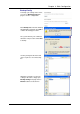
Table Of Contents
- Version 2.4
- Before You Use
- Unpacking
- Features
- ADSL Compliance
- ADSL2 Compliance
- ADSL2+ Compliance
- Wireless LAN Compliance
- ATM Features
- Bridging Features
- Routing Features
- Security Features
- Configuration and Management
- Subscription for ADSL Service
- Notes and Cautions
- Chapter 1: Overview
- Physical Outlook
- Front Panel
- LED Indicators
- Rear Panel
- Chapter 2: System Requirement and Installation
- System Requirement
- Choosing a place for the ADSL Router
- Connecting the ADSL Router
- USB Driver Installation
- For Windows ME
- For Windows 2000
- For Windows XP
- For Windows Vista
- Uninstalling the USB Driver
- For Windows ME
- For Windows 2000
- For Windows XP
- For Windows Vista
- Setting up TCP/IP
- For Windows 98
- For Windows ME
- For Windows NT
- For Windows 2000
- For Windows XP
- For Windows Vista
- Renewing IP Address on Client PC
- For Windows 98/ME
- For Windows NT/2000/XP
- For Windows Vista
- Chapter 3: Accessing the Internet
- PPP over ATM (PPPoA) Mode
- Description:
- Configuration:
- PPP over ATM (PPPoA) IP Extension Mode
- Description:
- Configuration:
- PPP over Ethernet (PPPoE) Mode
- Description:
- Configuration:
- PPP over Ethernet (PPPoE) IP Extension Mode
- Description:
- Configuration:
- Numbered IP over ATM (IPoA)
- Description:
- Configuration:
- Numbered IP over ATM (IPoA)+NAT
- Description:
- Configuration:
- Unnumbered IP over ATM (IPoA)
- Description:
- Configuration:
- Unnumbered IP over ATM (IPoA)+NAT
- Description:
- Configuration:
- Bridge Mode
- Description:
- Configuration:
- MER
- Description:
- Configuration:
- Chapter 4: Web Configuration
- Using Web-Based Manager
- Outline of Web Manager
- To Have the New Settings Take Effect
- Language
- Quick Start
- Connect to Internet
- Quick Setup
- Connection Type
- PPP over ATM/ PPP over Ethernet
- IP over ATM
- Bridging
- Status
- Overview
- ADSL Line
- ADSL BER Test
- Internet Connection
- Traffic Statistics
- DHCP Table
- Wireless Clients
- Routing Table
- ARP Table
- Advanced Setup
- Local Network – IP Address
- Local Network – DHCP Server
- Local Network – UPnP
- Local Network – IGMP Snooping
- Internet – Connections
- Adding a New One
- Internet – DNS Server
- Internet – IGMP Proxy
- Internet – ADSL
- IP Routing – Static Route
- Adding a New One
- Remove Static Route
- Example – Static Route
- IP Routing – Dynamic Routing
- Operation: There are two modes for you to choose, Active and Passive. Select Active for transmitting and receiving data, or select Passive for receiving data only.
- Virtual Server – Port Forwarding
- IP Address seen by Internet Users
- Add New Port Forwarding
- Virtual Server – Port Triggering
- Virtual Server – DMZ Host
- Virtual Server – Dynamic DNS
- Virtual Server – Static DNS
- NAT ALG Configuration
- Firewall
- Firewall – Bridge Filtering
- Firewall – IP Filtering
- Quality of Service
- Quality of Service – Bridge QoS
- Quality of Service – IP QoS
- Port Mapping
- Wireless
- Basic Settings
- Security
- For 64-bit WEP/128-bit WEP
- For 802.1X Wireless Network
- 802.1x environment Configuration
- For WPA (Wi-Fi Protected Access)
- For WPA-PSK; WPA2-PSK; Mixed WPA2/WPA-PSK
- For WPA-2; Mixed WPA2/WPA
- Access Control
- Repeater
- Management
- Diagnostics
- Management Accounts
- Management Control – From Remote
- Management Control – From Local
- TR-069 Client Configuration
- Identify the Validation of Certificate from ACS
- Internet Time
- System Log
- Configuring System Log
- Example
- System Log Configuration
- Viewing System Log – Remote Side (Server)
- Viewing System Log – Local Side (ADSL Router)
- Backup Config
- Update Firmware
- Reset Router
- UPnP for XP
- Chapter 5: Troubleshooting
- Problems with LAN
- Problems with WAN
- Problems with Upgrading
- Chapter 6: Glossary
- ARP (Address Resolution Protocol )
- DHCP (Dynamic Host Configuration Protocol)
- LAN (Local Area Network) & WAN (Wide Area Network)
- NAT (Network Address Translation) IP Address
- Private IP Address
- Public IP Address
- PVC (Permanent Virtual Circuit)
- RIP (Routing Information Protocol)
- UDP (User Datagram Protocol)
- Virtual Server
- VPI (Virtual Path Identifier) & VCI (Virtual Channel Identifier)
- Appendix A: Specifications
- Appendix B: Client Setup for 802.1x, WPA, and WPA-PSK
- Retreiving Client Certificate
- Enabling 802.1x Authentication and Security
- Enabling WPA Authentication and Security
- Enabling WPA-PSK Authentication and Security
ADSL Router User Manual
120
Connect to ACS:
Choose to connect to ACS with or
without SSL (Secure Socket Layer)
protocol according to your ISP.
If the ACS URL starts with http://,
choose without SSL mode; if it begins
with https://, select with SSL.
ACS URL Address:
Key in the Auto-Configuration Server
URL Address provided by the ISP,
e.g.,
http://10.11.95.124:8082/askey/ACSS
erver without SSL or
https://10.11.95.124:8443/askey/ACS
Server with SSL.
ACS User Name/ ACS Password:
When connecting to ACS, this device
must have correct user name and
password for authentication. Key in
the information provided by the ISP.
When the content of ACS URL
Address, User Name, and Password
match the ACS authorization, the
router will send an online report to
ACS.
Connection Request User
Name/Password:
If the ACS wants to communicate with
the device, it will have to offer the
matching Connection Request User
Name and Password. When the
device sends the report to ACS for the
first time, it will contain information for
this.
Periodic Transmission of Inform
Request:
If this function is enabled, the CPE will
frequently report to ACS the status
after a period of time set here. The
default setting is 300 seconds, and the
ISP can modify the value. Generally,
users do not have to change the
settings here.
If this function is disabled, the CPE will
only report once when the connection
between ACS and the device has
been set up.
Identify the Validation of Certificate from ACS
When using SSL protocol to connect to ACS, a trusted CA and synchronic time
setting with the server are used to identify the validation of the Certificate sent from
ACS.
When choosing with SSL for Connect
to ACS, you will see a paragraph
appear on the bottom of the window
(as shown in the right column).