ADSL2+ 4-Port Modem Router Quick Setup Guide RTA1335
Important This Guide is intended to get you started quickly. We have made the factory default setting of this router suitable for New Zealand1. All you need is to follow through the steps we describe here. This Guide should be read in conjunction with the RTA1335 ADSL Router User’s Manual2. It is provided as a PDF file on this CD. To view or print this User’s Manual, go to the previous menu ADSL Modem Router (RTA1335) and click the View User Manual button.
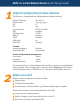
ADSL 2+ 4-Port Modem Router Quick Set-up Guide 1 Default Configuration for New Zealand This Router is shipped with the following factory default settings. Router IP address Subnet mask VPI VCI Connect mode NAT DSL line mode WAN IP DHCP DNS relay UPnP IGD 192.168.1.1 255.255.255.0 0 100 PPPoA VC-MUX enabled G.
Connection of this router to computers is via Ethernet, independent of the Operating System. There is no driver to load. This router comes with a built-in 4-port network switch. Up to 4 computers can be connected to the router directly. If you require connections for more computers, purchase another network hub and connect it to the router to provide for more connections. Only one Ethernet cable is provided. Extra cables and network hub can be purchased from your supplier. 3 Connecting the router 1.
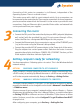
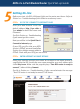
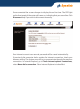
ADSL 2+ 4-Port Modem Router Quick Set-up Guide 5 Getting On-line Before you start, the DSL & Ethernet lights on the router must be on. Refer to Section 10 – Troubleshooting of this Guide to resolve any issues. STEP 1 GO TO THE ‘CONNECT TO INTERNET’ PAGE Start your web browser. Enter the default address http://192.168.1.1. Type admin for both User name and Password. See Q1 in Section 10 - Troubleshooting if you cannot get this screen. Next you will be in the Quick Start > Connect to Internet page.
Once connected the screen changes to display the on-line time. The PPP light on the front panel of the router will come on, indicating that you are online. Click Disconnect only if you wish to disconnect manually. Your Internet account user name & password will be saved automatically. If previously the computer had a modem for Internet connection, check your browser setting. The system may still try to communicate through the previous connection.
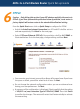
ADSL 2+ 4-Port Modem Router Quick Set-up Guide 6 PPPoE Caution - Only follow this section if your ISP advises explicitly the service is PPPoE. If you have followed the procedure below by mistake, reset router to factory default will restore router to the standard New Zealand setting. From the Quick Start menu click on Quick Setup to configure for PPPoE. 1. Untick the Auto Scan Internet Connection box. VPI and VCI shall be set to 0 and 100 respectively. Click Next for the next page. 2.
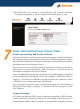
6. Now follow Step 2 of Section 5 – Getting On-line. The screen will show the changes made: pppoe_0_100 has replaced the default pppoa_0_100. 7 Some advanced functions of your router Firewall, port forwarding, DMZ & traffic restrictions By default a firewall is actively blocking incoming requests including Ping from the Internet to your private network. In the reverse direction requests sent from your network can freely pass through to the Internet.
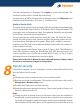
ADSL 2+ 4-Port Modem Router Quick Set-up Guide a public IP directly from the ISP. This arrangement is suitable for certain advanced applications that require the device behind to receive a public WAN IP. Caution: This mode of operation assumes firewall security will be provided by another device on your LAN. To set up IP extension, go to the Advanced menu. Select WAN > Internet. Click on the “modify icon” under Edit: The next screen displays VPI and VCI as 0 and 100. Do not change these numbers. Go Next.
The new configuration is displayed. Click Apply to confirm the changes. The router will restart itself to activate the new setting. You will notice all NAT or firewall settings disappear from the Advanced menu hereafter. Now follow Step 2 of Section 5 – Getting On-line. Quality of Service (QoS) The router allows prioritising of upstream traffic (to the Internet) by allowing the user to overwrite the Type of Service (TOS) field in the IP datagram header.
ADSL 2+ 4-Port Modem Router Quick Set-up Guide of your router and network. Use the built in access control list to restrict access to only authorised Internet hosts. Enable IP extension (bridging) without firewall protection. If the router operating in this mode is connected to a computer, to the minimum have a “personal firewall” (software) to protect the computer. Send your router away for repair or replacement without resetting to factory default or wiping out your Internet account login details.
10 Troubleshooting Q1. Cannot open the router control panel from my browser. 1. Check that the router’s ETHERNET light is on. Check that the ETHERNET cable is firmly plugged in. 2. Perform a PING test. In Windows XP or 2000, click Start-Run. Enter cmd then OK. (In pre-2000 Windows versions enter command instead). Type ping 192.168.1.1 then press Enter. The response should resemble: Pinging 192.168.1.1 with 32 bytes of data: Reply from 192.168.1.1: bytes=32 time=4ms TTL=30 ….
ADSL 2+ 4-Port Modem Router Quick Set-up Guide • If there is no designated ADSL jackpoint, any jackpoints may be used. Connect the router directly into a jackpoint, or through the port marked MODEM on a filter. 2. If the DSL light is on, but the PPP light is off, check that: • The Internet account User Name & Password are correctly entered. Go to the Quick Start menu as described in Section 5 – Getting On-line. Re-enter user name and password in the exact format as specified by the ISP.
Q5. The router’s IP and/or administrative password have been modified. But the details have now been forgotten. You can restore the router to factory default by pushing a pin into the hidden reset button located next to the power on/off button at the back of the router. Push and hold for 5 seconds then release to reset router. Q6. I need to know the WAN IP of the router when it is on line Go to Status > Internet Connection, the WAN IP is displayed here. Q.
Warranty Dynalink warrants this product against defects in materials and workmanship for a period of twelve months from the original date of purchase. We will, at our discretion, repair or replace the faulty unit, free of charge, provided it is returned to us with proof of purchase from an authorised dealer within the warranty period. Return delivery after repair will be paid for by Dynalink.