ADSL Router Quick Setup Guide RTA210
Important This Guide is intended to get you started quickly. We have pre-configured the router for the New Zealand ADSL network. All you need to do is to follow through the steps we describe here. This Guide should be read in conjunction with the ADSL Router User Manual. This is provided as a PDF file on the Utility CDROM. Note: the ADSL Router User Manual was written for international users. New Zealand users should ignore relevant material on page 9 and all sections of Chapter 3, except Section 3.
ADSL Router Quick Set-up Guide 1 Default Configuration for New Zealand We have pre-configured this router to the following settings. If you accept the settings, please move on to Section 2 "Installing the Router". Router IP address Subnet mask VPI VCI Encapsulation Operating mode NAT WAN IP DHCP DNS relay 192.168.1.1 255.255.255.0 0 100 PPPoA VC-MUX G.
STEP 1 CONNECT IT UP For a step-by-step guide refer to Page 5 Chapter 2 Hardware Description & Installation of the ADSL Router User Manual on CDRom. Connect the DSL port of the router into your ADSL jackpoint (telephone wall socket) with the provided line cord. Never connect through a microfilter. Connect the LAN port of the router to the Ethernet port of your computer (or uplink port of a network hub) with the Ethernet cable provided.
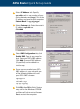
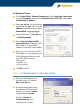
ADSL Router Quick Set-up Guide Select IP Address tab. Specify 192.168.1.x (x is any number of your choice between 2 and 254). This is the IP address assigned to your computer. Subnet Mask is 255.255.255.0. Select Gateway tab. Enter the router’s IP address 192.168.1.1. Click Add Select DNS Configuration tab, click Enable DNS. Type in any name for host. Enter your ISP’s DNS address. Click Add. A second DNS address (if specified) can be added in a similar way.
For Windows XP/2000: From Control Panel - Network Connections. Open Local Area Connections and click Properties. Double click Internet Protocol (TCP/IP). Select Use the following IP address. Enter 192.168.1.x (x is any number between 2 and 254). This is the IP address assigned to your computer. Subnet Mask is 255.255.255.0. Enter the Router’s IP 192.168.1.1 as Default gateway. Select Use the following DNS server addresses. Enter your ISP’s DNS address. A second DNS address (if specified) can be added.
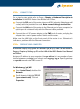
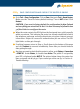
ADSL Router Quick Set-up Guide STEP 4 ENTER INTERNET ACCOUNT USER NAME AND PASSWORD Go to Configuration > WAN > ATM PVC > Setup ATM PVC. The pre-configured "MyConnection" PVC Interface will appear. Scroll down to check that Encapsulation Type is PPPoA & VC_MUX. Locate the PPP0A Configuration section. Edit the User Name and Password fields using the user name and password supplied by your ISP. Click Submit.
STEP 5 SAVE CONFIGURATION AND CHECK IF THE ROUTER IS ONLINE Go to Tool > Save Configuration. Click on Save. Next go to Tool > Reset Router. Make sure the "Reset to factory default settings" box is NOT ticked. Click Restart. CAUTION - if you reset to factory default the configuration for New Zealand and everything you entered will be lost. It is then necessary to follow Section 5 of this Guide to reconfigure the router.
ADSL Router Quick Set-up Guide 3 Other material for advanced users Refer to these sections of the ADSL Router User Manual for: DHCP: Configure PC to get IP from DHCP Enable DHCP Show DHCP table Page 32 Section 4.2 Page 43 Section 6.2.2 Page 70 Section 6.5.6 Use the Web Configuration Manager Page 39 Chapter 5 Change the private IP address of the router Page 42 Section 6.2.1 Enable routing RIP v1/v2 Page 45 Section 6.2.3 Modify ISP login name or password Page 48 Section 6.3.
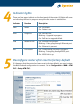
4 5 Indicator lights There are four green indicats on the front panel of the router. All lights will come on indicating self-test in progress every time the router is switched on. Indicator Function Description PWR Power Off - No power. On - Power is on. DIAG Diagnosis Off - Self-test OK. Blinking – Upgrade in progress. On - Self-test or upgrade failed. LAN Network Link Off - Ethernet not present. Blinking – Data going through Ethernet port. On - Ethernet is present.
ADSL Router Quick Set-up Guide Scroll down to Data Encapulation. Click on the selection box, change Bridge to PPP0A: Remember to click Submit to take effect and then go to Tool > Save > Configuration. Click on Save to save the configuration you have entered. 6 Troubleshooting Q1. Cannot open the router control panel from my browser. Check that the router’s LAN light is on. If not, check your Ethernet cable.
ping 192.168.1.1 then press Enter. The response should be: Pinging 192.168.1.1 with 32 bytes of data: Reply from 192.168.1.1: bytes=32 time=4ms TTL=30 If you see a similar response, router is communicating with the network correctly and the problem lies elsewhere. If the result is Request timed out or similar failures, there is a TCP/IP networking problem. Check the LAN cable type is correct (as in step 1 above) and firmly plugged in.
ADSL Router Quick Set-up Guide perform a PING test as described in Q1-3, using these addresses: (A) Ping www.dynalink.co.nz (or any valid web address) (B) Ping 205.178.180.16 (or any valid public IP address) If both (A) & (B) returned no reply, go to second image in Step 4 (Section 2 - Configuring Router). Make sure the Enable Network Address Translation box is ticked. Also check that the router’s IP 192.168.1.1 is entered as gateway, as in Step 2 (Section 2 - Configuring Router).
Warranty Dynalink Modems Ltd warrants this product against defects in materials and workmanship for a period of twelve months from the original date of purchase. We will, at our discretion, repair or replace the faulty unit, free of charge, provided it is returned to us with proof of purchase from an authorised dealer within the warranty period. Return delivery after repair will be paid for by Dynalink Modems Ltd within New Zealand.