
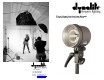
Instruction Manual
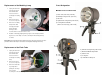

Replacement of the Modeling Lamp
1. Unplug the flash head
from the power pack
and allow the flash
head to cool before
touching the modeling
lamp.
2. Remove flash head
accessories if present.
3. Remove the modeling
lamp from the flash
head by pressing the
lamp in and then
turning it counter -
clockwise until it is released from the socket.
4. Install the new lamp by aligning the bayonet pins on the lamp base with the
bayonet slots on the lamp socket. Press the lamp in while turning the lamp
clockwise.
Please Note: Do not touch the new lamp with your hands. Oils from your hand can cause
premature failure of the lamp or could cause an unexpected shattering of the lamp.
Replacement of the Flash Tube
1. Unplug the flash head
from the power pack
and allow the flash
head to cool before
touching the modeling
lamp.
2. Remove flash head
accessories if present.
3. Remove the flash tube
by rocking and/or
pulling the outer edge
of the reflector
assembly out of the flash housing.
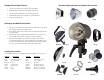
Parts Designation
MH2050 Fan Cooled Flash Head
1) Flash Tube (2000 watts part# 2405)
2) Modeling Lamp (250 watts part# 0515)
3) Tilt Head
4) Light Stand Locking Knob (part# C47092)
5) Locking Tilt Head Handle
(Multi-Position Ratcheting, part# C47098)
6) Umbrella Locking Knob
(part# C47093)
7) Illuminated Model lamp Switch
8) Cable Socket
9) Cooling Fan
10) Umbrella mounting hole