GSM Mobile Phone Brand: Ice Mobile Model: RING Viento II FCC ID: C89RINGVIENTO
Content 1 2 3 General Information ................................................................................................................................................. 4 1.1 Profile.............................................................................................................................................................. 4 1.2 Safety Information .................................................................................................................................
.8 4 5 Using the Headset ......................................................................................................................................... 18 Input method ........................................................................................................................................................... 18 4.1 Icons for Input Methods ................................................................................................................................ 18 4.
6 5.11 Games ........................................................................................................................................................... 39 5.12 Facebook ....................................................................................................................................................... 40 5.13 Ebuddy .........................................................................................................................................................
1 1.1 General Information Profile Please read this pamphlet carefully in order to make your phone in perfect condition. Perfectly combining humanized design and fine art, this mobile phone provides a streamlined outlook, comfortable hand-feeling, pleasant sounds and MP3 player which bring convenience and fun to your work. Our company may change this mobile phone without prior written notice and reserves the final right to interpret the performance of this mobile phone.
Do not use a hand-held phone while driving. Use hands-free fittings when calls are unavoidable while driving. In some countries, dialing or receiving calls while driving is illegal! ¾ SWITCH OFF IN AIRCRAFT Wireless devices can cause interference in aircraft. Using a mobile phone in flight is illegal and risky. Please make sure that your mobile phone is powered off in flight.
Use only approved accessories and batteries. ¾ USE SENSIBLY Use only in a normal and proper manner. ¾ EMERGENCY CALLS Ensure the phone is switched on and in service, enter the emergency number, e.g. 112, then press the Dial key. 7Give your location and state your situation briefly. Do not end the call until told to do so. Note: Just like all other mobile phones, this mobile phone does not necessarily support all the features described in this manual due to network or radio transmission problems.
¾ Do not throw, knock or shock the mobile phone, as that will destroy the internal circuits and high-precision components of the mobile phone. 2 2.
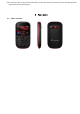
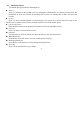
2.2 Functions of Keys The mobile phone provides the following keys: Dial key Press it to originate a call on SIM card 1 by entering the called number or selecting a contact from the phonebook; or press it to receive an incoming call; or press it in standby state to show the latest call records. End key Press it to end a call being dialed or end an ongoing call; or press it to exit the menu and return to the standby state; or hold it for two or three seconds to power on or off the mobile phone.
Sym key Press it in the edit interface to input a symbol. a key(2): Press it to switch between input methods. Alt:Press it in the edit interface to switch to symbol input on the keypad.
Lithium battery: 800mAH Please refer to their labels for other data related to the battery and the charger. 3 3.1 Getting started Installing the SIM Cards and the Battery An SIM card carries useful information, including your mobile phone number, PIN (Personal Identification Number), PIN2, PUK (PIN Unlocking Key), PUK2 (PIN2 Unlocking Key), IMSI (International Mobile Subscriber Identity), network information, contacts data, and short messages data.
pushed in. Aim the positive pole and negative pole of the battery at the battery connector of the mobile phone, and press the left of the battery to install the battery into the battery tank. Using code The mobile phone and the SIM cards support sorts of passwords, in order to prevent the phone and the SIM cards from being misused. When you are prompted to input any of the codes mentioned below, just input the correct code and then press the OK key.
-Then input the new PIN and press the OK key. -Input the new PIN again and then press the OK key. -If the input PUK is correct, the SIM card will be unlocked and the PIN will be reset. Note: The SIM card will be locked if you input wrong PIN code for three times. To unlock the SIM card, you need to input the PUK. In general, the PUK can be obtained from the network operator. PUK The PUK code (Personal Unlocking Key, 8digits) is required to change a blocked PIN. It is supplied with SIM card.
A barring code is required for setting the call barring function. You can obtain this code from the network operator to set the call barring function. 3.2 Installing T-Flash Card The T-Flash card is a pluggable mobile storage card inside the mobile phone. To install the T-Flash card, open its latch, place its indented side downward, insert the card into the card slot, and then close the latch. To remove the T-flash card, open its latch and slightly press the card inward.
When the battery energy is insufficient, the mobile phone prompts "Battery low". If you have set an alert tone, an alert tone will be given off when the battery level is too low. A charging animation appears when the battery is being charged. When the charging is complete, the animation disappears. Using a travel adapter: Install the battery into the mobile phone before charging the battery. Connect the adapter of the travel charger with the charging slot in the mobile phone.
To guarantee the optimal performance of your battery, please stick to the following rules: Use only the battery provided by the vendor. Otherwise, damages or even injuries could be caused during the charging. Power off the mobile phone before removing the battery. The charging process lasts a longer time for a new battery or a battery not in use for long. If the battery voltage is too low to enable the mobile phone to be powered on, charge the battery for a longer time.
3.4 Powering On/Off the Mobile Phone Hold the End key for a while to power on the mobile phone. A power-on animation appears on the display screen. Input the phone lock code and press the OK key if the mobile phone prompts you to input the phone lock code. The original code is 1122. Input the PIN and press the OK key if the mobile phone prompts you to input the PIN. The PIN is provided by the network operator for new opening SIM card. Enter the standby interface.
Dialing an international call Hold the * key and input "+". Then input the country code, the area code and the telephone number. Finally, press the Dial key. Dialing an extension Input the main number, press the * key for three or four times, input "p" or "w" and then the extension number, and finally press the Dial key. Dialing a call to a number in the phonebook Enter the phonebook and use the upward and/or downward direction keys to find the telephone number you want to call. Press the Dial key.
Using options during a conversation Select Options during a conversation to pause, end the ongoing call, originate a new call, browse the phonebook, view information, set the mute, set the DTMF, or perform other operations. For details, refer to the menu guide. 3.8 Using the Headset It would enter headset mode automatically when you insert headset to the slot. Make sure of inserting it at the bottom of the slot, or you can’t use it normally.
Numeric input:“ 123” English input in upper case:“ ABC” English input in lower case:“ abc” 4.2 Press a 4.3 To Shift Entry Methods key to switch between input methods. Numeric Input You can input numbers with the numeric input method. Press a number key to input the corresponding number. 4.
Number key 7 Number key 8 Number key 9 Number key 0 Left soft key Right soft key End key 7Z 8X 9C 0 Equivalent to OK or Options Equivalent to Back or Clear Press it to return to the standby interface English input: Each key is used to represent multiple characters. Quickly and continuously press a key till the character you want appears. Input the next character after the cursor moves.
5 5.1 Using the Menus Messages Short Message Service (SMS) is a network service that requires network support. To send and/or receive short messages, you may need to apply for this service first from the network operator. This mobile phone supports short message transmission. A short message is first sent to the short message service center in the network and then forwarded to the destination user.
Text message 5.1.1.1 Writing message Step 1: Input the content of the short message to be sent. Select Options to perform the following operations: Send to: To send the short message. Input method: To switch between input methods. Insert template: To insert a preset phrase into the short message. Advanced Insert number: To insert a number from the phonebook to the short message. Insert name: To insert a contact name from the phonebook to the short message.
Forward: To forward the short message to others. Delete: To delete the short message. Delete all: To delete all short messages from the Inbox. Save as template: To save the message as template so that you can use it more conveniently. Mark several: Mark several short messages so that you can operate some accordant operations on them. Mark as unread: To mark the message as unread. Advanced: Use number: To extract all numbers involved in the short message.
Select a short message and then press the OK key to browse the selected short message. While browsing a short message, you may select Options to perform the following operations: ·Resend: Send the short message. ·Edit: Edit the short message. After editing the short message, you may send it to a destination address as required. ·Delete: Delete the short message. ·Delete all: Delete the short message. ·Save as template: Save the message as template so that you can use it more conveniently.
* Theme: To set MMS theme * Contents: To edit MMS content. User can add words, pictures, sounds and enclosure. b.
5.1.1.7 Outbox MMS of outbox would display on the screen while choosing “outbox”. You may select Options to perform the following operations: *View: To view the MMS content *Details: To view the addressee, theme, date and size of MMS *Forward/Resend: To send MMS to others. “Resend” will prompt if the MMS is unsuccessful sent. *Delete: Delete the MMS you chosen *Delete all: Delete all MMS from the Inbox. *Use number: To use numbers of MMS 5.1.1.8 Drafts Listing all created MMS which stored in draft.
5.1.1.10 MMS settings This function enables you to set the configuration information of sending and receiving MMS as following: *Compose: To set signature of editing mode on or off *Send: To set the validity period, delivery report, read report, priority, spacing interval and sending time of MMS. *Retrieve: To set main net, roam net, delivery report and allowing sending report of receiving MMS * Filter: For setting anonymous sender and ads. *server profile: For setting net configuration that MMS require.
a blank after being deleted. 5.1.1.12 SMS Settings This function enables you to set the default features about the SMS. Profile settings: Save or modify the short message service center number required for short message transmission, or obtain it from the network operator. Voicemail server: Edit: Edit or delete your voice mailbox number; or select OK to save the number. Call voicemail: Dial the voice mailbox number stored in the voice mailbox number list.
SIM card can store depends on the storage capacity of the SIM card. The telephone numbers stored in the mobile phone and in the SIM cards form a phonebook. A name stored in the mobile phone can have at most four telephone numbers. After selecting a telephone number in the phonebook, select Options to perform the following operations: View: View the content of the telephone number. Sent text message: sent message to this number. Sent multimedia message: sent multimedia message to this number.
Fields: Select the items to be displayed for contacts in the phonebook and the items to be displayed in the interface for adding contacts. My vCard: Edit your name car, or send it via a short message, or save it as a file. Preferred storage: Select the default location where a new number is to be stored, i.e., SIM1, SIM2, or the phone.
phonebook. In the Name interface, input the name of the contact you want to search or the first letter(s) of the name. Press the Left soft key and select Search. All the contacts meeting the search condition are listed. Press the Up and Down direction keys to browse the contacts and select one contact to call. 5.2.1.3 Add New Contact This function enables you to add contacts to the phonebook. To add a contact to the SIM card or the phone: To SIM Card: Add the contact to SIM1.
Jump to date: Navigate to the calendar on the specified date. Go to weekly view : To view the calendar by week Print: You should power on Bluetooth before you print it. 5.4 Services STK STK service is the tool kit of SIM card. This phone supports the service function .The specific items are depended by SIM card and network. Service menu will be auto added to the phone menu when supported by network and SIM card. Internet service This function enables you to view the internet.
¾ Delete all: To delete all bookmarks you chosen ¾ Add new bookmark: To add new website Recent pages: To view websites you visited latest. Offline pages: To store the website of web page Input address: To enter the website ensuring it can be linked Service inbox: To store information by net auto sending Settings: To set the net setup, color setup, advanced setup and PUSH inbox Note: Consulting the local network operator for related fee and specific setup.
GPRS:General grouping wireless business. Press left soft key to perform the following operations: ¾ Name:Edit GPRS account name. ¾ GRPS connection point: Edit GPRS connection point name. ¾ User:Enter the connection account number you’ve applied. ¾ Password:Enter service password provided by network operator. 5.5 Multimedia Audio Player The audio player provides four buttons: Play or Pause, Stop, Back, and Forward, corresponding to the OK direction key, left direction key and right direction key.
movies. Play: To play the movie you chosen. Send: To send this file via Bluetooth or multimedia message. Rename: To rename the video and movies. Delete: To delete the video and movies you chosen. Delete all: To delete video files. Sort by: To rank the video files as your requirement(name, style, time, size) Storage: To store this file to SIM card or the phone. Melody composer Compose the melody all by yourself and play it.
Delete all files: To delete all pictures Storage: Storing pictures to SIM or the phone. Sound recorder The phone support WAV and AMR. The AMR takes the compression algorithm. So in the same memory condition, it has longer recording time than WAV. Because of having super recording time, user can choose recording format to record from “option” which can be stored to the phone memory and memory card.
5.6 Camera This function enables you take a picture you want. Roll the phone to align the camera to the picture and then press OK key, which the picture will be stored in the album. On the top of the screen display quick setup as following: Delaying shoot, night mode, photo quality and photo size. Functions of “option” key as following: Switch to video recorder: Switch to video recorder. Photos: Storing your pictures.
Press left soft key to enter record status. Scan: click
¾ ¾ ¾ ¾ ¾ ¾ Manual input: Input any frequency between 87.5 and 108.0. Preset auto search: Search channels automatically. Settings: Set on or off of the background play list and the loudspeaker of the phone. Record: To record new files. Append: To make additional record for assigned files of last-level directory. File list: Show a list of files you’ve reserved. 5.
instructions of games. 5.12 Facebook A value-added business embedded in the phone. 5.13 Ebuddy A value-added business embedded in the phone. 5.14 Alarm Five alarm clocks are set but deactivated by default. You can activate one, multiple or all of them as needed. For each alarm clock, the ringing date and the ringing time can be set. When the preset alert time is up, the mobile phone gives off an alert tone whereas the current date and time blinks on the screen.
5.16 Calculator Select Clear to clear the last inputs or results or hold Clear to clear all the inputs. Select OK to obtain the calculation results. Note: This calculator provides limited precision and is only applicable to simple arithmetic calculation. 5.17 File Manager The phone provides a certain space for users to manage files and supports the T-Flash card. The capacity of the T-Flash card is selectable.
¾ Sort by: To rank stored files. Displaying as ranked Select a file and then press Options to perform the following operations for different type of files: View/Play: View or play the selected file. This option may vary with the type of the file selected. Use as: To use pictures as wallpaper, screen saver, startup screen, shutdown screen or incoming picture. Send: To send files as message, email and Bluetooth. Details: Show the date and size of the selected file. Rename: Rename the selected file.
5.18 Manage Connections Bluetooth ¾ ¾ ¾ ¾ ¾ ¾ Activate: To activate or deactivate Bluetooth as needed. Inquiry audio device: To inquiry audio devices automatically. Inquiry new device: To inquiry new devices automatically. Active devices: To active devices. Settings: To set on visibility, change device name audio path and so on. About: It includes the information of the Bluetooth in this mobile phone. Dual SIM Card Settings Dual SIM open: Both SIM cards are standby if you set this option.
SIM card is registered. When Network selection mode is set to Manual, you need to select the network operator's network where the SIM card is registered. Preferences: Select the preferred networks. By default, the network where the current SIM card is registered will be displayed. Select Options or press the Left soft key to perform the following operations: ¾ Add from list: Add a network from the list of all the available PLMN networks. ¾ New: Add a preferred network.
support. Change password: To change the password. Phone lock: The function enables you to lock/unlock the phone. Entering password to switch on or off the phone. Password is required when the phone is locked. The password is 4 to 8 digits. Auto keypad lock: The function enables you to lock/unlock the keypad. Setting the auto locking time that 5s, 30s, 1min or 5mins is available. The keypad will be auto locked with no operation during the period. Change password: to change the password.
time. UART settings: Select SIM1 or SIM2. Misc. Settings: Set LCD backlight duration of the phone. Restore Factory Settings Choose Settings > Restore factory settings to restore the factory settings. Input the phone lock code and then select OK or press the Left soft key. Note: The initial phone lock code is 1122. 5.20 Call center Call history of SIM card 1 SIM1 Missed Calls You can view a list of the latest missed calls.
Delete SIM1 Call Log You can delete the latest call records. Choose Delete SIM1 call log and then select to delete all the numbers in the call history, or delete only the numbers in the missed calls list, the dialed calls list or the received calls list. SIM1 Call Time Choose SIM1 call time to view the last call time, the total time of all dialed calls and the total time of all received calls, and/or to reset all the time. Last call time: View the time duration of the last call.
input. Note: The call cost function relates to the SIM card. Some SIM cards do not support this function. The PIN2 is provided by the network operator. To obtain the PIN2, contact the network operator. SIM1 SMS Counter Choose SIM1 SMS counter to set the number of short messages sent and the number of short messages received. Sent: Reset the number of short messages sent. Received: Reset the number of short messages received. Note: This function does not relate to the SIM card.
by the network is chosen. Note: This function relates to the network. If you select Hide ID, dialing may fail. Therefore, make sure that calls can be normally dialed before you choose Hide ID. ◆ Call waiting ¾ Activate: After you choose Activate, the mobile phone will contact the network. A moment later, the network will make a response and send a message to acknowledge your operation.
- Activate: Input the diverted-to number and then activate the selected call divert function. - Deactivate: Deactivate the selected call divert function. - Query status: Query the network to obtain the current status of the selected call divert function. The mobile phone will contact the network. A moment later, the network will make a response and send the results to the mobile phone. ¾ Divert all data calls: Divert all data calls. This function requires the network operator's support.
home PLMN country. ¾ Incoming calls barring All calls: Bar all incoming calls. If this option is set, the mobile phone cannot receive any call. When roaming: Bar all incoming calls when roaming. If this option is set, the mobile phone cannot receive any call when roaming outside the home PLMN. For each call barring option, you can further perform the following operations: - Activate: Input the call barring code to activate the selected call barring function.
phone will automatically redial the number a moment later if the called party does not reply. The number of auto redial times can be set to a maximum of 10. In the auto redial period, you cannot dial other numbers. To end the auto redial process, press the End key. Note: This function requires support from the network operator to which the SIM card is registered. IP dial: Activate or deactivate the IP dial function and add or edit IP numbers. Call time display: To display call time or not in a call.
Type: To set words, italic text. Scroll: To set the text as page or row. Auto scroll: To switch on or off, open auto scroll to read text as page or row automatically. Scroll speed: To set the speed of scrolling. Full screen: To choose switch on or off full screen to read text. Choose stored position: To choose files of phone and memory card. Note: If the memory card is not available, phone is the default item.
World clock To view city of each time zone, corresponding date and time will display at the bottom of the screen. Press navigation key to choose to view cities. Press Left soft key to switch on or off daylight saving time of other cities. Currency convert To store exchange rate, press “OK”, then choose exchange rate setup. Input one rate and press OK. Entering the money amount and press OK, and then choosing exchange to foreign currency. 5.
Tone setup: Set the incoming call tone, power-on prompt tone, power-off prompt tone, message tone, and keypad tone. Volume: Set the volume of the conversation tone, the ring tone, the keypad tone. Alert type: Select ring, vibrate, ring and vibrate, or ring after vibrate mode. Ring type: Set the ring type to Single, Repeat or Ascending. Extra tone: Activate or deactivate the warning tone, error tone, network connection tone, and conversation start tone.
6 6.1 Appendix Appendix 1:Troubleshooting If you find exceptions when operating the mobile phone, restore the factory settings and then refer to the following table to solve the problem. If the problem persists, contact the distributor or service provider. Fault Cause Solution The SIM card Contact your network service provider is damaged. The SIM card is not in Check the SIM card SIM card error position. The metal face of the Clean the SIM card with a clean cloth SIM card is polluted.
Poor received signal quality Signals are obstructed. For instance, radio waves cannot be effectively transmitted nearby a high building or in a basement.
The mobile phone cannot be powered on The battery energy is exhausted.
The mobile phone is not in a service area of the GSM network The battery cannot be charged The signal is weak The charging voltage does not match the voltage range indicated on the charger An improper charger is used Poor contact Move to the network operator's service area Move to a place where the signal quality is high Ensure the charging voltage matches the voltage range indicated on the charger Use the charger specially designed for the mobile phone Ensure the charger plug is in good contact with
FCC RF EXPOSURE INFORMATION: WARNING!! Read this information before using your phone In August 1986 the Federal Communications Commission (FCC) of the United States with its action in Report and order FCC 96-326 adopted an updated safety standard for human exposure to radio frequency (RF) electromagnetic energy emitted by FCC regulated transmitters. Those guidelines are consistent with the safety standard previously set by both U.S. and international standards bodies.
RF Exposure Information: FCC RF Exposure requirements: The highest SAR value reported under this standard during product certification for use next to the body with the minimum separation distance of 1.5cm is 0.623W/kg, next to the head is 1.006W/kg. This transmitter must not be collocated or operating in conjunction with any other antenna or transmitter. This device complies with part 15 of the FCC rules.