DynaPredict - Quick Start Guide DynaPredict Manual - Quick Start - Version 3 – September 2022 Public Document
Table of Contents 1 2 3 4 5 6 Introduction_________________________________________ Accessing the system________________________________ Structuring the Asset Tree________________________ Positioning the DynaLoggers________________________ Mounting___________________________________________ Registering a DynaLogger___________________________ DynaPredict Manual - Quick Start - Version 3 – September 2022 Public Document 03 05 07 08 10 13 02
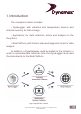
1. Introduction The complete solution includes: • DynaLogger, with vibration and temperature sensors and internal memory for data storage. • Application, for data collection, action and analysis on the shop floor; • Web Platform, with historic data and diagnostic tools for data analysis. In addition, a DynaGateway could be added to the solution in order to automate data collection from the DynaLoggers and send the data directly to the Web Platform.
The flowchart below shows a basic step-by-step outline of how the solution works: Figure: Flowchart Vision DynaPredict Manual - Quick Start - Version 3 – September 2022 Public Document 04
2. Accessing the system Install Mobile App To configure data loggers, spots and machines, it is necessary to download the "DynaPredict" app. The app is available on Android (version 5.0Ⓡ or above) and iOS (version 11 or above) devices and is compatible with smartphones and tablets. To install the app, simply search for "dynapredict" on the app store of the device (Google Play Store/App Store) and complete the download.
Access to the Web Platform To create the hierarchical sensor and gateway installation structure, as well as access the entire history of vibration and temperature measurements collected by the DynaLoggers, users have a complete Web Platform at their disposal. Figure: DynaPredict Web Platform - Login Screen Simply access the link https://dyp.dynamox.solutions and log in to the system with your access credentials.
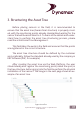
3. Structuring the Asset Tree Before placing sensors in the field, it is recommended to ensure that the asset tree (hierarchical structure) is properly created, with the monitoring points already standardized waiting for the sensor that will be associated to it. To learn all the details and understand how to perform the asset tree structuring process, please read the article Asset Tree Manegement. This facilitates the work in the field and ensures that the points are registered in the correct structure.
With these procedures completed, the user can finally go into the field to perform the physical installation of the sensors on the machines and components registered in the asset tree. After finishing these procedures, the user can finally go into the field and perform the physical installation of the sensors on the machines and components registered in the asset tree. More details regarding this process are present in the following articles of this section. 4.
Figure: Axes orientation Left: DynaLogger TcA+. Right: DynaLoggers HF and HF+ The images above show the orientation of the DynaLogger axes. This can also be seen on the label attached to the devices. The correct positioning of the device should take into account the axis and orientation of the machine. 1. The DynaLogger must be installed in a rigid part of the machine, avoiding regions that may present localized resonance; 2.
5. Mounting The mounting method is one of the most critical factors for measuring vibration. A rigid attachment is essential for avoiding false readings and data. Depending on the type of machine and position, different mounting methods could be used. To get the best results from the DynaPredict solution, screw mounting is recommended. To do this, the installation surface must be prepared first, as described below.
surface. Once this is done, tighten the screw and spring washer* supplied with the product, applying a tightening torque of 11Nm. * Use of spring washer is critical to achieving reliable results.
For these cases, in addition to the traditional surface preparation described above, chemical cleaning must also be carried out on site. Chemical cleaning Using an appropriate solvent, remove any oil or grease residue that may be at the installation site. After surface preparation, the glue preparation process should begin.
Press the DynaLogger on the selected location, orienting the axes (drawn on the product label) in the most appropriate way. Wait for the curing time indicated in the manual of the glue manufacturer itself, in order to guarantee the good fixation of the DynaLogger. 6. Registering a DynaLogger - Getting Started After attaching the DynaLogger in the desired location, you must associate its serial number* with the spot created earlier in the asset tree.
The process of registering a DynaLogger to a spot is done via Mobile Application. Therefore, make sure you have downloaded the App on your smartphone before going to the field to install the sensor. By logging into the App with your access credentials, all sectors, machines, and their divisions will be visible, as previously created in the asset tree via the Web Platform.
Body-worn Operation comply with RF exposure requirements, a minimum separation distance of 20cm must be maintained between the user’s body and the handset, including the antenna. Thirdparty belt-clips, holsters, and similar accessories used by this device should not contain any metallic components. Bodyworn accessories that do not meet these requirements may not comply with RF exposure requirements and should be avoided. Use only the supplied or an approved antenna.
Dynamox - Exception Management Parque Tecnológico Alfa José Carlos Daux, KM 01 Zip Code: 88030-909 Florianópolis / Santa Catarina - Brazil +55 (48) 3024 - 5858 support@dynamox.