
User's Manual


5
4
We’ve tried to make this watch as easy as possible to use. Great care has
been taken to make the button functions consistent and clear. Even if you
don’t read the whole manual, you should be able to work your watch if you
understand, in general, how the buttons work.
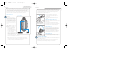
BUTTON FUNCTIONS, LEFT SIDE
ADJUST/EXIT
Think of ADJUST/EXIT as the button to use when you want to adjust, set or
reset something. For example, if you want to adjust the time, or reset the
chronograph. This button is a little different than the other buttons
because you usually have to press and hold it for a few seconds. This is so
you don’t accidentally reset or adjust something.
MODE/NEXT
The MODE/NEXT button will normally move you to the next mode. When
you are making adjustments or setting something, the MODE/NEXT button
will move you to the next adjustable element.
GETTING STARTED
BUTTON FUNCTIONS, RIGHT SIDE
The buttons on the right hand side of the watch have more functions than
the buttons on the left side. For that reason, we’ve included all the details
for quick reference.
START/LAP
You can think of the START/LAP button as the “go,” “plus,” or “move
forward” button. It also functions as an on/off switch in some modes.
• In TIME mode, press to turn the chime on and off.
• In CHRON mode, press to start the chronograph and mark lap
completion.
• In TIMER mode, press to start the countdown timer.
• In GRAPH mode, press to move forward through the list of data points.
• In DATA mode, press to move forward through the list of data points.
• In ALARM mode, press to turn the alarm on and off.
• When making adjustments, press to advance the blinking element.
STOP
The STOP button is the opposite of the START/LAP button. Think of it as the
“stop,” “minus,” or “go backwards” button. This button will also allow you
to alternate selections in some modes.
• In TIME mode, press and hold to select time zone 1 or 2.
• In CHRON mode, press to stop the chronograph and save run data to
memory.
• In TIMER mode, press to stop the countdown timer.
• In ALARM mode, press to select alarm 1 or 2.
• In DATA mode, press to select run number.
• When making adjustments, press to reverse the blinking element.
ELECTROLITE BUTTON
The ELECTROLITE button is used to turn on the light.
If you press and hold the ELECTROLITE button, you can make the light come
on at the press of any button. It’s great for night use. We call it auto-
Electrolite.
S
T
A
R
T
/
L
A
P
A
D
J
U
S
T
/
E
X
I
T
M
O
D
E
/
N
E
X
T
S
T
O
P
H20 RESIST 100M
STOP
START/LAP
MODE/NEXT
ADJUST/EXIT
ELECTROLITE
9328.2- SDM-ENG 6/13/00 5:51 PM Page 4