
User`s manual


6
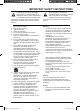
SETTING UP
1/2. Power On/Off switch/AC Power In
Beforeswitchingon,makesureMainsVoltage
matchesyourareasMainsVoltagespecification.
3. Balanced analog Input
Audio Input is via a female XLR connector. The
Input is electronically balanced with following
connections. The connections are printed on
the rear for easy reference.
1 : 0
2 : +
3 : -
12
3
4. Unbalanced analog input (RCA)
Unbalanced Input via RCA. If your audio source
doesn’t have a balanced output use the RCA
input connection
For best results always use only good quality
screened cables and connectors.
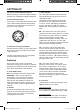
Switches
On the rear of the monitor you will find 6
switches for setting up the monitor for optimum
performance in different acoustic environments.
Each switch is explained in the following.
5. Power Mode switch
ON - The speaker is active and ready to play.
ON/SLEEP - After if no input signal has
been present on the inputs for 20 minutes
the speakers enters the “Sleep” mode and
saves power. The speaker is invoked and
ready to play when a signal is present on the
input again. Wake-up time is approximately 2
seconds.
6. Remote
Usually active speakers are at max level all
thetime.ByconnectingtheDynaudioExternal
Volumecontrol,thevolumeisconveniently
controllable via the remote.’
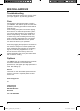
7. Filter switches
LF - This switch controls the bass gain level
using shelf-type EQ. The level can be set to
+2dB,0dBor-2dB.
This filter is used to adjust for the proximity
of boundaries, so if positioned close to wall
orcorner,usethe-2dBsetting.Ifpositioned
farfromwallsusethe+2dBor0position,
depending on other equipment, and personal
taste.
MF - This switch sets a notch filter, used to
compensate for the acoustic effect of a console.
Such placement usually results in a response
peakinlowermidrange.TheMFswitch
activates a bell shaped notch filter, which can
compensate.Useeitherthe-2orthe-4dB
setting. You may experiment finding the setting,
which provides the flattest response.
HF - This switch controls the Treble level
and it is used to match the high end of the
monitor to your other electronic equipment, and
your acoustical environment. Use the setting
providing the preferred timbre. If the sound is
toobright;trytosetto-1dBtoreducetrebleby
1dB.Iftoodullsound,use+1dBsettingtoraise
theHighPassby1dB.
HP - This switch sets the lower cut-off
frequency of the monitor. It is used to match
the monitor to a subwoofer. You can select
between 60Hz or 80Hz X-over. Flat is used
in case you do not use a subwoofer to assist
your monitors. When used with a subwoofer
it is recommended to use either 60Hz or
80Hz filter, thus allowing a higher un-distorted
sound-pressure level.
8. Level Trim
Use this switch to match the sensitivity of the
DBM50monitortoyoursource.
High-output Source
If your source has a high output, set switch to
the-10positiontoreducesensitivityby10dB.
Low-output source
If your source has a low output, set switch to
the+4positiontogain4dBmoresensitivity.
DBM50_prelim_2402_2012.indd 6 15-03-2012 14:36:14