
User Manual


5
After listening for a little while, set the "SUB SPEAKER POLARITY" switch on the Adp-2 to
either + or -, selecting the position which gives the most natural and deep bass.
The volume control of the Adp-2 and the Popular/Rock/Classic switches can be adjusted to suit
the nature of each recording.
METHOD 2: USING A SEPARATE PRE-AMPLIFIER AND MAIN AMPLIFIER
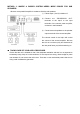
1) Using the usual audio connection cables with
phono plugs, connect the pre-amplifier output to
the left hand LINE IN sockets of the Adp-2.
2) Using similar cables, connect the two
remaining LINE IN terminals of the Adp-2 to the
input sockets of the power amplifier.
3) Put switch (5) to the LINE IN position.
4) Using speaker wire, connect the rear or sub
speakers to the SUB SPEAKER terminals of the
Adp-2.
5) Check, in making these connections, that the correct polarities have been observed (ie the
speaker wire connected to the red or + terminal of the amplifier goes to the red + of each of the
terminals on the Adp-2 and speakers and the negative or - wire to the negative terminals).
6) Position the rear speakers as described above (under METHOD l) and ensure that the volume
controls of the preamplifier and the Adp-2 are at minimum before plugging in the amplifiers and
Adp-2 to the mains and switching on.
7) After listening, try different positions of the “SUB SPEAKERS POLARITY” switch.
NB The Adp-2 has a red warning light on the front panel. This will blink when the SuperStereo
digital processor in the Adp-2 begins to overload and means that the output is distorting. Please
turn down the system’s main volume when this happens. To work well with the 15 watt maximum
output of the Adp-2, the rear speakers should be of adequate sensitivity. They need not, however,
be large: small and miniature speakers of good sensitivity work fine.