DX-32L230A12_11-0911_MAN_EN.
DX-32L230A12_11-0911_MAN_EN.book Page ii Monday, November 21, 2011 10:37 AM ii Dynex DX-32L230A12 32” LCD TV Contents CHILD SAFETY . . . . . . . . . . . . . . . . . . . . . . . . . . . . . . . . . . . . . . . . . . . . . . . . 1 Important Safety Instructions . . . . . . . . . . . . . . . . . . . . . . . . . . . . . . . . . 2 Warnings . . . . . . . . . . . . . . . . . . . . . . . . . . . . . . . . . . . . . . . . . . . . . . . . . . . . . . . . . . . . . .2 Cautions . . . . . . . . . . . . . . . . . . . .
DX-32L230A12_11-0911_MAN_EN.book Page iii Monday, November 21, 2011 10:37 AM iii Checking the digital signal strength . . . . . . . . . . . . . . . . . . . . . . . . . . . . . . . . . . 22 Setting parental controls . . . . . . . . . . . . . . . . . . . . . . . . . . . . . . . . . . . . .23 Setting or changing the password . . . . . . . . . . . . . . . . . . . . . . . . . . . . . . . . . . . . 23 Setting parental control levels . . . . . . . . . . . . . . . . . . . . . . . . . . . . . . . . . . . . . . .
DX-32L230A12_11-0911_MAN_EN.
DX-32L230A12_11-0911_MAN_EN.book Page 1 Monday, November 21, 2011 10:37 AM 1 f CHILD SAFETY It makes a difference how and where you use your flat panel display As you enjoy your new product, keep these safety tips in mind The issue The home theater entertainment experience is a growing trend, and larger TVs are popular purchases. However, TVs are not always supported on the proper stands or installed according to the manufacturer’s recommendations.
DX-32L230A12_11-0911_MAN_EN.book Page 2 Monday, November 21, 2011 10:37 AM 2 DX-32L230A12 Important Safety Instructions Important Safety Instructions 18 The apparatus should not be exposed to dripping or splashing, and no objects filled with liquids, such as vases, should be placed on the apparatus. Warnings Electric shock hazard This symbol indicates that dangerous voltage constituting a risk of electric shock is present within your TV. This label is located on the back of your TV.
DX-32L230A12_11-0911_MAN_EN.book Page 3 Monday, November 21, 2011 10:37 AM Important Safety Instructions DX-32L230A12 • If your TV does not operate normally by following the operating instructions. Adjust only those controls that are covered by the operating instructions because incorrect adjustment of other controls may result in damage and will often require extensive work by a qualified technician to restore your TV to its normal operation. • If your TV has been dropped or damaged in any way.
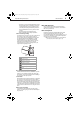
DX-32L230A12_11-0911_MAN_EN.book Page 4 Monday, November 21, 2011 10:37 AM 4 DX-32L230A12 Installing the stand or wall-mount bracket Installing the stand or wall-mount bracket 3 Remove the four screws that secure the stand column to the TV, then remove the column. Notes: • If you plan to wall-mount your TV, do not install the stand. • Store the stand and stand screws in case you decide to use the stand in the future.
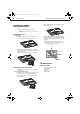
DX-32L230A12_11-0911_MAN_EN.book Page 5 Monday, November 21, 2011 10:37 AM TV components DX-32L230A12 Back HDMI 2 AV IN R AUDIO VIDEO L L AUDIO R AUDIO OUT SERVICE PORT Front 5 L AUDIO R AUDIO DIGITAL OUTPUT # Item Description 1 Remote sensor Receives the signals from the remote control. Do not block. 2 Lights red when your TV is in standby mode. Standby indicator For more information, see “Turning your TV on or off” on page 15.
DX-32L230A12_11-0911_MAN_EN.book Page 6 Monday, November 21, 2011 10:37 AM 6 # DX-32L230A12 Item 10 HDMI2 11 AV IN AUDIO OUT L/R 12 (analog audio out) TV components Description Remote control Connect an HDMI device to this jack. An HDMI cable carries both video and sound. You do not need to make an audio connection for an HDMI device. For more information, see “Using HDMI (best)” on page 10, or “Using DVI (same as HDMI but requires a sound connection)” on page 10.
DX-32L230A12_11-0911_MAN_EN.book Page 7 Monday, November 21, 2011 10:37 AM Making connections # 9 Button Description VOL+/VOL– Press to increase or decrease the volume. 10 Video Input Press to select the input source. VIDEO—Press to select the device connected to the AV IN jacks. HDMI—Press one or more times to select the device connected to the HDMI 1 or HDMI 2 jack. TV—Press to select the TV input source. COMP—Press to select the device connected to the COMPONENT video jacks.
DX-32L230A12_11-0911_MAN_EN.book Page 8 Monday, November 21, 2011 10:37 AM 8 DX-32L230A12 Connection type and jack Making connections Connecting a cable or satellite box Cable connectors Digital optical audio (SPDIF) Analog audio VGA (computer) video and audio Many cable or satellite TV boxes have more than one connection type. To get the best video, you should use the best connection type available. For more information, see “What connection should I use?” on page 7.
DX-32L230A12_11-0911_MAN_EN.book Page 9 Monday, November 21, 2011 10:37 AM Making connections 4 Connect the other end of the HDMI cable to the HDMI1 or HDMI2 jack on the back or side of your TV. L AU DIO R R HDMI 2 SERVICE PORT Side of TV R VIDEO L L AUDIO 3.5 mm audio cable Cable or satellite box HDMI cable with HDMI-DVI adapter 5 Connect a 3.5 mm audio cable (not provided) to the PC AUDIO IN jack on the back of your TV and to the AUDIO OUT jack on the cable or satellite box.
DX-32L230A12_11-0911_MAN_EN.book Page 10 Monday, November 21, 2011 10:37 AM 10 DX-32L230A12 Making connections Connecting an antenna or cable TV (no box) To connect an antenna or cable TV (no box): 1 Turn off your TV and all connected equipment. 2 Connect a coaxial cable (not provided) to the ANT/CABLE IN jack on the back of your TV and to the antenna or cable TV wall jack. Back of TV 3 Turn on the DVD or Blu-ray player, then set it to the output mode.
DX-32L230A12_11-0911_MAN_EN.book Page 11 Monday, November 21, 2011 10:37 AM Making connections DX-32L230A12 Using component video (better) Using composite video (good) To connect a DVD or Blu-ray player using component video: To connect a DVD or Blu-ray player using composite video: audio output is analog. 3 Connect an audio cable (not provided) to the L and R audio jacks on the back of your TV and to the L/R AUDIO OUT jacks on the DVD or Blu-ray player.
DX-32L230A12_11-0911_MAN_EN.book Page 12 Monday, November 21, 2011 10:37 AM DX-32L230A12 Making connections Connecting a VCR Connecting a camcorder or game console To connect a VCR: To connect a camcorder or game console: 1 Make sure that your TV’s power cord is unplugged and the VCR is turned off. 2 Connect a composite cable (provided) to the VIDEO and L and R audio jacks on the side of your TV and to the AV OUT jacks on the VCR.
DX-32L230A12_11-0911_MAN_EN.book Page 13 Monday, November 21, 2011 10:37 AM Making connections DX-32L230A12 Connecting a computer 13 Using HDMI Tip: Some computers have an HDMI jack. You can use an HDMI cable to connect the computer for a better picture. Using VGA To connect a computer using VGA: 1 Make sure that your TV’s power cord is unplugged and the computer is turned off. 2 Connect a VGA cable (not provided) to the PC IN VGA jack on the back of your TV and to the VGA jack on the computer.
DX-32L230A12_11-0911_MAN_EN.book Page 14 Monday, November 21, 2011 10:37 AM 14 DX-32L230A12 Using the remote control 2 Connect a digital optical audio cable (not provided) to DIGITAL OUTPUT jack on the back of your TV and to the digital optical audio jack on the digital home theater system. 2 Insert two AAA batteries into the battery compartment. Make sure that you match the + and – symbols on the batteries with the + and – symbols in the battery compartment. 3 Replace the battery cover.
DX-32L230A12_11-0911_MAN_EN.book Page 15 Monday, November 21, 2011 10:37 AM Understanding the basics 3 Press or to highlight a language, then press ENTER. The Choose Your Time Setting screen opens. If you selected Home Mode, the Choose Your TV Source screen opens.
DX-32L230A12_11-0911_MAN_EN.book Page 16 Monday, November 21, 2011 10:37 AM 16 DX-32L230A12 Understanding the basics Selecting the video input source Audio menu (TV mode) To select the video input source: 1 Turn on your TV, then press INPUT. The INPUT SOURCE list opens.
DX-32L230A12_11-0911_MAN_EN.book Page 17 Monday, November 21, 2011 10:37 AM Adjusting the picture Navigating the menus MENU 17 DX-32L230A12 Press MENU to open the on-screen menu. Press or to move the cursor on the screen or to adjust a selected item. Press or to select menu options.
DX-32L230A12_11-0911_MAN_EN.book Page 18 Monday, November 21, 2011 10:37 AM 18 DX-32L230A12 Adjusting the picture • Advanced Video—Opens the Advanced Video sub-menu where you can adjust additional video options. Picture Color Temperature Aspect Ratio Noise Reduction Overscan Advanced Contrast Audio Settings Channels Cool Auto Middle On • Adaptive Contrast–Automatically adjusts picture detail and brightness. You can select On or Off.
DX-32L230A12_11-0911_MAN_EN.book Page 19 Monday, November 21, 2011 10:37 AM Adjusting the sound 5 Press or to highlight an option, then press or to adjust the option. You can select: • Auto Adjust—Automatically adjusts the image settings such as position and phase. • H. Position—Moves the image right or left. • V. Position—Moves the image up or down. • Clock—Adjusts the sample frequency. • Phase—Adjusts the focus of stable images.
DX-32L230A12_11-0911_MAN_EN.book Page 20 Monday, November 21, 2011 10:37 AM 20 DX-32L230A12 Changing channel settings 4 Press EXIT to close the menu. After pressing EXIT, the picture turns off in approximately 5 to 10 seconds. Notes: • Audio only works only when the input source is TV and your TV is receiving a broadcast signal. • To exit audio only mode, press any button. When you exit audio only mode, the Audio Only option is automatically reset to Off.
DX-32L230A12_11-0911_MAN_EN.book Page 21 Monday, November 21, 2011 10:37 AM Changing channel settings 2 Press or to highlight Channels, then press . The Channels menu opens. Picture Audio On Off MENU Back EXIT Exit 3 Press or to highlight Add/Skip Channels, then press ENTER. The channel list opens. Channel No. 1.2 2.0 2.1 2.2 2.10 6.0 7.0 11.1 12.0 14.0 Audio Channel Name Show MBC DTV Back EXIT Exit 4 Press or to highlight the channel you want to hide, then press ENTER.
DX-32L230A12_11-0911_MAN_EN.book Page 22 Monday, November 21, 2011 10:37 AM 22 DX-32L230A12 Changing channel settings Adding or changing a channel label Checking the digital signal strength If a channel is not already labeled, you can label the channel to make it easier to identify. You can also relabel a channel that is already labeled. To add or change a channel label: 1 Press MENU. The on-screen menu opens with the Picture menu displayed.
DX-32L230A12_11-0911_MAN_EN.book Page 23 Monday, November 21, 2011 10:37 AM Setting parental controls 23 DX-32L230A12 Setting parental controls Parental controls let you prevent your children from watching inappropriate material on TV. When set, parental controls read the rating of the program (with some exceptions, such as news and sports) and deny access to programs that exceed the ratings level you select. To watch programs that exceed the selected rating, you must enter the password.
DX-32L230A12_11-0911_MAN_EN.book Page 24 Monday, November 21, 2011 10:37 AM 24 DX-32L230A12 Setting parental controls Setting parental control levels You can set parental control levels for the U.S. and Canada. The following procedure shows how to set controls for U.S. TV and movie ratings. You use similar steps for controlling Canadian TV ratings. Parental control settings are only applicable to programs that have a rating signal.
DX-32L230A12_11-0911_MAN_EN.book Page 25 Monday, November 21, 2011 10:37 AM Setting parental controls Blocking unrated TV Ratings U.S. TV ratings (age-based) None Not rated TV-Y All children TV-Y7 Children over seven years of age TV-G General audiences TV-PG Parental guidance suggested TV-14 Parents strongly cautioned TV-MA Mature audiences only U.S.
DX-32L230A12_11-0911_MAN_EN.book Page 26 Monday, November 21, 2011 10:37 AM 26 DX-32L230A12 Setting parental controls 5 Press or to highlight System Lock, then press or to select On. 3 Press ENTER. The Enter Password screen opens.
DX-32L230A12_11-0911_MAN_EN.book Page 27 Monday, November 21, 2011 10:37 AM Using closed captioning 2 Press or to highlight Settings, then press . The Settings menu opens with Parental Controls highlighted. Picture Audio Settings Channels 6 Press or to highlight RRT Setting, then press ENTER. If the program is broadcast with RRT5 rating information, the information is downloaded automatically and can be used for parental controls.
DX-32L230A12_11-0911_MAN_EN.book Page 28 Monday, November 21, 2011 10:37 AM 28 DX-32L230A12 Using closed captioning 3 Press or to highlight Closed Caption, then press ENTER. The Settings-Closed Caption menu opens with CC Mode highlighted.
DX-32L230A12_11-0911_MAN_EN.book Page 29 Monday, November 21, 2011 10:37 AM Adjusting time settings 2 Press or to highlight Settings, then press . The Settings menu opens. Picture Audio Settings Channels Parental Controls Time Closed Caption Menu Settings Computer Settings Input Label System Info Restore Default Move 29 DX-32L230A12 • • • • • Font Edge Color–Selects the color for the edges. Font Color–Selects the color for the text. Background Color–Selects the color for the background.
DX-32L230A12_11-0911_MAN_EN.book Page 30 Monday, November 21, 2011 10:37 AM 30 DX-32L230A12 Adjusting menu settings 4 Press ENTER, the Settings-Date/Time menu opens. Picture Audio Settings Channels Picture Auto Pacific Off 2011 July 15 09 : 05 AM Mode Time Zone DST Year Month Day Time Move 2 Press or to highlight Settings, then press . The Settings menu opens.
DX-32L230A12_11-0911_MAN_EN.book Page 31 Monday, November 21, 2011 10:37 AM Adjusting menu settings DX-32L230A12 2 Press or to highlight Settings, then press . The Settings menu opens. Picture Audio Move Select MENU Back Exit EXIT Audio Settings Channels Move Select MENU Back EXIT Exit Create labels for the devices connected to your TV. 3 Press or to highlight Menu Settings, then press or ENTER. The Settings-Menu Settings menu opens with Menu Language highlighted.
DX-32L230A12_11-0911_MAN_EN.book Page 32 Monday, November 21, 2011 10:37 AM 32 DX-32L230A12 Restoring settings to default Displaying system information 2 Press or to highlight Settings, then press . The Settings menu opens. To display system information: 1 Press MENU. The on-screen menu opens with the Picture menu displayed.
DX-32L230A12_11-0911_MAN_EN.book Page 33 Monday, November 21, 2011 10:37 AM Troubleshooting DX-32L230A12 Troubleshooting Warning: Do not try to repair your TV yourself. Contact authorized service personnel. Problem • Try another channel. The station may be experiencing problems. • Adjust the color saturation. See “Adjusting the TV picture” on page 17. • Make sure that the video cables are connected correctly and securely to the back of your TV.
DX-32L230A12_11-0911_MAN_EN.book Page 34 Monday, November 21, 2011 10:37 AM 34 DX-32L230A12 Problem Good picture, but no sound. Solution • • • • • • • • Increase the volume. Make sure that the sound is not muted. Unplug the headphones. Make sure that the correct audio mode is selected. Make sure that the audio cables are connected correctly and securely to the back of your TV. Make sure that the antenna or cable TV is connected correctly and securely.
DX-32L230A12_11-0911_MAN_EN.book Page 35 Monday, November 21, 2011 10:37 AM Troubleshooting Problem DX-32L230A12 Solution One or more channels do not display. • Make sure that the channels are not blocked. See “Setting parental control levels” on page 24. • Make sure that the channels are not hidden. The channel may have been deleted from the channel list. You can tune to the channel by pressing the number buttons or you can add the channel back to the channel list. See “Hiding channels” on page 20.
DX-32L230A12_11-0911_MAN_EN.book Page 36 Monday, November 21, 2011 10:37 AM 36 DX-32L230A12 Specifications Specifications Inputs DX-32L230A12 Specifications are subject to change without notice. HDMI/DVI Warranty DX-32L230A12 Component video Composite video Shared audio (component and composite) S-Video PC/VGA 3.5mm PC audio input USB Parts: 1 year Labor: 1 year Dimensions and weight DX-32L230A12 Without stand: 30.6 x 19.9 x 3.5 in. (77.6 x 50.5 x 9.0 cm) With stand: 30.6 x 21.5 x 10.0 in. (77.
DX-32L230A12_11-0911_MAN_EN.book Page 37 Monday, November 21, 2011 10:37 AM Programming universal remote controls Programming universal remote controls DX-32L230A12 37 Dynex TV codes for universal remote controls (for all Dynex TVs manufactured after Jan. 1, 2007) Universal remote control makes and models Programming a different universal remote control You can operate your Dynex TV with a new or existing universal remote control.
DX-32L230A12_11-0911_MAN_EN.book Page 38 Monday, November 21, 2011 10:37 AM 38 DX-32L230A12 • Connect the equipment into an outlet on a circuit different from that to which the receiver is connected. • Consult the dealer or an experienced radio/TV technician for help. FCC warning Changes or modifications not expressly approved by the party responsible for compliance with the FCC Rules could void the user’s authority to operate this equipment.
DX-32L230A12_11-0911_MAN_EN.book Page 39 Monday, November 21, 2011 10:37 AM Legal notices One-year limited warranty Dynex Televisions Definitions: Dynex Products (“Dynex”) warrants to you, the original purchaser of this new Dynex-branded television (“Product”), that the Product shall be free of defects in the original manufacturer of the material or workmanship for a period of one (1) year from the date of your purchase of the Product (“Warranty Period”).
DX-32L230A12_11-0911_MAN_EN.book Page -1 Monday, November 21, 2011 10:37 AM www.dynexproducts.com US and Canada Market - (800) 305-2204 Distributed by Best Buy Purchasing, LLC 7601 Penn Ave. South, Richfield, MN 55423 U.S.A. © 2011 BBY Solutions, Inc. All rights reserved. DYNEX is a trademark of BBY Solutions, Inc. Registered in some countries. All other products and brand names are trademarks of their respective owners.