37" LCD TV Televisor con pantalla LCD de 37" DX-LCD37-09 US ER GUI DE • GUÍ A DEL US UA RIO
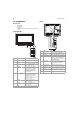
Contents Dynex DX-LCD37-09 37" LCD TV Contents Important safety instructions........................................................... 4 TV components ................................................................................ 6 Front and side............................................................................ 6 Back........................................................................................... 6 Remote control ...................................................................
Contents f CHILD SAFETY It makes a difference how and where you use your flat panel display As you enjoy your new product, keep these safety tips in mind The issue The home theater entertainment experience is a growing trend, and larger TVs are popular purchases. However, TVs are not always supported on the proper stands or installed according to the manufacturer’s recommendations. We and the consumer electronics industry are committed to making home entertainment enjoyable and safe.
Important safety instructions CAUTION RISK OF ELECTRIC SHOCK DO NOT OPEN Warning: To reduce the risk of electric shock, do not remove the cover or back. No user serviceable parts inside. Refer servicing to qualified service personnel. Warning: To reduce the risk of fire or electric shock, do not expose your TV to rain or moisture. Warning: To prevent electric shock, match the wide blade on the power cord plug to the wide slot on an electric outlet.
Important safety instructions Safety check After completing any service or repair to this TV, ask the service technician to perform routine safety checks to determine that your TV is in correct operating condition. Power source Operate your TV only from the type of power source indicated on the marking label. If you are not sure of the type of power supplied to your home, consult your TV dealer or local power company.
TV components TV components Back Accessories • Remote control • AA batteries (2) • User guide Note: Cables are not supplied. You can purchase cables at most electronics stores. Front and side 1 2 3 4 5 6 1 2 3 4 5 6 7 8 INPUT CHANNEL MENU Component Description 1 Remote control sensor Receives signals from the remote control. Do not block. 2 POWER Press to turn your TV on or off. 3 INPUT Press to select the video input source.
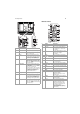
TV components Remote control 1 11 12 2 MTS/SAP 13 FREEZE 14 3 ZOOM MENU 4 5 6 7 8 PC-IN AUDIO COMPONENT 1 Y R R AUDIO AUDIO Pb 1 2 Pr VIDEO 1 COMPONENT 2 Y 6 9 7 10 R 3 4 AUDIO L Pr 5 VIDEO 8 Jack Description 1 PC-IN AUDIO Connect the computer audio jack to this jack. 2 AUDIO (for VIDEO1) Connect the audio for an analog device to these jacks. 3 VIDEO1 Connect an analog video device to this jack. The analog video cable does not carry audio.
Setting up your TV Connecting an antenna or basic cable # Button Description 17 CH Press to go to the next or previous channel in the channel list, or to select the external input mode.
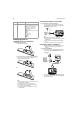
Setting up your TV Connecting a component video device Connecting an HDMI device You can connect two HDMI devices. You can connect two component video devices. To connect an HDMI device: To connect a component video device: • Connect one end of an HDMI cable to the HDMI OUT jack on the HDMI device, then connect the other end of the cable to the HDMI 1 INPUT or HDMI 2 INPUT jack on the back of your TV.
Setting up your TV Connecting an S-Video device You can connect two S-Video devices. Connecting a camcorder, game, or VCR To connect a camcorder, game, or VCR: To connect an S-Video device: 1 Connect one end of an S-Video cable to the S-VIDEO OUT jack on the S-Video device, then connect the other end of the cable to the S-VIDEO (VIDEO 1) or S-VIDEO (VIDEO 2) jack on the back of your TV.
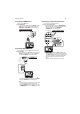
Using your TV Connecting an analog audio device To connect an analog audio device: • Connect one end of an audio cable to the AUDIO IN L and R jacks on the audio device, then connect the other end of the cable to the AUDIO OUT jacks on the back of your TV. AUDIO IN L R Analog audio device Setting up for the first time The first time you turn on your TV, a quick setup program starts that lets you select a language for the on-screen menu, select the TV signal source, and scan for available channels.
Using your TV Opening the on-screen menu To open the on-screen menu: 1 Press MENU. The on-screen menu opens. Scanning for channels The first time you turned on your TV, your TV scanned for channels. You only need to re-scan for channels if: • You change the TV signal source. For example, you change from Air to Cable. • You move your TV to a different viewing area. • Additional channels have become available since the initial scan. • You want to restore DTV channels you have deleted.
Using your TV Notes: If you connect cable TV without a cable box, you may need to contact your cable TV provider for help. If you press POWER or MENU during the scan, the scan will be canceled. For digital channels, if you unplug the power cord without turning off your TV first, the channel list information may be lost. Deleting channels from the channel list If the channel list includes channels you do not want, you can delete the channels from the list.
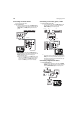
Using your TV 2 Press or to select LANGUAGE, then press ENTER. 2 Press or Language Select the language for setup display. to select PICTURE, then press ENTER. Picture Picture Mode English Dynamic Brightness 30 Elija el idioma de ajuste. Español Contrast 60 Sélectionner langue écran config. Français Color 36 Tint 0 Sharpness 0 Reset Settings Color Temp. Neutral Off Energy Saving 3 Press or to select English, Español, or Français, then press ENTER. 4 Press MENU to close the menu.
Using your TV • Surround–Press or to select On or Off. • Reset Settings–Press ENTER to reset the sound settings to the factory default. 4 Press MENU to close the menu. To display analog channel information: • Press DISPLAY. The following information appears: 6 Selecting the video input source SAP / STEREO 480i 480i To select the video input source: • Press INPUT or CH repeatedly to select the video input source.
Using your TV Checking the antenna signal strength For a 16:9 video signal To check the antenna signal strength: 1 Press MENU. The on-screen menu opens. Normal Zoom Cinema Wide • Normal–Squeezes the picture horizontally to be displayed at 4:3. Black bars appear on the sides of the picture. • Zoom–Enlarges the center of the picture. The outer part of the picture is cropped. • Wide—Displays the picture at its original size.
Using your TV Freezing the picture 5 Press MENU to close the menu. Using analog closed captioning To freeze the picture: • Press FREEZE. The picture freezes on the screen, but the sound continues to play. Press any button except POWER to return to normal viewing. To use analog closed captioning: 1 Press MENU. The on-screen menu opens. Notes: If your TV does not detect a signal or the signal is protected, the picture freezes and the sound is muted.
Using your TV • Text1 through Text4—Displays text in a large black box that may obstruct the picture. Text1 normally displays the text for the audio in the same language as the audio. Text3 normally displays the text for the audio in a second language. Text2 and Text4 are rarely used and usually display information provided by the broadcaster like news or weather reports. 6 Press MENU to close the menu.
Using your TV Edge Color Font Size CC Style CC Style Closed Caption Closed Caption User Setting User Setting Font Style Font Style White Font Size Large Font Size Black Font Color Middle Font Color Red Font Opacity Small Font Opacity Green Back Color Back Color Blue Back Opacity Back Opacity Yellow Edge Color Edge Color Magenta Edge Type Edge Type Cyan Font Color Edge Type CC Style Closed Caption CC Style User Setting Closed Caption User Setting Font Style White
Using your TV 4 Press the number buttons to enter the four-digit password. If you have not set a password, enter 0000. V-chip Setting the TV Rating Many TV programs have ratings set by broadcasters. You can blick TV programs based on these ratings. To set the TV rating: MPAA Rating 1 Press TV Rating or to select TV Rating, then press ENTER. Downloadable Rating V-chip Clear Downloadable Rating New Password FV V 5 Press or to select a parental control option, then press ENTER.
Using your TV Changing the password 5 Press or To change the password: to select New Password, then press ENTER. V-chip 1 Press MENU. The on-screen menu opens. Enter password. Confirm password. PIN Code 2 Press or to select DETAIL, then press ENTER. Back Adjusting the computer image Closed Caption To adjust the computer image: V–chip 1 Press MENU. The on-screen menu opens.
Maintaining • Clock—Press or to stabilize the image. For best results, adjust the Phase setting before you adjust the Clock setting. • Phase—Press or to improve image clarity. 5 Press MENU to close the menu. Selecting the HDMI audio mode You can select the HDMI audio mode for the device connected to the HDMI 1 IN jack only. To select the HDMI audio mode: 1 Press MENU. The on-screen menu opens. Maintaining Cleaning • Before cleaning the screen, unplug your TV from the power outlet.
Troubleshooting Problem Solution Problem Solution No color. Make sure that the antenna or cable TV is connected correctly and securely. Ghosts in picture. Make sure that the antenna or cable TV is connected correctly and securely. If you are using an outside antenna, check the condition of the wiring and connections. If you are using an outside antenna, check the condition of the wiring and connections. Try another channel. The problem might be limited to the broadcasting station.
Troubleshooting Problem Solution Problem Solution No reception of digital signals. Make sure the auto channel scan has been completed. The auto channel scan must be completed when you set up your TV for the first time or move it to a location where previously unavailable channels are broadcast. Remote control does not work. If you are using an outside antenna, check the condition of the wiring and connections. Check the remote control batteries.
Specifications Specifications Specifications are subject to change without notice. TV format Closed caption system Channel coverage (ATSC/NTSC) ATSC / NTSC-M TV standard §15.122/FCC (digital CC) §15.
Legal notices
One-year limited warranty Dynex Products (“Dynex”) warrants to you, the original purchaser of this new DX-LCD37-09 (“Product”), that the Product shall be free of defects in the original manufacture of the material or workmanship for a period of one (1) year from the date of your purchase of the Product (“Warranty Period”). This Product must be purchased from an authorized dealer of Dynex brand Products and packaged with this warranty statement. This warranty does not cover refurbished product.
Legal notices
Contenido Dynex DX-LCD37-09 Televisor con pantalla LCD de 37" Contenido Instrucciones importantes de seguridad......................................... 31 Componentes del televisor ............................................................. 32 Vista frontal y lateral................................................................ 33 Vista posterior ......................................................................... 34 Control remoto ..............................................................
Contenido F SEGURIDAD PARA LOS NIÑOS Cómo y dónde usa su televisor de pantalla plana hace toda la diferencia F Al mismo tiempo que disfrute su nuevo producto, recuerde estos consejos de seguridad ¿De qué se trata? La experiencia de entretenimiento del cine en casa es una tendencia que se desarrolla cada día más, y televisores de tamaños grandes se venden muy bien.
Instrucciones importantes de seguridad CUIDADO RIESGO DE CHOQUE ELÉCTRICO NO ABRIR Advertencia: Para reducir el riesgo de choque eléctrico, no retire la cubierta o la parte posterior. No hay partes reparables por el usuario en el interior. Refiera cualquier reparación a personal de servicio calificado. Advertencia: Para reducir el riesgo de incendio o choque eléctrico, no exponga su televisor a la lluvia o la humedad.
Componentes del televisor • Si se ha derramado líquido u objetos han caído dentro de su televisor. • Si el televisor ha sido expuesto a la lluvia o al agua. • Si su televisor no funciona normalmente aún siguiendo las instrucciones de operación.
Componentes del televisor Vista frontal y lateral 1 2 3 4 5 6 7 8 # Componentes Descripción 1 Sensor del control remoto Recibe las señales del control remoto. No se debe obstruir. 2 ENCENDIDO Permite encender o apagar su televisor. 3 SELECCIÓN DE ENTRADA Permite seleccionar la fuente de entrada de video. Cuando se muestra el menú de pantalla, permite confirmar selecciones. 4 CANAL Permite ir al canal adyacente superior en la lista de canales.
Componentes del televisor Vista posterior PC-IN 1 AUDIO COMPONENT 1 Y 2 AUDIO AUDIO Pb # Toma Descripción 1 ENTRADA DE PC Conecte una computadora con un cable de VGA en esta toma. 2 ENTRADA DE HDMI 2 Conecte un equipo HDMI en esta toma. 3 ENTRADA DE HDMI 1 Conecte un equipo HDMI o DVI en esta toma. Para conectar un equipo DVI necesita conectar un cable HDMI-DVI, y conectar un cable de audio a las tomas de entrada de audio izq./der. (AUDIO IN L/R).
Componentes del televisor Control remoto 1 # Botón Descripción 8 REGRESAR Permite regresar al canal anterior. 9 VOL Permiten subir o bajar el volumen. 10 SILENCIAR Permite silenciar el sonido. Presione el botón de nuevo para restaurar el sonido. 11 SELECCIÓN DE ENTRADA Permite seleccionar la fuente de entrada de video. 14 12 APAGADO AUTOMÁTICO Permite configurar el temporizador de apagado automático.
Preparación de su televisor Preparación de su televisor Instalación de las pilas del control remoto Para instalar las pilas del control remoto: 1 Abra el compartimiento de las baterías. Notas: Siempre desconecte el cable coaxial cuando mueva su televisor. Si usa una antena para recibir TV analógica, la misma antena generalmente funciona para TV digital (DTV). Si desea alternar entre antena y TV por cable, instale un selector de antena.
Preparación de su televisor Conexión de un equipo con HDMI Puede conectar dos equipos con HDMI. Conexión de un equipo con DVI Para conectar un equipo con DVI, necesita un cable de conversión de HDMI a DVI. Para conectar un equipo con HDMI: • Conecte un extremo de un cable de HDMI a la toma de salida de HDMI (HDMI OUT) en el equipo con HDMI, y conecte el otro extremo del cable a la entrada de HDMI 1 (HDMI 1 INPUT) o a la entrada de HDMI 2 (HDMI 2 INPUT) en la parte posterior de su televisor.
Preparación de su televisor Conexión de un equipo con video de componentes Puede conectar dos equipos con video de componentes. Para conectar un equipo con video de componentes: 1 Conecte un cable de video de componentes a la salida de video de componentes [COMPONENT VIDEO OUT] (Y, Pb y Pr) en el equipo con video de componentes y conecte el otro extremo del cable a las tomas de componentes 1 (COMPONENT 1) o de componentes 2 (COMPONENT 2) en la parte posterior de su televisor.
Preparación de su televisor Conexión de una videocámara, una consola de videojuegos o un VCR Para conectar una videocámara, una consola de videojuegos o un VCR: 1 Conecte un extremo del cable de video a la toma de salida de video (VIDEO OUT) en la videocámara, consola de videojuegos o el VCR, y conecte el otro extremo a la toma de VIDEO1 o VIDEO2 en la parte posterior de su televisor.
Uso de su televisor Conexión de una computadora Nota: Asegúrese de que el cable de VGA tiene un núcleo de ferrita. Para conectar una computadora: 1 Conecte un extremo de un cable de VGA a la toma de VGA en una computadora y conecte el otro extremo del cable a la toma de entrada de PC (PC-IN) en la parte posterior de su televisor.
Uso de su televisor Notas: El programa de configuración inicial solamente se ejecuta una vez cuando se selecciona a aire (Air) o Cable. Si cambia la fuente de señal de TV, necesitará volver a escanear los canales. Para obtener más información, refiérase a “Escaneo de canales” en la página 41. Si presiona el botón de encendido (POWER) o de menú (MENU) mientras su televisor está escalonando los canales, se dejará de escanear.
Uso de su televisor 4 Presione o para seleccionar aire [Air] (antena) o Cable (TV por cable o satélite). Su televisor escaneará los canales. Cuando se ha completado el escaneo, se mostrará el canal más bajo en la lista de canales. 3 Presione o para seleccionar CHANNEL LIST (Lista de canales) y presione el botón de entrar (ENTER). Channel List Highlight channels for Ch Up/Down key selection. DTV 6 DTV 8 DTV 48 DTV 67 27 Now the system is scanning for channels, please wait.
Uso de su televisor 3 Presione o para seleccionar Manual Register (Registro manual) y presione el botón de entrar (ENTER). Manual Register For analog channels, select a channel to register using number keys. For digital channels, you must perform Autoscan function. Register La mayoría de canales de TV digital tienen más de un canal. El canal principal lleva la señal del programa de TV principal.
Uso de su televisor • Color Temp. (Temperatura de color) — Presione o para seleccionar Cool (Fresco), Neutral (Neutro) o Warm (Cálido) y presione el botón de entrar (ENTER). • Energy Saving (Ahorro de energía) — Presione o para aumentar o reducir el brillo de la retroiluminación. 4 Presione el botón de menú (MENU) para cerrar el menú. • HDMI2 — Selecciona el componente con HDMI o DVI conectado a la toma de HDMI2 . • PC — Selecciona la computadora conectada a la toma de entrada de PC (PC-IN).
Uso de su televisor • Presione el botón de visualización (DISPLAY) o de atrás (BACK) para cerrar la pantalla. Para mostrar información sobre un equipo externo: • Presione el botón de visualización (DISPLAY). La siguiente información aparecerá: Video1 480i 480i • Zoom — Agranda el centro de la imagen. La parte externa de la imagen esta cortada. • Ancho – Muestra la imagen en su tamaño original. • Cine – Muestra la imagen con su dimensión máxima sin cambiar su relación de aspecto.
Uso de su televisor 2 Presione o para seleccionar CHANNEL (Canal) y presione el botón de entrar (ENTER). Uso de subtítulos optativos digitales Para usar subtítulos optativos digitales: 1 Presione el botón de menú (MENU). Se abrirá el menú de pantalla. Channel Autoscan Channel List Manual Register Antenna 3 Presione o para seleccionar Antenna (Antena) y presione el botón de entrar (ENTER).
Uso de su televisor Uso de subtítulos optativos analógicos Para usar subtítulos optativos analógicos: 1 Presione el botón de menú (MENU). Se abrirá el menú de pantalla. 2 Presione o para seleccionar DETAIL (Detalle) y presione el botón de entrar (ENTER). Detail Closed Caption V–chip PC Settings HDMI1 Audio Auto 3 Presione o para seleccionar Closed Caption (Subtítulos optativos) y presione el botón de entrar (ENTER).
Uso de su televisor Cambio del estilo de subtítulos optativos digitales 5 Presione o para seleccionar User Setting (Configuración del usuario) y presione el botón de entrar (ENTER). CC Style Para cambiar el estilo de los subtítulos optativos digitales: 1 Presione el botón de menú (MENU). Se abrirá el menú de pantalla.
Uso de su televisor Tipo de borde Color de fuente CC Style Closed Caption User Setting CC Style Closed Caption User Setting Font Style White Font Style Font Size Black Font Size Font Color Red Font Color None Font Opacity Green Font Opacity Raised Back Color Blue Back Color Depressed Back Opacity Yellow Back Opacity Uniform Edge Color Magenta Edge Color L.Shadow Edge Type Cyan Edge Type R.Shadow 9 Presione el botón de menú (MENU) para cerrar el menú.
Uso de su televisor 4 Presione los botones numéricos para ingresar una contraseña de cuatro dígitos. Si no ha configurado una contraseña, ingrese 0000. • • • • PG-13 — No se recomienda a niños menores de 13 años. PG — Se recomienda la guía de los padres. G — Para audiencia general. NR — Sin clasificación. V-chip 3 Presione el botón de menú (MENU) para cerrar el menú.
Uso de su televisor 4 Presione el botón de menú (MENU) para cerrar el menú. Notas: Cuando se bloquea una clasificación, las clasificaciones superiores se bloquean automáticamente. Las clasificaciones inferiores se mantendrán disponibles para verlas. Cuando se bloquea la clasificación más alta, todas las clasificaciones se bloquean automáticamente. Diferentes programas usan diferentes clasificaciones.
Mantenimiento 3 Presione o para seleccionar PC Settings (Configuración de PC) y presione el botón de entrar (ENTER). 3 Presione o para seleccionar HDMI1 Audio (audio de HDMI 1) y presione botón de entrar (ENTER). Detail PC Settings Closed Caption Auto Adjustment V–chip Horizontal Position -- PC settings Vertical Position -- HDMI1 Audio Clock -- Digital Phase -- Analog 4 Presione o para seleccionar la opción que desea ajustar y presione el botón de entrar (ENTER).
Localización y corrección de fallas Localización y corrección de fallas Problema Solución La unidad no enciende. Asegúrese de que el cable de alimentación esté enchufado. Problema Solución Imagen débil. Asegúrese de que la antena o la TV por cable esté correctamente conectada y asegurada. Si está usando una antena exterior, verifique la condición del cableado y las conexiones. Ajuste de las opciones de contraste (Contrast) y brillo (Brightness) en el menú de pantalla.
Problema Localización y corrección de fallas Solución Diferentes marcas de color Aleje la unidad de aparatos eléctricos en la pantalla. cercanos. Apague la unidad y espere 30 minutos antes de volver a encenderla. Problema Solución El control remoto no funciona. Si está usando una antena exterior, verifique la condición del cableado y las conexiones. Revise las pilas del control remoto. Intente con otro canal. El problema puede estar limitado a la estación transmisora.
Especificaciones Especificaciones Las especificaciones están sujetas a cambio sin aviso previo. Formato de TV Sistema de subtítulos optativos Rango de canales (ATSC/NTSC) Sistema de sintonización Acceso de canales Salida de sonido Estándar de TV ATSC/NTSC-M §15.122/FCC (subtítulos optativos digitales) §15.
Avisos legales
Avisos legales Garantía limitada de un año Dynex Products (“Dynex”) le garantiza a usted, el comprador original de este nuevo DX-LCD37-09 (“Producto”), que éste se encontrará libre de defectos de material o de mano de obra en su fabricación original por un periodo de un (1) año a partir de la fecha de compra del Producto (“Período de Garantía”). Este Producto debe ser comprado en un distribuidor autorizado de productos Dynex y empacado con esta declaración de garantía.
Avisos legales
Avisos legales 59
Avisos legales
Avisos legales 61
Avisos legales
Avisos legales 63
08-1262 www.dynexproducts.com (800) 305-2204 Distributed by Best Buy Purchasing, LLC 7601 Penn Ave. South, Richfield, MN 55423 U.S.A. © 2008 Best Buy Enterprise Services, Inc. All rights reserved. DYNEX is a trademark of Best Buy Enterprise Services, Inc. Registered in some countries. All other products and brand names are trademarks of their respective owners. Distribuido por Best Buy Purchasing, LLC 7601 Penn Ave. South, Richfield, MN 55423 U.S.A. © 2008 Best Buy Enterprise Services, Inc.