1-0170_DX-PHD25_MAN_ENG_V1.fm Page 1 Thursday, March 17, 2011 11:51 AM USB 2.0 - 2.
11-0170_DX-PHD25_MAN_ENG_V1.fm Page 2 Thursday, March 17, 2011 11:51 AM 2 Contents Introduction ..................................................................................... 2 Safety information ........................................................................... 2 Features............................................................................................ 2 Setting up your hard drive enclosure ................................................ 3 Using your enclosure .................
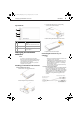
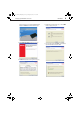
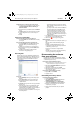
11-0170_DX-PHD25_MAN_ENG_V1.fm Page 3 Thursday, March 17, 2011 11:51 AM Setting up your hard drive enclosure Top and Front DX-PHD25 3 3 Connect the drive’s data connector to the corresponding connector on the enclosure circuit board. 2.5” PATA hard drive 4 Slide the drive tray, with drive attached, into the enclosure. # Item Description Activity LED 1 LED turns on when the hard drive is turned on. LED blinks when the hard drive is active. 2 USB 2.
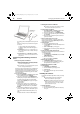
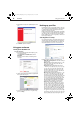
11-0170_DX-PHD25_MAN_ENG_V1.fm Page 4 Thursday, March 17, 2011 11:51 AM 4 DX-PHD25 Setting up your hard drive enclosure Formatting the hard drive in Windows Note: Formatting is only required for a new hard drive. Do not format a drive that contains valuable data that you want to save. To format the hard drive using Windows: Optional USB 2.0 Y connector for additional power (if necessary) 1 Right click My Computer (or Computer, depending on what version of Windows you have), then click Manage.
11-0170_DX-PHD25_MAN_ENG_V1.fm Page 5 Thursday, March 17, 2011 11:51 AM Setting up your hard drive enclosure Or, if the screen does not open, locate the CD in Windows Explorer and double-click Run.exe on the CD. The initial menu opens. DX-PHD25 5 5 Read the license agreement, click “I accept..., “ then click NEXT. The Choose Setup Type screen opens. 3 Click Install Backup Software. The Welcome screen opens. 6 Choose the setup type, then click Install to start installation.
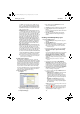
11-0170_DX-PHD25_MAN_ENG_V1.fm Page 6 Thursday, March 17, 2011 11:51 AM 6 DX-PHD25 7 When installation is complete, the Setup Wizard Completed screen opens. Using your enclosure Backing up your files The Backup Files project lets you back up important files to a disc, hard drive, or other storage device. A Backup Files project can be scheduled to run daily, weekly, or monthly. Large backups are automatically spread across as many discs as required.
11-0170_DX-PHD25_MAN_ENG_V1.fm Page 7 Thursday, March 17, 2011 11:51 AM Backing up your files .sgi, .slddrw, .svg, .svg2, .targa, .tcw, .tga, .tif, .tiff, .vda, .vdx, .vsd, .vss, .vst, .vsx, .vtx, .wmf, .wmz, and .wpg. Your entire My Pictures folder (Windows XP) or Pictures folder (Windows Vista and Windows 7) is included if it is located on the drive or in the folder you selected to archive. • Productivity: All files with the following file name extensions --- .bk0, .bk1, .bk2, .bk3, .bk4, .bk5, .bk6, .
11-0170_DX-PHD25_MAN_ENG_V1.fm Page 8 Thursday, March 17, 2011 11:51 AM 8 DX-PHD25 To save your project, click Save. Enter a name for the project, then click OK. If you decided to run the project now, a progress screen will inform you when the project has been completed. 9 Click Done to return to the project window. Note: Scheduled projects must be saved before they can be run. To open and run a saved Backup Files project: 1 Click File. If the project is listed on the File menu, select it.
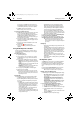
11-0170_DX-PHD25_MAN_ENG_V1.fm Page 9 Thursday, March 17, 2011 11:51 AM Disconnecting the enclosure from your computer To add file extensions to one of the preset file selection categories: 1 Select the file category you would like to customize. The choices are Email, Financial, Music, Photos, Productivity, and Video & Recorded TV. 2 Enter the file extension you would like to add into the Extension text box. 3 Click Add. The file extension is added to the list box on the right.
11-0170_DX-PHD25_MAN_ENG_V1.fm Page 10 Thursday, March 17, 2011 11:51 AM 10 DX-PHD25 Troubleshooting Troubleshooting I do not see the additional drive in my system Windows users: Partition and format the new hard drive by using Disk Management in Windows. Macintosh users: Partition and format the new hard drive by clicking Disk Utilities in the Utilities folder, then clicking your external enclosure.
-0170_DX-PHD25_MAN_ENG_V1.fm Page 11 Thursday, March 17, 2011 11:51 AM Legal notices One-year limited warranty Dynex Products (“Dynex”) warrants to you, the original purchaser of this new DX-PHD25 (“Product”), that the Product shall be free of defects in the original manufacture of the material or workmanship for a period of one (1) year from the date of your purchase of the Product (“Warranty Period”).
11-0170_DX-PHD25_MAN_ENG_V1.fm Page 12 Thursday, March 17, 2011 11:51 AM www.dynexproducts.com (800) 305-2204 Distributed by Best Buy Purchasing, LLC 7601 Penn Ave. South, Richfield, MN 55423 U.S.A. © 2011 BBY Solutions, Inc. All rights reserved. DYNEX is a trademark of BBY Solutions, Inc. Registered in some countries. All other products and brand names are trademarks of their respective owners.