Dynex Wireless Optical Mouse DX-WLMSE USE R GUI DE
DX-WLMSE 2 Dynex DX-WLMSE Wireless Optical Mouse Contents Important safety instructions....................................................................2 System requirements ................................................................................2 Package contents ......................................................................................3 Features ....................................................................................................3 Setting up the mouse...............
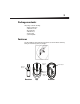
Package contents This package contains the following: • Wireless optical mouse • USB wireless receiver • Mouse driver CD • AAA batteries (2) • Extension cable • Quick Setup Guide Features Your Tilt Scroll Wheel is designed for four-way navigation. You can view whole documents by turning the scroll wheel up, down, left, and right.
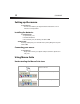
DX-WLMSE 4 Setting up the mouse To set up the mouse: • Insert the enclosed CD into your computer's disk drive and follow the on-screen instructions to install your driver. Installing the batteries To install the batteries: 1 Open the battery cover. 2 Install the AAA batteries. 3 Close the battery cover, then slide the power button to ON. Saving power To extend your battery life, you can turn off the mouse power by sliding the mouse power button to OFF.
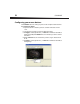
Accessing Mouse Suite To access Mouse Suite: • Double-click the Mouse icon in the system tray or right-click to view the context menu, then click Adjust Mouse Properties. Or, If the mouse icon is not in your system tray, click Start, then Settings, then Control Panel, then Dynex Mouse. About the Mouse Suite dialog The main dialog is divided into six tabs. Click each tab to view related settings. Under each tab there are three common buttons: • Click OK to save your settings and close the dialog.
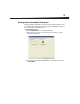
DX-WLMSE 6 Configuring your mouse buttons Click the Buttons tab to view an image of your mouse and a description of button functions. To assign function to buttons: 1 Open the menu next to the button you want to customize in the button overview screen. 2 Select the function you want to assign to the button from the list. 3 Click Apply to start using this function, or click Cancel to exit the Mouse Suite without making changes. Or, Click the Button menu.
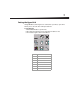
Setting the HyperGrid The HyperGrid function, when assigned to one of the buttons on your mouse, opens a menu with easy access to nine of the most commonly used functions. To set the Hypergrid 1 Click and hold the button to open the menu. 2 Move the pointer to the function you need and release the button to select. 3 Press the button again to exit the selected function.
DX-WLMSE 8 Assigning Hyperlink The Hyperlink function, when assigned to one of the buttons on your mouse, opens up a specified program. To assign Hyperlink 1 Click Settings. 2 Enter or browse for the program you want to open. Add a description if you want. 3 Click OK, then click Apply on the main screen. When you click the assigned button, the program you have specified opens. Assigning Magnifier function The Magnifier is a unique feature of your mouse.
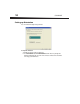
Slowing down the double-click speed Many items in Windows require that you click the left mouse button twice in quick succession to be activated. This is called a 'double- click'. If you experience difficulty double-clicking on items, the time between clicks may be too short. To slow down the double-click 1 Click the Double-Click tab to set the delay between clicks. 2 Double-click on the icon in the test area. If the icon does not animate, you need to slow down the double click.
DX-WLMSE 10 Setting up Orientation You can set the desired angle to hold your mouse. To set up the orientation: 1 Hold the mouse at the angle you want to use. 2 On the Orientation tab, click Set Orientation. Move the mouse to your right and make the animated dog run across the screen. The mouse orientation is now matched to the angle you held the mouse.
Setting up your tilt scroll wheel To set up your tilt scroll wheel: 1 Click the Wheel tab to configure how the scroll and tilt wheel on your mouse is used in Windows. 2 Click Enable Universal Scrolling or Use Microsoft Office 97 Scrolling Emulation only. 3 If you select universal scrolling, click Exceptions to configure applications in which universal scrolling will not be available. 4 Click Apply to have your changes take effect.
DX-WLMSE 12 To configure Exceptions: 1 Click Exception in the Wheel tab to display a list of applications that use Microsoft Office 97 Scrolling Emulation regardless of whether universal scrolling is enabled. 2 Click an item in the list, then click Remove to delete that item. Or, Click Add, then click Browse to select the application to add to this list.
Assigning wheel functions You can assign a separate function to the wheel button itself, apart from the scroll function. To assign wheel function: 1 Select Quick/Auto Scroll Control to set the button control scroll speed when pressed. Or, select Button Function from the drop down menu to assign to the wheel button. 2 Click OK to have your changes take effect. Setting scrolling speed: You can specify the speed at which the window scrolls when using the scroll wheel.
DX-WLMSE 14 Activating Mouse Suite settings Click the Mouse Suite tab to add the Mouse Suite icon to the system tray or uninstall the Mouse Suite software. To add the Mouse Suite icon to system tray: 1 Check Show mouse icon in system tray to display the icon in the system tray. 2 Click OK. Uninstalling the Mouse Suite To uninstall the Mouse Suite: 1 Click Uninstall. A confirmation message appears. 2 Click Yes to uninstall or No to cancel.
Re-linking your mouse If the connection between your mouse and receiver is broken, you can re-link your mouse with the receiver. To re-link your mouse with the receiver: 1 Press the Connect Button on the receiver. The LED indicator flashes. 2 On the bottom of your mouse, press the Connect Button. Your mouse is linked with the receiver, and the receiver's LED indicator turns off. 3 If the mouse does not link with the receiver, repeat steps 1 and 2.
DX-WLMSE
One-year limited warranty Dynex Products (“Dynex”) warrants to you, the original purchaser of this new DX-WLMSE (“Product”), that the Product shall be free of defects in the original manufacture of the material or workmanship for a period of one (1) year from the date of your purchase of the Product (“Warranty Period”). This Product must be purchased from an authorized dealer of Dynex brand Products and packaged with this warranty statement. This warranty does not cover refurbished product.
DX-WLMSE This warranty also does not cover: • Damage due to incorrect operation or maintenance • Connection to an incorrect voltage supply • Attempted repair by anyone other than a facility authorized by Dynex to service the Product • Products sold as is or with all faults • Consumables, such as fuses or batteries • Products where the factory applied serial number has been altered or removed REPAIR REPLACEMENT AS PROVIDED UNDER THIS WARRANTY IS YOUR EXCLUSIVE REMEDY.
www.dynexproducts.com (800) 305-2204 © 2009 Best Buy Enterprise Services, Inc. All rights reserved. DYNEX is a trademark of Best Buy Enterprise Services, Inc. Registered in some countries. All other products and brand names are trademarks of their respective owners. Distributed by Best Buy Purchasing, LLC 7601 Penn Ave. South, Richfield, MN 55423 U.S.A.