USER GUIDE DX-HTIB_09-1148_MAN_ENG.
DX-HTIB_09-1148_MAN_ENG.
DX-HTIB_09-1148_MAN_ENG.fm Page 3 Tuesday, March 2, 2010 1:48 PM Home Theater System Contents Welcome . . . . . . . . . . . . . . . . . . . . . . . . . . . . . . . . . . . . . . . . . .3 Important safety instructions . . . . . . . . . . . . . . . . . . . . . . . . . . .3 Features . . . . . . . . . . . . . . . . . . . . . . . . . . . . . . . . . . . . . . . . . .5 Setting up your player . . . . . . . . . . . . . . . . . . . . . . . . . . . . . . .10 Using your player. . . . . . . . . . . . . . . . . . . .
DX-HTIB_09-1148_MAN_ENG.fm Page 4 Tuesday, March 2, 2010 1:48 PM DX-HTIB 4 9 Protect the power cord from being walked on or pinched particularly at plugs, convenience receptacles, and the point where they exit from the apparatus. 10 Only use attachments/accessories specified by the manufacturer. 11 Unplug this apparatus during lightning storms or when unused for long periods of time. 12 Refer all servicing to qualified service personnel.
DX-HTIB_09-1148_MAN_ENG.
DX-HTIB_09-1148_MAN_ENG.fm Page 6 Tuesday, March 2, 2010 1:48 PM DX-HTIB 6 # Component Description 10 SOURCE button Press repeatedly to cycle through the available sources, including FM/AM Radio, Audio input, and CD/DVD modes. 11 Volume knob Turn clockwise to increase the volume or counterclockwise to decrease the volume. 12 PLAY/ENTER button In DVD/CD mode, press to begin playback. In menu mode, press to accept the selection.
DX-HTIB_09-1148_MAN_ENG.fm Page 7 Tuesday, March 2, 2010 1:48 PM Home Theater System # 7 Component Description 10 Audio (L & R) output Connect a TV with L/R audio inputs to these jacks. These cables normally have red and white connectors. 11 Video output jack 12 Optical output jack Plug a composite A/V device, such as a TV, into this jack. This cable normally has a yellow connector. Connect a Dolby Digital amplifier with digital optical input to this jack.
DX-HTIB_09-1148_MAN_ENG.fm Page 8 Tuesday, March 2, 2010 1:48 PM DX-HTIB 8 # Button Description 3 4 CD/DVD AM/FM Press to select the CD/DVD source. Press to select the radio source. 5 6 MO/ST Numbers Press to toggle between mono and stereo radio signals. Press to enter channel numbers or the parental control password. 7 SEARCH 8 SETUP In playback mode, press this button once and the TV screen will display a search menu.
DX-HTIB_09-1148_MAN_ENG.fm Page 9 Tuesday, March 2, 2010 1:48 PM Home Theater System # Button 9 Description 23 ZOOM In playback mode, press repeatedly to select the picture magnification. You can select 2 times, 3 times, 4 times, 1/2, 1/3, or 1/4. 24 MEMORY Press to save a radio station as a preset. See “Using the radio” on page 16. 25 DVD MENU During DVD playback, press to go to the root menu on the DVD, then select an item according to your preference.
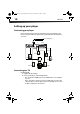
DX-HTIB_09-1148_MAN_ENG.fm Page 10 Tuesday, March 2, 2010 1:48 PM DX-HTIB 10 Setting up your player Connecting your player Before connecting your player, refer to the picture below. Each connection must be solid. Disconnect the power cables on all elements of the system until you have finished all of the connections. External DVD player Player Subwoofer Center speaker Left speaker TV Right speaker Surround left Surround right Connecting to a TV To connect to a TV: 1 Unplug the TV and your player.
DX-HTIB_09-1148_MAN_ENG.fm Page 11 Tuesday, March 2, 2010 1:48 PM Home Theater System 11 • Acceptable - If your TV has A/V connections, use the A/V cable to connect the player to the TV. Video Input Audio L Audio R HDMI Y Pb/Cb Pr/Cr 3 Plug in the TV and the player. Notes: • When a DVD is being played, we recommend changing the Resolution, TV Display, and TV Type in order to make it compatible with your TV. • You can connect the player to your TV in several different ways.
DX-HTIB_09-1148_MAN_ENG.fm Page 12 Tuesday, March 2, 2010 1:48 PM DX-HTIB 12 Connecting to an amplifier To connect to an amplifier: Coaxial cable Optical cable Video cable 1 Unplug the amplifier and your player. 2 Connect the coaxial (digital or optical) output of the player to the amplifier. Use either the digital coaxial or digital optical connection and cable. Connect to video input 3 Plug in the TV and the player.
DX-HTIB_09-1148_MAN_ENG.fm Page 13 Tuesday, March 2, 2010 1:48 PM Home Theater System 13 3 Press the button on the remote control corresponding to the sound/video source you want. Options include: • CD/DVD for disc playback • AM/FM for radio • AUX1 or AUX2 for an external sound source • USB for a USB flash drive Adjusting the volume To adjust the volume: • Rotate the volume control on the front of your player or press VOL+/VOL– on the remote control. • Press MUTE to mute the sound.
DX-HTIB_09-1148_MAN_ENG.fm Page 14 Tuesday, March 2, 2010 1:48 PM DX-HTIB 14 Viewing disc information To view disc information: • During playback, press DISPLAY one or more times to view specific disc information. The information available depends on the type of disc in the player. You can view: • Title (or Single) Elapsed–Shows the elapsed playing time for the title. • Track Remain–Shows the remaining playing time for the track. • Total Elapsed–Shows the total elapsed playing time.
DX-HTIB_09-1148_MAN_ENG.fm Page 15 Tuesday, March 2, 2010 1:48 PM Home Theater System 15 Playing an MP3 disc To play an MP3 disc: 1 Press STANDBY/ON to turn on the player. 2 Press the OPEN/CLOSE button on the remote control (or the (eject) button on the front panel) to open the disc tray. Insert an MP3 disc and press the OPEN/CLOSE or (eject) button again to close it. Your player will read the disc automatically and display the menu.
DX-HTIB_09-1148_MAN_ENG.fm Page 16 Tuesday, March 2, 2010 1:48 PM DX-HTIB 16 • To view a specific picture, input its number using the number buttons or press or . • To repeat a picture, press the REPEAT button. • While playing, press STOP or DVD MENU button to return to the main menu. • You can also use the options such as Fast forward/rewind, Pause, and so on. Notes: • Your JPEG picture may be distorted at the edge of some TVs. This is caused by the TV and not your player.
DX-HTIB_09-1148_MAN_ENG.fm Page 17 Tuesday, March 2, 2010 1:48 PM Home Theater System 17 Listening to a USB device You can listen to audio and watch Video/JPG files using the USB port on your player. Before operating, switch to USB mode. To listen to a USB device: 1 Connect the USB device to the receiver. 2 Press the USB button on the remote control. 3 While playing the files, press the DVD MENU button to display the file browser, then select the file you want.
DX-HTIB_09-1148_MAN_ENG.
DX-HTIB_09-1148_MAN_ENG.fm Page 19 Tuesday, March 2, 2010 1:48 PM Home Theater System 19 Setup menu pages Page GENERAL SETUP PAGE LANGUAGE SETUP Options CLOSE CAPTION–Turn on DVD closed captions. SCREEN SAVER–Turns on a screen saver that appears when the same image stays on the screen for five minutes. VERSION–Shows the model number of the player. DEFAULT–Reset the player to the original factory default settings. OSD LANGUAGE–Selects the language of the screen displays and setup menus.
DX-HTIB_09-1148_MAN_ENG.fm Page 20 Tuesday, March 2, 2010 1:48 PM DX-HTIB 20 Page Options TV TYPE–Sets the aspect ratio of the video image. Choices include: • 4:3PS –Select this option when the player is connected to a normal TV. Wide-screen images are shown on the screen, but with some parts cropped automatically. • 4:3LB–Select this when the player is connected to a normal TV. Wide-screen images are VIDEO SETUP shown on the screen, with a black band on the top and bottom.
DX-HTIB_09-1148_MAN_ENG.fm Page 21 Tuesday, March 2, 2010 1:48 PM Home Theater System Problem 21 Solution No picture on the TV • Make sure that your player is connected correctly. • Make sure that the TV is set to video mode and that the input source is selected correctly. • Make sure that the scanning mode on the player matches the TV. Picture is distorted. • During fast-forwarding or fast-reversing, distortion is normal. • The DVD may be damaged. Try another DVD.
DX-HTIB_09-1148_MAN_ENG.fm Page 22 Tuesday, March 2, 2010 1:48 PM DX-HTIB 22 Handling discs • To keep a disc clean, do not touch the play side (non-label side) of the disc. • Do not attach paper or tape to the disc. • Keep the disc away from direct sunlight or heat sources. • Store the disc in a disc case after playback. Installing the remote control battery To install the remote control battery: 1 Remove the battery compartment cover. 2 Insert the battery into the battery compartment.
DX-HTIB_09-1148_MAN_ENG.fm Page 23 Tuesday, March 2, 2010 1:48 PM Home Theater System 23 Power supply ~110V / 60 Hz Max power Frequency response 200 Watts 100 Hz to 20 KHz ±3dB Audio S/N Better than 80 dB, weight A Operating temperature Weight 41° to 95°F (5° to 35°C) 23.15 lbs (10.5 kg) Dimensions (W × D × H) 23.07 in. x 15.04 in. x 11.6 in. (58.6 cm x 38.2 cm x 29.4 cm) Legal notices FCC Part 15 This device complies with Part 15 of the FCC Rules.
DX-HTIB_09-1148_MAN_ENG.fm Page 24 Tuesday, March 2, 2010 1:48 PM DX-HTIB 24 90-day limited warranty Dynex Products (“Dynex”) warrants to you, the original purchaser of this new DX-HTIB (“Product”), that the Product shall be free of defects in the original manufacture of the material or workmanship for a period of 90 days from the date of your purchase of the Product (“Warranty Period”).
DX-HTIB_09-1148_MAN_ENG.
DX-HTIB_09-1148_MAN_ENG.fm Page 28 Tuesday, March 2, 2010 1:48 PM www.dynexproducts.com (800) 305-2204 © 2010 BBY Solutions, Inc. All rights reserved. DYNEX is a trademark of BBY Solutions, Inc. Registered in some countries. All other products and brand names are trademarks of their respective owners. Distributed by Best Buy Purchasing, LLC 7601 Penn Ave. South, Richfield, MN 55423 U.S.A.