Contents AV RECEIVER TX-NR818 Safety Information and Introduction ............2 Table of Contents ...........................................6 Connections .................................................13 Turning On & Basic Operations..................23 Instruction Manual Advanced Operations ..................................51 Controlling Other Components...................82 Appendix .......................................................
Safety Information and Introduction WARNING: TO REDUCE THE RISK OF FIRE OR ELECTRIC SHOCK, DO NOT EXPOSE THIS APPARATUS TO RAIN OR MOISTURE. CAUTION: TO REDUCE THE RISK OF ELECTRIC SHOCK, DO NOT REMOVE COVER (OR BACK). NO USER-SERVICEABLE PARTS INSIDE. REFER SERVICING TO QUALIFIED SERVICE PERSONNEL.
Safety Information and Introduction Precautions 1. Recording Copyright—Unless it’s for personal use only, recording copyrighted material is illegal without the permission of the copyright holder. 2. AC Fuse—The AC fuse inside the unit is not userserviceable. If you cannot turn on the unit, contact your Onkyo dealer. 3. Care—Occasionally you should dust the unit all over with a soft cloth. For stubborn stains, use a soft cloth dampened with a weak solution of mild detergent and water.
Safety Information and Introduction For Canadian Models IMPORTANT NOTE: THIS CLASS B DIGITAL APPARATUS The plug is fitted with an appropriate fuse. If the fuse needs to be replaced, the replacement fuse must approved by ASTA or BSI to BS1362 and have the same ampere rating as that indicated on the plug. Check for the ASTA mark or the BSI mark on the body of the fuse. If the power cord’s plug is not suitable for your socket outlets, cut it off and fit a suitable plug. Fit a suitable fuse in the plug.
Safety Information and Introduction Supplied Accessories Make sure you have the following accessories: Indoor FM antenna (➔ page 22) ■ Aiming the remote controller To use the remote controller, point it at the AV receiver’s remote control sensor, as shown below.
Safety Information and Introduction Table of Contents Safety Information and Introduction Important Safety Instructions ......................................2 Precautions ...................................................................3 Supplied Accessories...................................................5 Table of Contents..........................................................6 Features .........................................................................7 Front & Rear Panels.................
Safety Information and Introduction Features Amplifier • 135 Watts/Channel @ 8 ohms (FTC) • 180 Watts/Channel @ 6 ohms (IEC) • 230 Watts/Channel @ 6 ohms (JEITA) • WRAT–Wide Range Amplifier Technology (5 Hz to 100 kHz bandwidth) • Linear Optimum Gain Volume Circuitry • H.C.P.S.
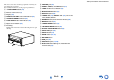
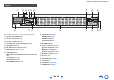
Safety Information and Introduction Front & Rear Panels Front Panel a b f c g d e h (North American models) i (European, Australian and Asian models) j k lm n opq u v w x r s y En-8 t z
Safety Information and Introduction The AV receiver has various logos printed on it. They are not shown here for clarity. For detailed information, see the pages in parentheses.
Safety Information and Introduction Display s a b cd e f j k l For detailed information, see the pages in parentheses. a Speaker/channel indicators m c Z3 (Zone 3) indicator (79) i Input indicators (102) HDMI indicator (75) DIGITAL indicator ANALOG indicator d Listening mode and format indicators (40) j Bi AMP indicator e M.
Safety Information and Introduction Rear Panel a b cd no e f g h i j p q r k l m s a u REMOTE CONTROL jack i ZONE 2 and ZONE 3 12V TRIGGER OUT jacks r SB/FH/FW EXT AMP* jacks b USB port j ZONE 2/ZONE 3 LINE OUT jacks c ETHERNET port k FM ANTENNA jack and AM ANTENNA terminal d RS232 port Terminal for control.
Safety Information and Introduction Remote Controller Controlling the AV Receiver a b i c To control the AV receiver, press RECEIVER to select Receiver mode. You can also use the remote controller to control Onkyo Blu-ray Disc/DVD player, CD player, and other components. See “Entering Remote Control Codes” for more details (➔ page 85). For detailed information, see the pages in parentheses.
Connections Connecting the AV Receiver Connecting the Speaker Cables The following illustration shows how to connect the speakers to each pair of terminals. If you’re using only one surround back speaker, connect it to the SURR BACK L terminals. Connecting Your Speakers Tip Speaker Configuration The following table indicates the channels you should use depending on the number of speakers that you have.
Connections ■ 7.1-channel playback Select the speakers (surround back, front high, front wide) you want to use for 7.1-channel playback. You can set which speakers you want to use by priority. See “Selecting Speaker Layout” (➔ page 49). Front high right Front wide right Front right Front left Front wide left Front high left Center ■ 9.1-channel playback By adding an external amplifier to the 7.1-channel configuration shown on the left, you can enjoy 9.1-channel playback.
Connections Attaching the Speaker Cable Labels Speaker Connection Precautions The speaker terminals are color-coded for identification purpose. Read the following before connecting your speakers: • You can connect speakers with an impedance of between 4 and 16 ohms. If the impedance of any of the connected speakers is 4 ohms or more, but less than 6 ohms, be sure to set the minimum speaker impedance to “4ohms” (➔ page 59).
Connections Using Dipole Speakers Using Powered Subwoofers Bi-amping the Front Speakers Important: TV/screen a LINE INPUT LINE INPUT LINE INPUT LINE INPUT • When making the bi-amping connections, be sure to remove the jumper bars that link the speakers’ tweeter (high) and woofer (low) terminals. • Bi-amping can be used only with speakers that support biamping. Refer to your speaker manual. Bi-amping provides improved bass and treble performance.
Connections Connecting a Power Amplifier Using Speakers Without Crossover Network If you want to use a more powerful power amplifier, you can use the AV receiver as a preamp. Connect all speaker outputs to the power amplifier. See the manuals supplied with your amplifier for details. *1 L *2 R Important: • Speakers without crossover network are speakers with no built-in crossover network.
Connections About AV Connections Connecting AV components a HDMI cable : Video & Audio TV, projector, etc. *1 • Push plugs in all the way to make good connections (loose connections can cause noise or malfunctions). • To prevent interference, keep audio and video cables away from power cords and speaker cables. Right! ■ Optical digital audio Optical digital connections allow you to enjoy digital sound such as PCM*2, Dolby Digital or DTS. The audio quality is the same as coaxial.
Connections Connecting Components with HDMI Satellite/cable set-top box, etc. Personal computer TV, projector, etc. Camcorder, etc. Blu-ray Disc/DVD player Game console Set top box/digital video recorder, etc. * * If your TV doesn’t support Audio Return Channel (ARC), you need to connect an optical digital cable together with the HDMI cable to the AV receiver.
Connections Connecting Your Components The on-screen menus appear only on a TV that is connected to HDMI OUT MAIN. If your TV is connected to other video outputs, use the AV receiver’s display when changing settings. Connect your components to the appropriate jacks. The default input assignments are shown below. See “Connection Tips and Video Signal Path” for more information (➔ page 101). ✔: Assignment can be changed (➔ page 58). No.
Connections No. Jack/Port G H • With connection F, if your Blu-ray Disc/DVD player has both the main stereo and multichannel outputs, be sure to connect the main stereo. Components COMPONENT VIDEO MONITOR OUT TV, projector, etc. IN 1 (BD/DVD) Blu-ray Disc/DVD player, RI dock ✔ IN 2 (CBL/SAT) Satellite/cable set-top box, RI dock, etc. ✔ PC IN*5 Personal computer Connecting Onkyo RI Components Note *1 *2 *3 *4 *5 Do not connect the AV receiver’s USB port to a USB port on your computer.
Connections Connecting the Antennas Connecting the Power Cord This section explains how to connect the supplied indoor FM antenna and AM loop antenna. The AV receiver won’t pick up any radio signals without any antenna connected, so you must connect the antenna to use the tuner. North American models 1 Connect the supplied power cord to the AV receiver’s AC INLET. European, Australian and Asian models To AC wall outlet Push. Insert wire. Release. Insert the plug fully into the jack.
Turning On & Basic Operations Turning On/Off the AV Receiver Turning On 1 8ON/STANDBY Press 8ON/STANDBY on the front panel. or Press RECEIVER followed by 8RECEIVER on the remote controller. The AV receiver comes on and its display lights. Turning Off 1 Press 8ON/STANDBY on the front panel. or Press RECEIVER followed by 8RECEIVER on the remote controller. The AV receiver will enter standby mode.
Turning On & Basic Operations Initial Setup This section explains the settings that we recommend you to make before using the AV receiver for the very first time. A setup wizard is launched upon first-time use to let you perform those settings. Selecting the Language for the Onscreen Setup Menus This step determines the language used for the onscreen setup menus. See “Language” in “OSD Setup” (➔ page 74). Tip The on-screen menus appear only on a TV that is connected to HDMI OUT MAIN.
Turning On & Basic Operations Source Connection This step checks the connection of source components. 1 2 3 4 Use q/w to select one of the following options, and then press ENTER. `Yes, Continue: Performs the checkings. `No, Skip: Skips this step and continues to “Remote Mode Setup”. Select the input selector for which you want to check the connection and press ENTER. The picture of the corresponding source should appear on screen with a verification prompt.
Turning On & Basic Operations Playback 2 The on-screen information appears only on a TV that is connected to HDMI outputs. If your TV is connected to other video outputs, use the AV receiver’s display when changing settings. This section describes the procedure for using the remote controller, unless otherwise specified. Playing the Connected Component ■ Operating with the remote controller INPUT SELECTOR RECEIVER VOL q/w 3 4 Start playback on the source component.
Turning On & Basic Operations Controlling Contents of USB or Network Devices Press USB or NET first. a TOP MENU This button displays the top menu for each media or service. n 2 This button stops playback. b q/w and ENTER These buttons navigate through the menus. o MODE You can switch between Standard Mode and Extended Mode. e/r This button cycles through pages. h PLAYLIST e/r In Standard Mode (iPod/iPhone), this button selects playlists. c 1 This button starts playback.
Turning On & Basic Operations Understanding Icons on the Display This section describes icons that appear on the AV receiver’s display during media playback. Icon Playing an iPod/iPhone via USB 3 Press MODE repeatedly to switch to Extended Mode (Music) or Extended Mode (Video). The on-screen information appears only on a TV that is connected to HDMI outputs. A list of your iPod/iPhone model’s contents appears. Pause This section explains how to play music/video files on the iPod/iPhone.
Turning On & Basic Operations Extended Mode (Music) Control The music content information is displayed (lists are displayed), and you can control the music content while looking at the screen. Top screen list: Playlists, Artists, Albums, Genres, Songs, Composers, Shuffle Songs, Now Playing. Note Playing a USB Device Listening to vTuner Internet Radio The on-screen information appears only on a TV that is connected to HDMI outputs. You need to connect the AV receiver to your home network (➔ page 107).
Turning On & Basic Operations ■ Adding vTuner Internet Radio Stations to Favorites There are two ways you can register specific Internet radio stations (programs) from the vTuner Internet Radio. Adding to My Favorites The selected program will be added to “My Favorites” on the network service screen, which appears when pressing NET on the remote controller. 1. Press MENU with the station selected or while a station is playing. 2. Use q/w to select “Add to My Favorites”, and press ENTER. 3.
Turning On & Basic Operations Changing the Icon Layout on the Network Service Screen You need to connect your TV to the HDMI output (HDMI OUT MAIN) to make the following on-screen setting. The layout of icons can be customized by switching their positions on the network service screen. 1 Press NET. The network service screen appears, and the NET indicator lights. If it flashes, verify that the Ethernet cable is firmly connected to the AV receiver.
Turning On & Basic Operations 5 Click “OK” to close the dialog box. This completes the Windows Media Player 11 configuration. You can now play the music files in your Windows Media Player 11 library through the AV receiver. 3 Move your cursor and click on “Turn on media streaming”. A list of media server appears. Wording may vary slightly depending on the network location. 4 On the “Media streaming options”, select the AV receiver and confirm that it is set to “Allow”.
Turning On & Basic Operations ■ Creating a shared folder Playing music files on a shared folder Right-click the folder that you want to share. In order to enjoy Home Media, you must first create a shared folder on your computer. ■ Setting the sharing options 1 2 3 4 1 5 Under “Network File and Folder Sharing”, select “Share”. Playing Music Files on a Shared Folder This section explains how to play music files on a computer or NAS (Network Attached Storage) through the AV receiver.
Turning On & Basic Operations Listening to AM/FM Radio This section describes the procedure of using the buttons on the front panel, unless otherwise specified. Using the Tuner With the built-in tuner you can enjoy AM and FM radio stations. You can store your favorite stations as presets for quick selection. You can also change the frequency steps (➔ page 74). 1 ■ Auto tuning mode ■ Tuning into stations by frequency You can tune into AM and FM stations directly by entering the appropriate frequency.
Turning On & Basic Operations 4 Press MEMORY again to store the station or channel. The station or channel is stored and the preset number stops flashing. Repeat this procedure for all of your favorite AM/FM radio stations. ■ Selecting Presets 1 To select a preset, use PRESET e/r on the AV receiver, or the remote controller’s CH +/–. Tip • You can also use the remote controller’s number buttons to select a preset directly.
Turning On & Basic Operations ■ Listening to Traffic News (TP) RDS program types (PTY) You can search for stations that broadcast traffic news. Type Display 1 2 None None Press RT/PTY/TP three times. If the current radio station is broadcasting TP (Traffic Program), “[TP]” will appear on the AV receiver’s display. If “TP” without square brackets appears, this means that the station is not broadcasting TP.
Turning On & Basic Operations Using Basic Functions Using the Automatic Speaker Setup With the supplied calibrated microphone, Audyssey MultEQ® XT32 automatically determines the number of speakers connected, their size for purposes of bass management, optimum crossover frequencies to the subwoofer (if present), and distances from the primary listening position.
Turning On & Basic Operations 1 2 Turn on the AV receiver and the connected TV. On the TV, select the input to which the AV receiver is connected. Set the speaker setup microphone at the Main Listening Position a, and connect it to the SETUP MIC jack. If “Speakers Type (Front)” is set to “Digital Crossover”, a confirmation screen appears. Select “Next (2-7. Digital Processing Crossover Network)” to display the screen for Digital Processing Crossover Network (➔ page 63). Continue with the settings.
Turning On & Basic Operations 10 Use q/w to select a target, and use e/r to change the setting. After the results of Audyssey MultEQ® XT32 have been saved, the menu will display the “Audyssey” (➔ page 67), “Dynamic EQ” (➔ page 67), “Dynamic Volume” (➔ page 68) settings. Error Messages Changing the Speaker Setup Manually While Audyssey MultEQ XT32 Room Correction and Speaker Setup is in progress, one of the error messages below may appear.
Turning On & Basic Operations Using the Listening Modes Selecting Listening Modes See “About Listening Modes” for detailed information about the listening modes. ■ Listening Mode Buttons Press RECEIVER first. MUSIC MOVIE/TV PURE AUDIO GAME THX MOVIE/TV button This button selects the listening modes intended for use with movies and TV. MUSIC button This button selects the listening modes intended for use with music. GAME button This button selects the listening modes intended for use with video games.
Turning On & Basic Operations SP (speaker layout) Z M*2 J X K C L Listening mode buttons Input Source The following audio formats are supported by the listening modes. A This is mono (monophonic) sound. S This is stereo (stereophonic) sound. Two independent audio signal channels are reproduced through two speakers. D This is 5.1-channel surround sound. This surround system has five main channels of sound and a sixth subwoofer channel (called the point-one channel). F This is 7.
Turning On & Basic Operations ■ Onkyo-Original DSP Listening Modes Listening Mode Description Orchestra Suitable for classical or operatic music, this mode emphasizes the surround channels in order to widen the stereo image, and simulates the natural reverberation of a large hall.
Turning On & Basic Operations ■ Listening Modes Listening Mode Description Pure Audio*1 In this mode, the display and video circuitry are turned off, minimizing possible noise sources for the ultimate in high-fidelity audio reproduction. (As the analog video circuitry is turned off, only video signals input through HDMI IN can be output from the HDMI output.) Pu r eAAu d i o Direct Stereo Sound is output from the front left and right speakers and subwoofer.
Turning On & Basic Operations Listening Mode Description Input Source Speaker Layout Dolby Pro Logic IIx*7 Dolby Pro Logic IIx expands any 2-channel source for 7.1-channel playback. It provides Dolby Pro Logic II a very natural and seamless surround-sound PL Mo v i e experience that fully envelops the listener. As well as music and movies, video games PL Mu s i c can also benefit from the dramatic spatial effects and vivid imaging.
Turning On & Basic Operations Listening Mode PL PL PL PL PL PL Input Source Speaker Layout • Dolby Pro Logic II/IIx*7 Movie + S B Audyssey DSX bM • Dolby Pro Logic II/IIx*7 Music + Mu s i c DSX Audyssey DSX • Dolby Pro Logic II/IIx*7 Game + Game DSX Audyssey DSX The combination of Dolby Pro Logic II/IIx and Audyssey DSX® modes can be used.
Turning On & Basic Operations Listening Mode Description Input Source • Dolby Pro Logic IIz Height + THX Cinema • Dolby Pro Logic IIz Height + THX Music • Dolby Pro Logic IIz Height + THX Games The combination of Dolby Pro Logic IIz Height and THX Cinema/Music/Games modes can be used. The PLIIz and THX indicators light on the AV receiver’s display.
Turning On & Basic Operations Using the Home Menu The Home menu provides quick access to frequently used menus. The Home menu appears only on a TV that is connected to HDMI OUT MAIN. If your TV is connected to other video outputs, use the AV receiver’s display when changing settings. 1 Press RECEIVER followed by HOME. The Home menu will be superimposed on the TV screen. Tip • Alternatively, you can use HOME on the AV receiver. 2 Use e/r or q/w and ENTER to make the desired selection.
Turning On & Basic Operations With the sleep timer, you can set the AV receiver to turn off automatically after a specified period. You can display various information about the current input source as follows. 1 1 Press RECEIVER once followed by SLEEP repeatedly to select the required sleep time. The sleep time can be set from 90 to 10 minutes in 10 minute steps. The SLEEP indicator lights on the AV receiver’s display when the sleep timer has been set.
Turning On & Basic Operations Using the Whole House Mode The Whole House Mode is useful when you want to add extra background music to your home party; this allows you to enjoy the same stereo music as the main room in separate rooms (Zone 2/3). The Whole House Mode selects the same input source for Multi Zone as the main room’s. See also: • “Speaker Setup” (➔ page 59) • “Multi Zone” (➔ page 78) 1 Press WHOLE HOUSE MODE on the front panel.
Turning On & Basic Operations Using Easy Macros By using ACTIVITIES in Easy macro mode, you can sequentially operate Onkyo components via simple commands from a single-button press. These commands are user-definable. See “Using Normal Macros” (➔ page 90). 1 Press ACTIVITIES (MY MOVIE, MY TV, or MY MUSIC) to start the Easy macro command. The default sequences of actions are described below. To change the related source component, see “Changing the Source Components” shown later in this chapter.
Advanced Operations On-screen Setup Using the Quick Setup With the AV receiver connected to a TV, there are two ways of changing the settings on-screen: using the Quick Setup or the Setup menu (HOME). ■ Quick Setup The Quick Setup provides quick access to frequently used settings. You can change settings and view the current information. RECEIVER ENTER q/w/e/r ■ Setup menu (HOME) The Setup menu (HOME) provides a convenient way to change the AV receiver’s various settings.
Advanced Operations Note *1 *2 *3 *4 *5 *6 *7 • The video preview is not displayed when: – HDMI IN 5/6/7 is the current HDMI input source, or – No signal is present on the current input source. • The video of the currently-selected input is displayed on the main screen, not on a preview thumbnail. “Dolby Volume”, “Dynamic EQ” and “Dynamic Volume” cannot be selected when any of the THX listening modes is selected, with “Loudness Plus” set to “On” or “Preserve THX Settings” set to “Yes” (➔ page 62).
Advanced Operations Dolby Volume Late Night Music Optimizer ■ Dolby Volume See “Dolby Volume” of “Audio Adjust” (➔ page 65). ■ Late Night For Dolby Digital and Dolby Digital Plus sources, the options are: ` Off ` Low: Small reduction in dynamic range. ` High: Large reduction in dynamic range. ■ Music Optimizer `Off `On The Music Optimizer function enhances the sound quality of compressed music files. When set to “On”, the M.Opt indicator lights on the AV receiver’s display.
Advanced Operations Re-EQ Screen Centered Dialog With the Re-EQ function, you can compensate a soundtrack whose high-frequency content is too harsh, making it more suitable for home theater viewing. By using the front high speaker, this function moves the center image of dialogs etc. upwards, so that the image of dialogs is fixed to the display height.
Advanced Operations Using the Setup Menu (HOME) ■ Screen Saver If there is no video signal on the current input source and no operation for a specific time (three minutes by default), a screen saver automatically comes on. Explanatory Notes a Main Menu Speaker Setup b Speaker Configuration c d ■ Subwoofer ` Yes ` No Tip RECEIVER ENTER q/w/e/r • The time until the screen saver activates itself can be changed in the “Screen Saver” setting (➔ page 74).
Advanced Operations About the HYBRID STANDBY Indicator By way of optimized circuitry, this function reduces power consumption when the AV receiver is in standby mode. The HYBRID STANDBY indicator will light in either of the following conditions: – “HDMI Through” is enabled (the HDMI indicator is off). – “Network Standby” is enabled (the NET indicator is off).
Advanced Operations Input/Output Assign 1 2 Main Menu 3 4 “Setup” 5 Input/Output Assign Monitor Out On the “Monitor Out” settings, you can select whether or not to have the video sources’ images output through the HDMI output. If you connect your TV to the HDMI output, the “Monitor Out” setting is automatically set and composite video and component video sources are upconverted* and output. Composite video, component video ■ Monitor Out ` Main: Select this if your TV is connected to HDMI OUT MAIN.
Advanced Operations HDMI Input If you connect a video component to an HDMI input, you must assign that input to an input selector. For example, if you connect your Blu-ray Disc/DVD player to HDMI IN 2, you must assign “HDMI2” to the “BD/DVD” input selector. If you’ve connected your TV to the AV receiver with an HDMI cable, composite video and component video sources can be upconverted* and output by the HDMI output. You can set this for each input selector by selecting the “- - - - -” option.
Advanced Operations Digital Audio Input Speaker Setup If you connect a component to a digital audio input, you must assign that input to an input selector. For example, if you connect your CD player to the OPTICAL IN 1, you must assign “OPTICAL1” to the “TV/CD” input selector. Here are the default assignments.
Advanced Operations Note • If the “Speakers Type (Front)” setting is set to “Bi-Amp” or “Digital Crossover”, Powered Zone 2 cannot be used. • When the “Powered Zone 2” setting is set to “Yes” and Zone 2 is turned on, the surround back and front high speakers cannot be used. • If the “Powered Zone 2” setting is set to “No”, the “Powered Zone 3” setting cannot be selected.
Advanced Operations ■ Double Bass This setting is NOT set automatically by Audyssey MultEQ® XT32 Room Correction and Speaker Setup (➔ page 37). ` On ` Off(THX) Turn this setting on to boost bass output by feeding bass sounds from the front left, right, and center channels to the subwoofer. Note • When the “Subwoofer” setting is set to “No” or the “Front” setting to anything other than “Full Band”, this setting is fixed to “- - - - -”.
Advanced Operations Equalizer Settings THX Audio Setup With the Equalizer settings, you can adjust the tone of speakers individually with a 7-band equalizer. The volume of each speaker can be set (➔ page 61). ■ Surr Back Speaker Spacing ` <1ft (<0.3m) ` 1ft-4ft (0.3m-1.2m) ` >4ft (>1.2m) You can specify the distance between your surround back speakers. ■ Manual Equalizer ` On: You can adjust the equalizer for each speaker manually.
Advanced Operations THX Loudness Plus THX Loudness Plus is a new volume control technology featured in THX Ultra2 Plus™ and THX Select2 Plus™ Certified receivers. With THX Loudness Plus, home theater audiences can now experience the rich details in a surround mix at any volume level. A consequence of turning the volume below Reference Level is that certain sound elements can be lost or perceived differently by the listener.
Advanced Operations ■ High Distance, Low Distance ` 0inch(0.0cm) to 12inch(30.0cm) in 1 inch(2.5 cm) steps With this setting, you can adjust the virtual position of tweeter and woofer units. Adjusting “High Distance” virtually shifts woofers behind tweeters. Adjusting “Low Distance” virtually shifts tweeters behind woofers. Audio Adjust 1 2 3 Note 4 “Setup” 5 Dolby Main Menu Audio Adjust With the Audio Adjust functions and settings, you can adjust the sound and listening modes as you like.
Advanced Operations Center Width ` 0 to 3 to 7 With this setting, you can adjust the width of the sound from the center speaker when using the Dolby Pro Logic IIx Music listening mode. Normally, if you’re using a center speaker, the center channel sound is output from only the center speaker. (If you’re not using a center speaker, the center channel sound will be distributed to the front left and right speakers to create a phantom center).
Advanced Operations Dialogue Normalization Dialogue Normalization (DialogNorm) is a feature of Dolby Digital, which is used to keep the programs at the same average listening level so the user does not have to change the volume control between Dolby Digital, Dolby Digital Plus and Dolby TrueHD programs.
Advanced Operations The “Straight Decode” option means that straight decoding listening mode (Dolby Digital, DTS, etc.) is selected. ■ Subwoofer ` No, Yes You can choose whether or not to use the subwoofer with the sound program. ■ Music Optimizer*1 ` Off, On See “Music Optimizer” (➔ page 53). ■ Equalizer*1 ` Off ` Manual: The manual setting in “Equalizer Settings” (➔ page 62) is applied. ■ Audyssey*1 ` Off, Movie, Music See “Audyssey” (➔ page 53). ■ Dynamic EQ*1*2 ` Off, On See “Dynamic EQ” (➔ page 53).
Advanced Operations Movies are mixed in rooms calibrated for film reference. To achieve the same reference level in a home theater system each speaker level must be adjusted so that –30 dBFS band-limited (500 Hz to 2000 Hz) pink noise produces 75 dB sound pressure level at the listening position. A home theater system automatically calibrated by Audyssey MultEQ® XT32 will play at reference level when the master volume control is set to the 0 dB position.
Advanced Operations Name Edit You can enter a custom name for each individual input selector and radio preset for easy identification. When entered, the custom name will appear on the display. The custom name is edited using the keyboard screen. ■ Name 1 Use q/w/e/r to select a character, and then press ENTER. Repeat this step to enter up to 10 characters. 2 To store a name when you’re done, be sure to select “OK” by using q/w/e/r, and then press ENTER. Space: Enters a space character.
Advanced Operations ■ Picture Mode*1*3 ` Custom: All settings can be performed manually. ` ISF Day: Select when the room is bright. ` ISF Night: Select when the room is dark. ` Cinema: Select when the picture source is a movie or alike. ` Game: Select when the video source is a game console. ` Streaming: Attempts to reduce the mosquito noise and block artifact effects. ` Through: Does not adjust picture quality (changes resolution). ` Direct: Does not adjust picture quality (does not change resolution).
Advanced Operations ■ Resolution*4*6*8 ` Through: Select this to pass video through the AV receiver at the same resolution and with no conversion. ` Auto: Select this to have the AV receiver automatically convert video at resolutions supported by your TV. ` 480p (480p/576p), 720p, 1080i, 1080p: Select the desired output resolution. ` 1080p/24: Select this for 1080p output at 24 frames per second. ` 4K Upscaling: Select this for an output resolution four times that of 1080p.
Advanced Operations Audio Selector ■ Audio Selector ` ARC: The audio signal from your TV tuner can be sent to HDMI OUT MAIN of the AV receiver.*1 With this selection, the TV’s audio can be automatically selected as a priority among other assignments. ` HDMI: This can be selected when HDMI IN has been assigned as an input source. If both HDMI (HDMI IN) and digital audio inputs (COAXIAL IN or OPTICAL IN) have been assigned, HDMI input is automatically selected as a priority.
Advanced Operations 2 Use q/w to select the signal format that you want to set, and then use e/r to select a listening mode. Only listening modes that can be used with each input signal format can be selected (➔ pages 40 to 46). The “Last Valid” option means that the listening mode selected last will be used. The “Straight Decode” option means that straight decoding listening mode (Dolby Digital, DTS, etc.) is selected. Note • For the “TUNER” input selector, only “Analog” will be available.
Advanced Operations ■ Power On Volume ` Last, Min, 1 to 99 or Max (Absolute display) ` Last, –QdB, –81dB to +18dB (Relative display) With this preference, you can specify the volume setting to be used each time the AV receiver is turned on. To use the same volume level that was used when the AV receiver was turned off, select “Last”. The “Power On Volume” setting cannot be set higher than the “Maximum Volume” setting.
Advanced Operations HDMI ■ HDMI Control(RIHD) ` Off ` On Turn this setting on to allow p-compatible components connected via HDMI to be controlled by the AV receiver (➔ page 104). Note • When the setting is set to “On” and the menu is closed, the names of connected p-compatible components and “RIHD On” are displayed on the AV receiver. “Search…” → “(name)” → “RIHD On” When the AV receiver cannot receive the name of the component, it is displayed as “Player*” or “Recorder*”, etc.
Advanced Operations ■ Audio Return Channel (ARC) ` Off ` Auto: The audio signal from your TV tuner can be sent to HDMI OUT MAIN of the AV receiver. The audio return channel (ARC) function allows an ARC capable TV to send the audio stream to HDMI OUT MAIN of the AV receiver. To use this function, you must select the TV/CD input selector and your TV must be ARC capable. Default setting: “- - - -” Note • This setting is fixed to “- - - -” when the “HDMI Control(RIHD)” setting is set to “Off”.
Advanced Operations ■ DHCP ` Enable ` Disable This setting determines whether or not the AV receiver uses DHCP to automatically configure its IP Address, Subnet Mask, Gateway, and DNS Server settings. Note • If you select “Disable”, you must configure the “IP Address”, “Subnet Mask”, “Gateway”, and “DNS Server” settings yourself. ■ IP Address ` Class A: “10.0.0.0” to “10.255.255.255” ` Class B: “172.16.0.0” to “172.31.255.255” ` Class C: “192.168.0.0” to “192.168.255.
Advanced Operations Multi Zone Note Main room In addition to the main listening room, you can also enjoy playback in the other room, or as we call Multi Zone. And, you can select a different source for each room. • With this setup, the volume of Zone 2/3 is controlled by the AV receiver. • When Powered Zone 2 is used, playback in the main room is reduced to 5.1 channels. • When Powered Zone 3 is used, playback in the main room is reduced to 3.1 channels.
Advanced Operations Connecting the Zone Speakers to an Additional Amplifier This setup allows 7.1-channel playback in your main listening room and 2-channel stereo playback in Zone 2/3. Controlling Multi Zone Components 2 ■ Operating on the AV receiver Input selector buttons Tip MASTER VOLUME Main room To turn off Zone 2/3, press ZONE 2 or ZONE 3. The Z2/Z3 indicator on the AV receiver’s display flashes. Press OFF. The zone is turned off. • The corresponding trigger output goes low (0 volts).
Advanced Operations 2 3 To select an input source for Zone 2/3, press ZONE repeatedly, followed by an INPUT SELECTOR button. To select AM or FM, press the TUNER input selector and ZONE repeatedly. To turn off Zone 2/3, press ZONE repeatedly, followed by 8RECEIVER. The zone is turned off. Tip • The corresponding trigger output goes low (0 volts). Adjusting the Volume for Zones ■ Operating on the remote controller 1 2 Press ZONE repeatedly. Use VOL q/w.
Advanced Operations Using the Remote Controller in Zone and Multiroom Control Kits Using a Multiroom Kit with Other Components From the connecting block To control the AV receiver with the remote controller while you’re in Zone, you’ll need a commercially available multiroom remote control kit for each zone. • Multiroom kits are made by Niles and Xantech. These kits can also be used when there isn’t a clear line of sight to the AV receiver’s remote sensor, such as when it’s installed inside a cabinet.
Controlling Other Components iPod/iPhone Playback via Onkyo Dock Using the Onkyo Dock The Dock is sold separately. Models sold are different depending on the region. For the latest information on the Onkyo Dock components, see the Onkyo web site at: http://www.onkyo.com Before using the Onkyo Dock components, update your iPod/iPhone with the latest software, available from the Apple web site. For supported iPod/iPhone models, see the instruction manual of the Onkyo Dock.
Controlling Other Components ■ u Dock operation Controlling Your iPod/iPhone Press the appropriate REMOTE MODE button first. By pressing the REMOTE MODE button that’s been programmed with the remote control code for your Dock, you can control your iPod/iPhone in the Dock with the buttons described further in this section. See “Entering Remote Control Codes” for details on entering a remote control code (➔ page 85). See the Dock’s instruction manual for more information.
Controlling Other Components Controlling Other Components You can use the AV receiver’s remote controller to control your other AV components. This section explains how to enter the remote control code for a component that you want to control: DVD, TV, CD, etc. See “Learning Commands” for learning commands directly from another component’s remote controller (➔ page 89). See “Using Normal Macros” for programming ACTIVITIES to perform a sequence of remote control actions (➔ page 90).
Controlling Other Components Entering Remote Control Codes Remapping Colored Buttons You’ll need to enter a code for each component that you want to control. You can change the configuration of colored buttons, with which REMOTE MODE buttons are preset. 1 Look up the appropriate remote control code in the separate Remote Control Codes list. The codes are organized by category (e.g., DVD player, TV, etc.).
Controlling Other Components ` 71323: Onkyo CD recorder without u ` 82990: Onkyo Dock without u Remote Control Codes for Onkyo Components Connected via RI Onkyo components that are connected via u are controlled by pointing the remote controller at the AV receiver, not the component. This allows you to control components that are out of view, in a rack, for example. 1 2 3 Make sure the Onkyo component is connected with an u cable and an analog audio cable (RCA).
Controlling Other Components ■ TV operation Controlling MHL-Enabled Mobile Device Press the appropriate REMOTE MODE button first. By programming the supplied remote controller with the appropriate remote control code, you can use it to operate your MHL-enabled mobile device. Connect your MHL-enabled mobile device to the AUX INPUT MHL jack. We advise you to program the remote control code on the AUX button.
Controlling Other Components Press the appropriate REMOTE MODE button first.
Controlling Other Components • When the remote controller runs out of batteries, all commands acquired will be lost and will have to be learned all over again. Therefore, do not discard your other remote controllers. If the command is learned successfully, the REMOTE MODE button flashes twice.
Controlling Other Components 3 Using Normal Macros You can program the remote controller’s ACTIVITIES to perform a sequence of remote control actions. Example: To play a CD you typically need to perform the following actions: 1. Press RECEIVER to select the Receiver remote controller mode. 2. Press 8RECEIVER to turn on the AV receiver. 3. Press TV/CD to select the TV/CD input source. 4. Press 1 to start playback on the CD player.
Appendix Troubleshooting If you have any trouble using the AV receiver, look for a solution in this section. If you can’t resolve the issue yourself, contact your Onkyo dealer. If you can’t resolve the issue yourself, try resetting the AV receiver before contacting your Onkyo dealer. To reset the AV receiver to its factory defaults, turn it on and, while holding down CBL/SAT, press 8ON/STANDBY. “Clear” will appear on the AV receiver’s display and the AV receiver will enter standby mode.
Appendix If the input signal format is set to “PCM” or “DTS”. 72 Set it to “Off”. ■ Only the front speakers produce sound When the Stereo or Mono listening mode is selected, 43 only the front speakers and subwoofer produce sound. ■ The front high, front wide and surround back speakers produce no sound Depending on the current listening mode, no sound may be produced by the front high, front wide and surround back speakers. Select another listening mode.
Appendix ■ About DTS signals When DTS program material ends and the DTS — bitstream stops, the AV receiver remains in DTS listening mode and the dts indicator remains on. This is to prevent noise when you use the pause, fast forward, or fast reverse function on your player. If you switch your player from DTS to PCM, you may not hear any sound because the AV receiver does not switch formats immediately. In such case, you should stop your player for about three seconds and then resume playback.
Appendix Make sure you’ve selected the correct remote controller mode. 12, 86 When using the remote controller to control other manufacturers’ AV components, some buttons may not work as expected. — Make sure you’ve entered the correct remote control 85 code. Make sure to set the same ID on both the AV receiver 77 and remote controller. ■ Can’t control other components If it’s an Onkyo component, make sure that the u 21 cable and analog audio cable are connected properly.
Appendix If you download or copy large files on your — computer, playback may be interrupted. Try closing any unused programs, use a more powerful computer, or use a dedicated server. If the server is serving large music files to several — networked devices simultaneously, the network may become overloaded and playback may be interrupted. Reduce the number of playback devices on the network, upgrade your network, or use a switch instead of a hub.
Appendix ■ If the picture on your TV/monitor connected to the HDMI output is unstable, try switching the DeepColor function off To turn off the DeepColor function, simultaneously press the STB/DVR and 8ON/STANDBY buttons on the AV receiver. While holding down STB/DVR, press 8ON/STANDBY until “Deep Color:Off” appears on the AV receiver’s display. Then, release both buttons.
Appendix Firmware Update To update the firmware of the AV receiver, you can choose from the following two methods: update via network, or update via USB storage. Choose the one that best suits your environment. Before proceeding with the update, please read the corresponding explanations carefully. ■ Update via network You need a wired Internet connection to update the firmware. ■ Update via USB storage (➔ page 99) Please prepare a USB storage device such as a USB flash memory stick.
Appendix Update Procedure 1 Press RECEIVER followed by HOME on the remote controller. The Home menu appears on the TV screen. 2 Select “Firmware Update” and press ENTER. Note that the “Firmware Update” option will be grayed out for a short while after the AV receiver is turned on. Please wait until it becomes operable. 3 Select “Update via NET” and press ENTER. Note that this option will not be available if there is no firmware file newer than the currently installed version.
Appendix Updating the Firmware via USB The AV receiver allows you to update the firmware using a USB device. Note • Never unplug or turn off the AV receiver during the update process. • Never plug or unplug an HDMI cable or a USB device during the update process. • Never unplug the USB storage device containing the firmware file or the AC power cord during the update process. • Do not attempt to access the AV receiver from your PC while it is being updated.
Appendix Troubleshooting Case 1: If an error occurs, “Error!! *-**” is displayed on the AV receiver’s display. (Alpha-numeric characters on the front display are denoted by asterisks.) Refer to the following table and take appropriate action. ■ Errors during an update via USB Error Code Description *-10, *-20 The USB device was not detected. Make sure the USB flash memory or USB cable is properly connected to the USB port.
Appendix Connection Tips and Video Signal Path The AV receiver supports several connection formats for compatibility with a wide range of AV equipment. The format you choose will depend on the formats supported by your components. Use the following sections as a guide. The on-screen setup menus appear only on a TV that is connected to HDMI OUT MAIN. If your TV is connected to other video outputs, use the AV receiver’s display when changing settings.
Appendix ■ Signal Selection If signals are present at more than one input, the inputs will be selected automatically in the following order of priority: HDMI, component video, composite video. However, for component video only, regardless of whether a component video signal is actually present, if a component video input is assigned to the input selector, that component video input will be selected.
Appendix Video Resolution Chart The following tables show how video signals at different resolutions are output by the AV receiver.
Appendix Using an RIHDcompatible TV, Player, or Recorder p, which stands for Remote Interactive over HDMI, is the name of the system control function found on Onkyo components. The AV receiver can be used with CEC (Consumer Electronics Control), which allows system control over HDMI and is part of the HDMI standard. CEC provides interoperability between various components, however, operation with components other than p-compatible components cannot be guaranteed.
Appendix ■ How to connect and setup 1 2 Confirm the connection and settings. 1. Connect the HDMI OUT MAIN jack to the HDMI input jack of the TV. Blu-ray Disc/DVD player, etc. HDMI connection AV receiver DIGITAL AUDIO connection (OPTICAL) HDMI connection TV, projector, etc. 2. Connect the audio output from the TV to the OPTICAL IN 2 jack of the AV receiver using an optical digital cable.
Appendix About HDMI Designed to meet the increased demands of digital TV, HDMI (High Definition Multimedia Interface) is a new digital interface standard for connecting TVs, projectors, Blu-ray Disc/DVD players, set-top boxes, and other video components. Until now, several separate video and audio cables have been required to connect AV components.
Appendix Network/USB Features Connecting to the Network The following diagram shows how you can connect the AV receiver to your home network. In this example, it’s connected to a LAN port on a router, which has a 4-port 100Base-TX switch built-in. Internet radio Modem WAN LAN Router Network Requirements ■ Ethernet Network For the best results, a 100Base-TX switched Ethernet network is recommended.
Appendix Server Requirements ■ Server playback The AV receiver can play digital music files stored on a computer or media server and supports the following technologies: • Windows Media Player 11 • Windows Media Player 12 • Windows Media Connect 2.0 • DLNA-certified media server If the operating system of your computer is Windows Vista, Windows Media Player 11 is already installed. Windows Media Player 11 for Windows XP can be downloaded for free from the Microsoft web site.
Appendix Supported Audio File Formats For server playback and playback from a USB device, the AV receiver supports the following music file formats. Variable bit-rate (VBR) files are supported. However, playback times may not display correctly. Note • With remote playback, the AV receiver does not support the following music file formats: FLAC and Ogg Vorbis. • In the case of server playback, the above-mentioned file formats may not be played depending on the server type. ■ MP3 (.mp3 or .
Appendix License and Trademark Information “x.v.Color” is a trademark of Sony Corporation. THX and the THX logo are trademarks of THX Ltd. which may be registered in some jurisdictions. All rights reserved. Manufactured under license under U.S. Patent No's: 5,956,674, 5,974,380, 5,978,762, 6,487,535, 6,226,616, 7,212,872, 7,003,467, 7,272,567, 7,668,723, 7,392,195, 7,333,929, 7,548,853 & other U.S. and worldwide patents issued and pending.
Appendix Specifications Amplifier Section Rated Output Power All channels: (North American) 135 watts minimum continuous power per channel, 8 ohm loads, 2 channels driven from 20 Hz to 20 kHz, with a maximum total harmonic distortion of 0.
2-1, Nisshin-cho, Neyagawa-shi, OSAKA 572-8540, JAPAN Tel: 072-831-8023 Fax: 072-831-8163 http://www.onkyo.com/ 18 Park Way, Upper Saddle River, N.J. 07458, U.S.A. Tel: 800-229-1687, 201-785-2600 Fax: 201-785-2650 http://www.us.onkyo.com/ Liegnitzerstrasse 6, 82194 Groebenzell, GERMANY Tel: +49-8142-4401-0 Fax: +49-8142-4208-213 http://www.eu.onkyo.
Using Internet Radio Using Internet Radio Common Procedures in Internet Radio Menu Note • Available services may vary depending on the region. 1 2 Press NET. A list of the network services appears, and the NET indicator lights. If it flashes, verify that the Ethernet cable is firmly connected to the AV receiver. Select the desired service and press ENTER. The top page of the selected service appears.
Using Internet Radio Pandora® internet radio –Getting Started (U.S. only) Pandora is a free, personalized Internet radio service that plays the music you know and helps you discover music you’ll love. 1 Use q/w to select “I have a Pandora Account” or “I’m new to Pandora” and then press ENTER. If you are new to Pandora select “I’m new to Pandora”. You will see an activation code on your TV screen. Please write down this code. Go to an Internet connected computer and point your browser to www.pandora.
Using Internet Radio Using Rhapsody (U.S. only) 1 Use q/w to select “Sign in to your account” and then press ENTER. To use Rhapsody, you need an account. If you don’t have one yet, you can create a new account at www.rhapsody.com/onkyo If you have an existing Rhapsody account, select “Sign in to your account” and press ENTER. Enter your user name (usually your email) and password in the next keyboard screen, or in Web Setup. ■ Using the keyboard screen 1.
Using Internet Radio Using the SiriusXM Internet Radio (North American only) 1 Your Onkyo AV receiver includes a free trial of SiriusXM Internet Radio. The “Account Info” screen shows how many days are left in your trial. After the trial period expires, if you want to continue listening to the service, you must subscribe. To subscribe go to www.siriusxm.com/internetradio with your computer. Use q/w to select “Sign In”, and then press ENTER.
Using Internet Radio Using Last.fm Internet Radio 1 Last.fm is a music service that learns what you love... Your new Onkyo AV receiver is very clever. If you have a free Last.fm account, it will keep track of all the songs you’ve just played. When you visit the Last.fm website, you can see personal charts of the music you’ve enjoyed, share them with friends and see what they like, too. ■ Using the keyboard screen 1. Use q/w/e/r and the ENTER to enter your user name and password. 2. Select “OK”. 3.
Using Internet Radio Using Slacker Personal Radio 1 If you do not have an account, create one on the Slacker website (www.slacker.com) with your computer. If you already have a Slacker account, select “Sign in to your account” and then press ENTER. The keyboard screen appears. You can enter information from the remote control or the keys on the main unit. 2 If there are no mistakes in the information you have entered, use q/w/e/r to select “OK” then press ENTER.
Using Internet Radio Using MP3tunes Listen to your music collection on your home stereo in complete digital fidelity without a personal computer plus safely backup all your songs. Here’s how: Playing Contents on the AV Receiver 5 Tip • Before proceeding, you need to select the MP3tunes service as described in “Common Procedures in Internet Radio Menu” (➔ page 1). Creating an Account on your Computer 1 From your computer, open a web browser and go to: www.mp3tunes.com/signup 2 3 Create an account.
Utilisation d’une webradio Utilisation d’une webradio Procédures courantes dans le menu de webradio Remarque • Les services disponibles peuvent varier en fonction de la région. 1 2 Appuyez sur NET. Une liste des services réseau s’affiche, et le témoin NET s’allume. S’il clignote, vérifiez que le câble Ethernet est fermement branché sur l’ampli-tuner AV. Sélectionnez le service désiré et appuyez sur ENTER. La page principale du service sélectionné s’affiche.
Utilisation d’une webradio Pandora® internet Radio –Pour commencer (États-Unis uniquement) Pandora est un service de radio en ligne libre et personnalisé vous permettant de lire la musique que vous connaissez et de découvrir celle que vous aimez. 1 Utilisez q/w pour sélectionner « I have a Pandora Account » ou « I’m new to Pandora », puis appuyez sur ENTER. Si vous ne connaissez pas Pandora sélectionnez « I’m new to Pandora ». Un code d’activation apparaîtra sur l’écran de votre téléviseur.
Utilisation d’une webradio Utilisation de Rhapsody (Etats-Unis uniquement) 1 Utilisez q/w pour sélectionner « Sign in to your account », puis appuyez sur ENTER. Vous devez posséder un compte pour utiliser Rhapsody. Si vous ne disposez pas encore d’un compte, vous pouvez en créer un à partir de www.rhapsody.com/onkyo Si vous possédez déjà un compte Rhapsody, sélectionnez « Sign in to your account », puis appuyez sur ENTER.
Utilisation d’une webradio Utilisation de SiriusXM Internet Radio (Amérique du Nord uniquement) 1 Votre ampli-tuner AV Onkyo comprend un essai gratuit de SiriusXM Internet Radio. L’écran « Account Info » affiche le nombre de jours restants dans votre essai. Une fois la période d’essai expirée, si vous souhaitez continuer à écouter le service, vous devez vous abonner. Pour vous inscrire, accédez à l’adresse www.siriusxm.com/internetradio à l’aide de votre ordinateur.
Utilisation d’une webradio Utilisation de la webradio Last.fm 1 Last.fm un service de musique qui apprend ce que vous aimez… Votre nouvel ampli-tuner AV Onkyo est très intelligent. Si vous avez un compte Last.fm gratuit, il garde une trace de toutes les chansons que vous avez juste jouées. Quand vous vous rendez sur le site Web de Last.fm, vous pouvez voir les graphiques personnels de la musique que vous avez appréciée, les partagez avec vos amis et également voir ce qu’ils aiment.
Utilisation d’une webradio Utilisation de Slacker Personal Radio 1 Si vous ne possédez pas de compte, créez-en un à partir du site Web de Slacker (www.slacker.com) à l’aide de votre ordinateur. Si vous possédez déjà un compte Slacker, sélectionnez « Sign in to your account », puis appuyez sur ENTER. L’écran clavier s’affiche. Pouvez saisir des informations à partir de la télécommande ou des touches sur l’appareil principal.
Uso de Internet Radio Uso de Internet Radio Procedimientos comunes en el menú Internet Radio Uso de múltiples cuentas El receptor de AV permite múltiples cuentas de usuario, lo que quiere decir que se puede cambiar libremente entre varios usuarios. Después de registrar las cuentas de usuario, el acceso se realiza desde la pantalla “Users”. Nota 1 • Los servicios disponibles pueden variar de una región a otra. 1 2 Pulse NET. Aparecerá una lista de los servicios de red y se iluminará el indicador NET.
Uso de Internet Radio Pandora® Internet Radio –Primeros pasos (solo EE.UU.) Pandora es un servicio de radio por Internet gratuito y personalizado que reproduce la música que usted conoce y le ayudará a descubrir música que le encantará. 1 Utilice q/w para seleccionar “I have a Pandora Account” o “I’m new to Pandora” y luego pulse ENTER. Si no conoce Pandora seleccione “I’m new to Pandora”. Verá un código de activación en la pantalla del televisor. Tome nota de este código.
Uso de Internet Radio Uso de Rhapsody (sólo EE.UU.) 1 Utilice q/w para seleccionar “Sign in to your account” y luego pulse ENTER. Para utilizar Rhapsody, necesitará una cuenta. Si todavía no tiene una, puede crear una nueva en www.rhapsody.com/onkyo Si ya tiene una cuenta Rhapsody, seleccione “Sign in to your account” y pulse ENTER. Escriba su nombre de usuario (normalmente el correo electrónico) y contraseña en la pantalla de teclado que aparece a continuación o en la configuración web.
Uso de Internet Radio Uso de SiriusXM Internet Radio (solo Norteamérica) 1 Su receptor de AV Onkyo incluye una prueba gratuita de SiriusXM Internet Radio. La pantalla “Account Info” muestra los días que quedan de la prueba. Una vez que termine el periodo de prueba, si desea seguir escuchando este servicio, deberá contratarlo. para suscribirse vaya a www.siriusxm.com/internetradio con su ordenador. Utilice q/w para seleccionar “Sign In”, y luego pulse ENTER.
Uso de Internet Radio Uso de Last.fm Internet Radio 1 Last.fm es un servicio musical que sabe lo que le gusta... Su nuevo receptor de AV Onkyo es muy inteligente. Si tiene una cuenta gratuita de Last.fm, hará un seguimiento de todas las canciones que acaba de escuchar. Cuando visite el sitio web de Last.fm, podrá ver listas personales de la música que ha disfrutado, compartirlas con sus amigos y también ver lo que les gusta a ellos. ■ Utilización de la pantalla de teclado 1.
Uso de Internet Radio Uso de Slacker Personal Radio 1 Si no tiene una cuenta, cree una en el sitio web de Slacker (www.slacker.com) con su ordenador. Si ya tiene una cuenta de Slacker, seleccione “Sign in to your account” y pulse ENTER. Aparecerá la pantalla de teclado. Puede introducir información desde el mando a distancia o desde el teclado de la unidad principal. 2 Si no hay errores en la información que ha introducido, utilice q/w/e/r para seleccionar “OK” y luego pulse ENTER.
Y1203-2 SN 29401189B (C) Copyright 2012 Onkyo Sound & Vision Corporation Japan. All rights reserved.
Using Internet Radio Using Internet Radio Common Procedures in Internet Radio Menu Note • Available services may vary depending on the region. 1 Press NET. A list of the network services appears, and the NET indicator lights. If it flashes, verify that the Ethernet cable is firmly connected to the AV receiver. 2 Select the desired service and press ENTER. The top page of the selected service appears.
Using Internet Radio Using Last.fm Internet Radio 1 Last.fm is a music service that learns what you love... Your new Onkyo AV receiver is very clever. If you have a free Last.fm account, it will keep track of all the songs you’ve just played. When you visit the Last.fm website, you can see personal charts of the music you’ve enjoyed, share them with friends and see what they like, too. ■ Using the keyboard screen 1. Use q/w/e/r and the ENTER to enter your user name and password. 2. Select “OK”. 3.
Internetradio verwenden Internetradio verwenden Allgemeine Verfahren bei den Internetradio-Menüs Anmerkung • Die verfügbaren Dienste sind länderabhängig verschieden. 1 Drücken Sie NET. Es erscheint eine Liste der Netzwerkdienste und die NET-Anzeige leuchtet. Wenn sie blinkt, überprüfen Sie ob das Ethernet-Kabel fest im AV-Receiver eingesteckt ist. 2 Wählen Sie den gewünschten Service aus und drücken Sie ENTER. Die oberste Seite des ausgewählten Services erscheint.
Internetradio verwenden Verwendung von Last.fm Internet Radio 1 Last.fm ist ein Musikdienst, der sich Ihre Lieblingsmusik merkt... Ihr neuer Onkyo AV-Receiver ist äußerst clever. Wenn Sie ein kostenloses Last.fm-Konto eingerichtet haben, werden darin alle kürzlich abgespielten Titel gespeichert. Wenn Sie die Last.fmWebsite besuchen, können Sie Ihre persönlichen Charts der von Ihnen abgespielten Musik anzeigen; teilen Sie diese mit Freunden und sehen Sie auch, welche Musik Ihre Freunde mögen.
Remote Control Codes Remote Control Codes 1 / While holding down the REMOTE MODE button to which you want to assign a code, press and hold down [DISPLAY] (about 3 seconds). The REMOTE MODE button/Remote indicator lights. On Integra products, button names are capitalized. For example, “Remote Mode” button and “Display” button. Notes: • Remote control codes cannot be entered for [RECEIVER] and the multi zone button. • Only TV remote control codes can be entered for [TV].
Remote Control Codes Codes de télécommande Códigos de control remoto 1 1 Tout en maintenant enfoncé le bouton REMOTE MODE auquel vous souhaitez associer un code, pressez et maintenez enfoncé le bouton [DISPLAY] (pendant environ 3 secondes). Le bouton REMOTE MODE/le témoin Remote s’allume. Les noms de boutons sont en manjuscules sur les produits Integra. Par exemple, le bouton « Remote Mode » et le bouton « Display ».
Remote Control Codes Codici del telecomando Fernbedienungscodes 1 1 Tenendo premuto il tasto REMOTE MODE al quale si desidera assegnare il codice, premere e tenere premuto [DISPLAY] (per circa 3 secondi). Il tasto REMOTE MODE/l'indicatore Remote si accende. Sui prodotti Integra, i nomi dei tasti sono scritti con l'iniziale maiuscola. Ad esempio, tasto “Remote Mode” e tasto “Display”. Note: • I codici di controllo del telecomando non possono essere inseriti per [RECEIVER] e i tasti multi zona.
Remote Control Codes Afstandsbedieningscodes Fjärrstyrningskoder 1 1 Houd terwijl u de REMOTE MODE toets ingedrukt houdt waarvoor u een code wilt toewijzen de [DISPLAY] toets ingedrukt (ongeveer 3 seconden). De toets REMOTE MODE (afstandsbedieningsmodus) / Het indicatielampje afstandsbediening gaat branden. Op producten van Integra staan de namen van de toetesn in hoofdletters. Bijvoorbeeld, de toetsen “Remote Mode” en “Display”.
Remote Control Codes 遙控代碼 遥控代码 1 1 在按住想指定編碼的 REMOTE MODE (遙控模式)按鈕時,同時按住 [DISPLAY] (顯示)(約 3 秒)。 REMOTE MODE (遙控模式)按鈕 / 遙控指示燈亮起。 在 Integra 系列產品上,按鈕名稱為大寫。 例如,「Remote Mode」(遙控模式) 按鈕和 「Display」(顯示)按鈕。 注意: • [RECEIVER (接收机)] 和多区域按钮不能输入遥控编码。 • 只能为 [TV (电视)] 输入电视遥控编码。 • 除 [RECEIVER (接收机)]、[TV (电视)] 和多区域按钮外,不能为 REMOTE MODE (遥 控模式)按钮指定任何类别的遥控编码。 但是,这些按钮仍可用作输入选择器按钮,因 此,选择与设备所要连接的输入端对应的 REMOTE MODE(遥控模式) 按钮。 例如,如果 要将 CD 播放机连接到 CD 输入端,应在输入遥控编码时选择 [TV/CD (电视 /CD)]。 • [RECEIER] (接收機)和多區域按鈕不能輸入遙控編碼。 • 您只能為 [TV] (電視)
Remote Control Codes Dedicated Onkyo Receiver Cable Set Top Box Default 62503 mio TV 02802 Toshiba 01509 Samsung Zone 2 62506 Motorola UPC 01582 Scientific Atlanta 01877, 01982 Zone 3 62507 01376, 00858, 01562, 01982, 01998, 02378 Verizon 02378 Shaw 01376 Moxi 02187 Videotron 01877 Suddenlink 01376, 01877 NEC 01496 Virgin Media 01068, 01060 Thomson 01582 Cable Set Top Box Cable Set Top Box Cable/PVR Combination 01877 ADB 02254, 02769 Neuf TV 03107 Visiopass 00817
Remote Control Codes IPTV/PVR Combination CD AT&T 00858 Goldmund 70157 Restek 70157 BT Vision 02294 Grundig 70157 Revox 70157 Cisco 00858, 02345, 02378 Harman/Kardon 70157 Rotel 70157 Cassette Deck Kreatel 01385 Hitachi 70032 SAE 70157 Aiwa 70157 Arcam 40076 40029 Motorola 00858, 02378 Integra CD 71817, 70101 Sansui MD Yamaha 70490 40029 Neuf TV 03107 JVC 70072 SAST 70157 Audiolab Philips 02294 Kenwood 70626, 70157, 70036 Siemens 70157 Carver 40029 40076
Remote Control Codes Accessory Polk Audio 82228 Video - Accessory Satellite Set Top Box Satellite Set Top Box Satellite Set Top Box Amstrad 00847, 01175, 01662, 01693 CGV 01413, 01567 Durabrand 01284 Chess 01334, 01626 Echostar Ansonic 02418 CityCom 01176 00775, 00853, 01323, 01409, 02527 Clatronic 01413 Eco-Star 01413 01631 ADB 02254, 02769 Arnion 01300 Aon 02769 ASCI 01334 Clayton 01626 Edision Apple 02615 AssCom 00853 Com Hem 01176, 01915 Elap 01413, 01567 AT&T
Remote Control Codes Satellite Set Top Box Satellite Set Top Box Satellite Set Top Box Satellite Set Top Box Hama 01567 Leiko 01626 Pace Sat Industrie 01611 Hanseatic 01100 Lemon 01334 SAT+ 01409 Hirschmann 00173 Lenoxx 01611 Hitachi 01284 Linsar 01284 00847, 00853, 00887, 01175, 01323, 01356, 01423, 01662, 01693, 01850, 02059, 02060, 02211, 02657 Hornet 01300 Listo 01626 Pacific 01284 Schaub Lorenz 02418 HTS 00775 Lodos 01284 Palcom 01409, 01611 Schneider 01206, 012
Remote Control Codes Satellite Set Top Box Satellite Set Top Box SAT/PVR Combination SAT/PVR Combination Star 00887 UBC 00642 BskyB 01175, 01662 Schneider 01206 Stream System 01300 UEC 00879, 01356 Bush 01645 Sedea Electronique 01206 Strong 00853, 00879, 01284, 01300, 01409, 01626, 02418 United 01251, 01626, 02418 Canal Satellite 02657 SKY Unitymedia 01882 Canal+ 02657 01175, 01662, 01693, 01850, 02754 Universum 00173, 01251 CanalSat 02657 SKY Deutschland 02754 01693, 01
Remote Control Codes Television Akai Television 10178, 10556, 10037, 10714, 10715, 10208, 11675 Basic Line Akiba 10037 Akito Akura Alba 10037 10037 Dick Smith Electronics 10698 Cathay Baur 10037, 10195, 10512 CCE 10037 Digatron 10037 Beaumark 10178 11667 10037 11037 Digihome Beijing 10208 10037 10037, 10668 10171, 10037, 10714, 10668, 11037, 11363, 11585, 11667, 11709 Centurion Digiline Beko 10037, 10714, 10715, 11652 Changhong 10508 Digitek 11709 11666 Digitor 10037, 1
Remote Control Codes Television Television Television Erres 10037 Genesis 10037 ESA 10171 Genexxa 10037 ESC 10037 GFM 10171, 11864, 11886 Euroman 10037 Godrej 11585 Europa 10037 Goldfunk 10668 Europhon 10037 GoldStar Evesham 11248, 11667 10178, 10037, 10714, 10715 Excello 11037 Exquisit 10037 Ferguson 10037, 10625, 10560, 10195, 11037, 11585 Fidelity 10171, 10037, 10512 Finlandia 10208 Finlux 10556, 10037, 10714, 10715, 11248, 11667 Firstline 10556, 10037, 10714, 10
Remote Control Codes Television Lifetec Television 10037, 10714, 10668, 11037, 12001 Linsar 11585 Local India TV 10208 Local Malaysia TV 10698 Lodos 11037 Loewe 10037, 10512, 11884 Logik 11037, 10698 Logix 10668 Luma 11037 Lumatron 10037, 10668 Lumenio 10037 Lux May 10037 Luxor 11037, 10208 LXI 10178 M Electronic 10037, 10714, 10634, 10195, 10512, 11652 Madison 10037 Magnavox 10171, 11454, 11365, 11506, 11755, 11867, 12372 Medion Television 10556, 10037, 10714, 10668, 1103
Remote Control Codes Television Television Television Television Phoenix 10037 Reflex 10037, 10668, 11037 Sei-Sinudyne 10037 SunBriteTV 11610 Phonola 10556, 10037 Relisys 11585 Serie Dorada 10178 Sungoo 11248 Pioneer 10037, 10698, 10512, 11457, 11636, 12171 Remotec 10171, 10037 Shanghai 10208 Sunny 10037 Reoc 10714 Sharp Sunstar 10037 Plantron 10037 Revox 10037 10650, 10818, 11165, 11423, 11659 Sunstech 12001 Playsonic 10037, 10714, 10715, 11652 RFT 10037 Shintosh
Remote Control Codes Television Technosonic Techvision Television 10556, 10625, 10499, 11324 Television VCR Toyoda 11709 VU 11365, 12098 Humax TRANS-continents 10556, 10037, 10668, 11037 Walker 11667 Panasonic 20614, 20616 Waltham 10037, 10668, 11037 Philips 20739 10037, 10698, 10512, 11363 Wansa 12098 ReplayTV 20614, 20616 Wards 10178 Sonic Blue 20614, 20616 Watson 10037, 10714, 10668, 11037 Sony 20636 TiVo 20636, 20739 11709 Techwood 11037, 11667 Tecnimagen 10556 Tec
Remote Control Codes TV/VCR Combination DVD Technics 10556 Dantax 30539, 30713 Harman/Kardon 30582, 31229, 33228 Maxim 30713 Thomson 10625 Denon 30490, 30634, 31634, 32258, 32748 Henss 30713 MDS 30713 Hitachi 30573, 30713, 31664 Medion 30630, 30741 31152 Hoeher 30713 Memorex 32213 3D LAB 30539 Dick Smith Electronics Metz 30571, 30713 30675 30713 31152 Accurian Digihome HotMedia Micromedia 30503, 30539 30713 30713 30646 Acoustic Solutions DigiLogic Humax 30713 M
Remote Control Codes DVD DVD DVD Radionette 30741 Sylvania 30630, 30675 Radiotone 30713 Symphonic 30675 RCA 30522, 30571, 32213, 32587 Tamashi 31394 Tandberg 30713 REC 30490 Targa 30741 Red 32213 Tchibo 30741 Redstar 31394 TCL 32587 TCM 30741 Roadstar 30713 Rotel 30623 Salora 30741 Samsung 30490, 30573, 30199, 30820, 31635, 32069, 32329, 32489, 33195 Sanyo 30713 Schneider 30539, 30646, 30713 Schoentech 30713 Scott 31394 SEG 30713 Semp Sharp 30571, 30741, 306
Remote Control Codes DVD-R TV/DVD Combination Victor 31597 Magnavox Yamaha 30646 Matsui 11037, 30713 Zenith 30741 Medion 12719 Nordmende 12001 Odys 12719 HD-DVD 12372 Integra 32901, 33104 33504 Panasonic 12170 LG 30741 Philips Microsoft 32083 11454, 10556, 11394, 30539 10698 Onkyo 32901, 33104 33504 Powerpoint Xbox 32083 Prosonic 12001 Pvision 12001 TV/DVD Combination RCA 12746, 12932 Akai 11675 Schaub Lorenz 12001 Black Diamond 11037, 30713 SEG 11037, 12719,
Remote Control Codes Memo 19
Y1112-1 SN 29401094 (C) Copyright 2012 ONKYO SOUND & VISION CORPORATION Japan. All rights reserved.