
Installation Guide Owner manual


3-11
4WD DYNO INSTALLATION
Dyno Installation
Version 1 Above Ground Model 424x/424xLC
2
Automotive Dynamometer Installation Guide
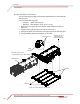
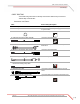
5 Secure the rail clamps to the cradle assembly on the dyno using two 3/8-inch
shoulder bolts and two spacers each.
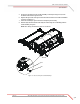
6 Replace the pins and cotter pins removed earlier from the four cradle assemblies
as shown in Figure 3-5.
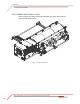
7 Move the rail clamps up and down and verify they move freely.
8 Roll the dyno back and forth and verify the rail clamps are not binding and the
track assembly is square.
Note: For clarity, the stationary dyno is not shown.
Figure 3-6: Secure the Dyno to the Rail Clamps
AD353
spacer
bolt