
Installation Guide Owner manual

3-33
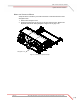
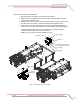
4WD DYNO INSTALLATION
4WD Dyno Movement Test
Version 1 Above Ground Model 424x/424xLC
2
Automotive Dynamometer Installation Guide
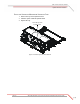
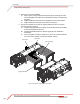
4WD DYNO MOVEMENT TEST
Verify the movement of the 4WD dyno before installing the bridge.
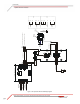
1 Verify the hydraulic motor is filled with hydraulic fluid. Refer to “Filling the
Hydraulic Motor with Hydraulic Fluid” on page 3-31 for more information.
2 Turn the dyno electronics on.
3 Verify the dyno has 100-140 psi of compressed air.
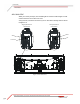
4 Press the red button on the dyno pendant. The button should light up indicating
the brakes are activated. The red button will control the brakes on both dynos.
5 Verify the brakes are working properly by pressing the red button a few times to
cycle the brakes.
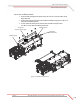
6 With the brakes on, press and hold the "in" button on the dyno movement
pendant. You should hear air venting, and the rail clamps releasing.
Note: The dyno brakes MUST be on or the 4WD dyno will not move.
Note: If the Linx is installed, the brake must be released.
7 Keep holding the "in" button down until you see the dyno begin to move.
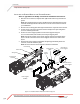
8 Repeat this procedure holding the "out" button.
9 Remove the cap on the hydraulic motor and check the level of the oil. Add
additional oil if needed. Refer to “Filling the Hydraulic Motor with Hydraulic
Fluid” on page 3-31 for more information.