
Installation Guide Instruction Manual


Appendix
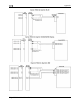
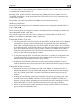
Mounting Tab Dimensions
The dimensions for the included mounting tab are below. Note that the tab does not extend
behind the panel perpendicularly. This sharper angle causes the HS34 to pull itself against the
panel when screwed into the tab.
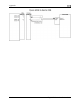
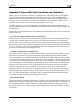
HS34 Mounting
As shown in diagram at right, make a rectangular cutout
– oriented either vertically or horizontally, depending on
HS34 version ordered – of 1.45” by 4.75” (3.69 cm by
12.07 cm). Drill three holes at the locations specified in
the diagram. Your HS34 also shipped with a life-sized
mounting template for making this cutout and drilling
the mounting tab holes. Secure the mounting tab to your
panel in whatever way you desire. Riveting it to the
panel is ideal, but drilling holes for mounting screws
and nuts also works.
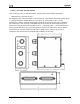
Upon securing the mounting tab to the back of your
panel, slide the HS34 into it. Because the mounting tab
does not extend behind the panel perpendicularly, the
HS34 must slide into the panel such that only the top (or
right, for the horizontal version) of the bezel meets the
panel. The tapered mounting screw fits into the PEM
nut at the end of the mounting tab. Use the included
7/64” Allen wrench to secure the mounting screw into
the mounting tab. As you screw the mounting screw
tighter, the bottom (or left, for the horizontal version) of
the bezel moves closer to the panel. Once it touches the
panel, do not turn the mounting screw any further.
9-18 FlightDEK-D180 Installation Guide