
Installation Guide Instruction Manual


Transducer Installation
the RV series, common locations include the wingtip and under the horizontal stabilizer. Avoid
these three locations:
Engine exhaust paths
The engine itself
Where the sensor will have direct sunlight
Where the backside is exposed to a heated cabin
Mounting Instructions
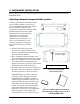
After the mounting location has been determined, drill a 3/8” hole in the skin at the desired
location. Uncoil the cable attached to the OAT probe. Remove the nylon nut from the cable.
From outside the skin of the aircraft, insert the cable first and then the threaded end of the OAT
probe. From within the skin of the aircraft, gently pull the cable until the threaded end of the
OAT probe pokes through the hole. Thread the nylon nut down the cable and up to the threaded
end of the OAT probe. Spread some Loctite around the threads of the OAT probe. Twist the nut
onto the threads of the OAT probe and tighten.
Wiring Instructions.
Once you have physically mounted the OAT probe, route its attached cable to the FlightDEK-
D180. Connect one of the black/white wires to ground, either at a supplied connection on the 37-
pin harness or at another convenient location. If using the EFIS 3-wire OAT simply route either
the yellow or blue wire to ground.
Connect the other black/white wire on the OAT probe to the desired GP input on the FlightDEK-
D180 main harness. Again, if using the EFIS 3-wire OAT simply route either the yellow or blue
wire (whichever did not get routed to ground) to the desired GP input. When routing wires for
this sensor, try to keep wires away from radios, ignition, or other electronics.
CARBURETOR TEMPERATURE SENSOR
Install the carburetor temperature sensor in the venturi
area at the point where ice first begins to form. This is
located after the main nozzle, before the throttle valve.
You must remove the plug in the carburetor housing
below the throttle valve. On 4-cylinder engines which
use the Marvel Schebler MA-3 carburetors, this plug is
located on the forward side. On 6-cylinder engines
using the MA-4 carburetor, the plug is located on the
rear. If your carburetor is not drilled and tapped for the
plug, you must remove the carburetor from the engine
and drill out the lead plug in the appropriate spot. Tap
the hole with a ¼-28 tap. Remove all chips and burrs
before reinstalling.
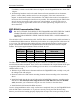
1
k
Ω
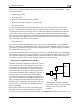
GP in
Route either of the two wires to an electrical ground.
Route the other wire to the general-purpose input of
your choice. If you received a temperature sensor with all black wires (Dynon P/N 100413), you
+5V
ex
citation
Connection for all black wire sensor
(P/N 100413) only. No resistor needed
for black/white wire sensor (P/N
100468).
3-14 FlightDEK-D180 Installation Guide