
Instructions Owner manual


DYNON AVIONICS
101156-000 - Rev D Page 1 of 3
Dynon Servo Shear Screw Replacement Instructions
In the event that a servo’s original shear screw loosens, becomes damaged or breaks, action
must be taken to service the screw. When followed properly, these instructions enable the
customer to perform this task in the field. If the customer does not feel comfortable
performing these actions, Dynon will be happy to inspect and/or repair servos as necessary.
Fig 1
A shear screw is “loose” if the screw is no longer firmly seated in the threaded servo
disc. This can be observed by holding the attachment disc completely still and
attempting to rotate the arm/capstan. No movement should be possible. If there is
any movement at all between these two parts, your shear screw is loose and should be
repaired per the following instructions. However, slight movement of the ENTIRE
arm/capstan/disc/shaft relative to the internal gearing is expected. This is inherent to
the design and due to designed-in drive gear lash and tolerance of the shaft captured
in the servo housing. Small amounts of movement here are normal and should not be
confused with a loose arm/capstan or shear screw.
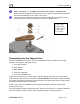
1. Servo Arm
2. Flat washer
3. Wave washer
4. Castle nut
5. Cotter pin
6. Shear screw