
Instructions Owner manual


DYNON AVIONICS
101156-000 - Rev D Page 2 of 3
Care should always be taken when reworking the safety mechanisms on the servos.
These features were specifically designed to fail under certain conditions. Deviation
from these instructions could result in property damage, injury, or death.
Removing Arm/Capstan
To fully access the shear screw the arm/capstan must be removed. To do this, the cotter pin
must be removed from the castellated nut. Note that cotter pins should never be reused;
replace with a new pin. Unthread the castellated nut, remove wave and nylon washers, and
remove the arm or capstan. Put all these pieces aside – they will be reused.
Replacement of Broken or Loose Shear Screw
If the shear screw head has broken off, inspect the remaining threaded portion of the screw
in the attachment disc. If the remaining threaded screw piece does not interfere with the
arm – as is the case most of the time – it is not necessary to remove it as the threadlocker will
keep it in place. However, if the broken neck tip of the screw protrudes past the face of the
attachment disc hole or if the remaining screw portion seems loose, it must be removed.
Clean the face of the attachment disc to remove any hardened threadlocker to prepare the
area for the new hardware.
If the shear screw has loosened, simply unscrew it completely and remove as much residual
threadlocker off the screw as possible and clean with isopropyl alcohol.
Clear the shear screw hole of any loose debris using compressed air.
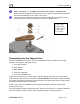
Preparing/Installing Replacement Shear Screw
This step requires Loctite 271 or 263 red liquid threadlocker. Substitutions are not
permitted.
This step requires a torque wrench/driver that can measure 16 in-oz (1 in-lb) of force.
The servo attachment disc was designed with 3 threaded shear screw holes. This allows a new
screw to be installed, in either of the two remaining threaded holes, even when the lower
half of a previously sheared screw remains.
Apply a single drop of red Loctite 271 or 263 threadlocker to the threads of the replacement
shear screw, ensuring that the liquid wicks to all of the threads. Install in any of the
available servo disc holes. Tighten the shear screw to 16 in-oz (1 in-lb). This torque value
MUST NOT be exceeded as it may fatigue or break the shear screw. Remember that in this
application, it is the threadlocker’s job to keep the screw in place, not the stress of the
screw’s threads or head against the disc. Wipe excess threadlocker from around the head of
the shear screw and allow it to cure for at least 24 hours at room temperature (colder
temperatures may take longer) before the servo arm or capstan is reinstalled.