Page 1 16:45 7/1/08 18858_OPS_MANUAL_UPDATE_US.
Important safety instructions 18858_OPS_MANUAL_UPDATE_US.qxd 7/1/08 16:45 Page 2 IMPORTANT SAFETY INSTRUCTIONS When using an electrical appliance, basic precautions should always be followed, including the following: READ ALL INSTRUCTIONS BEFORE USING THIS VACUUM CLEANER WARNING TO REDUCE THE RISK OF FIRE, ELECTRIC SHOCK, OR INJURY: 1 Do not leave appliance when plugged in. Unplug from electrical outlet when not in use and before servicing.
18858_OPS_MANUAL_UPDATE_US.qxd 7/1/08 16:45 Page 3 Important safety instructions Please read this guide carefully before use.
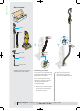
Assembling 18858_OPS_MANUAL_UPDATE_US.qxd 7/1/08 16:45 Page 4 Box contents Wand Hose 2 1 Stair tool Brush tool Crevice tool Additional accessories may be included with some models. Assembling your DCO7 This machine was inspected and packaged carefully before being shipped from the factory. 2 While pressing the hose release button, slide the wand down inside the hose. If you need assistance during assembly or operation, please call the Dyson Helpline at 1- 866 - 693 - 9766.
18858_OPS_MANUAL_UPDATE_US.qxd 7/1/08 16:45 Page 5 Assembling 3 3 Slide the wand into the top of the machine until it clicks securely into place. You may need to press firmly and should hear a ‘click’ sound. 4 4 Push the brush and stair tools securely into the storage holes on either side of machine. Fit the crevice tool into the tool clip on the back of the wand. 5 5 Store the cord safely by winding it counter-clockwise around the cord winders and securing with the cord clip.
Using your DCO7 18858_OPS_MANUAL_UPDATE_US.qxd 7/1/08 16:45 Page 6 Using your DCO7 WARNING • This machine is intended for domestic use only. Fine dust such as plaster dust or flour should only be vacuumed in small amounts. • Consult your flooring manufacturer’s instructions before vacuuming your flooring, rugs and carpets. Some carpets will fuzz if a rotating brushbar is used when vacuuming. If this happens we recommend vacuuming in bare floors mode and consulting with your flooring manufacturer.
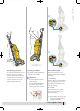
18858_OPS_MANUAL_UPDATE_US.qxd 7/1/08 16:45 Page 7 Using your DCO7 1 2 Transporting your Dyson Carrying your DCO7 Brush control system To move the machine from room to room, ensure it is upright, with the cord stored on the cord winders and the wand securely in place. Tilt back on the rear wheels and push forward. Your DCO7 should be lifted by using the carry handle. Ensure the machine is in an upright position before adjusting the setting. CAUTION • Do not shake the machine when carrying.
Washing your filter 18858_OPS_MANUAL_UPDATE_US.qxd 7/1/08 16:45 Washing your filter Page 8 1 CAUTION • Turn power off and unplug before washing filter. Failure to do so could result in electric shock or personal injury. 2 B 3 A A Lifetime washable filter IMPORTANT Check your washable filter regularly and wash at least every 6 months according to instructions to maintain performance. Removing washable filter 1 Press the filter release catch to remove the filter housing from the machine.
18858_OPS_MANUAL_UPDATE_US.qxd 7/1/08 16:45 Page 9 Washing your filter 4 6 5 7 12 hrs 2 1 4 Rinse the blue foam pad and squeeze gently, repeating until the water runs clear. 5 Rinse the yellow case and tap firmly, repeating until the water runs clear. 6 Leave in a warm place to dry for 12 hours. Make sure the filter is completely dry before replacing in the machine. CAUTION • Do not dry in an oven or microwave. • Do not dry in a clothes dryer. • Do not dry near an open flame.
Using the tools 18858_OPS_MANUAL_UPDATE_US.qxd 7/1/08 16:45 Page 10 Using the tools A Choosing the right tool The tools allow you to clean surfaces above the floor and to reach hard to clean areas. Ensure the machine is in an upright position before using tools. B A Brush tool – with soft bristles to dislodge dust and cobwebs. Can be used to clean vents and some furniture. B Stair tool – with velour strips to pick up hairs and an agitating edge to lift the carpet.
18858_OPS_MANUAL_UPDATE_US.qxd 7/1/08 16:45 Page 11 Using the tools Hose mode Press the hose release button and remove the wand. Fit one of the tools directly on to the end of the hose. FOR YOUR SAFETY • When the hose is fully extended, grasp firmly by the hose, not the tool. Reversed wand mode (for selected models only) Remove wand as shown for hose mode. Reverse the wand and click it into the end of the hose, pressing the hose release button to ensure a correct fit.
Emptying the Clear bin TM 18858_OPS_MANUAL_UPDATE_US.qxd 7/1/08 16:45 Page 12 Emptying the Clear bin TM CAUTION • Turn power off and unplug before emptying the bin. Failure to do so could result in electric shock or personal injury. • Do not use machine without clear bin in place. TM TM TM Removing the bin Clear bin emptying option 1 Clear bin emptying option 2 Press the cyclone release catch with your thumb to remove the clear bin assembly from the machine.
18858_OPS_MANUAL_UPDATE_US.qxd 7/1/08 16:45 B D TM C Emptying the Clear bin A Page 13 TM Shroud cleaning (when necessary) To reassemble the clear bin , place on the floor with the clear bin base closed. TM To remove any build-up of lint or large dust particles on the shroud: A Press the bin release catch to remove the clear bin . TM TM C Holding the carry handle, put the cyclone assembly inside the clear bin ,line up the front and rear catches, and push down to click the catches into place.
Clearing blockages 18858_OPS_MANUAL_UPDATE_US.qxd 7/1/08 16:45 Page 14 Clearing blockages A CAUTION • Unplug the machine from the electrical outlet before starting to look for blockages. Failure to do so could result in electric shock or personal injury. B • If any part of the machine becomes blocked it may overheat and then stop automatically shut off. Unplug machine and leave to cool down for at least 60 minutes before clearing the blockage.
18858_OPS_MANUAL_UPDATE_US.qxd 7/1/08 16:45 Page 15 • The ratcheting noise may warn that the brushbar is obstructed. If this occurs, unplug the machine from the electrical outlet before removing the obstruction. 1 2 3 U-bend Airway inspection valve Brushbar • Tilt the machine forward to slide out the U-bend. • Squeeze the valve release buttons to remove the airway inspection valve. Lay the machine on its front. • Check inside for blockages. • Check inside for blockages.
Using and maintaining optional accessories 18858_OPS_MANUAL_UPDATE_US.qxd 7/1/08 16:45 Page 16 Using and maintaining optional accessories • Not all accessories available with all models. Low reach floor tool Flexi crevice tool Usage Usage Extends and flexes to clean awkward gaps and spaces • Colors may vary. CAUTION • Do not use your vacuum cleaner outdoors or on wet surfaces. Vacuum may be used inside a garage only when used with the Model 08909 Dyson Car Cleaning Kit accessories.
18858_OPS_MANUAL_UPDATE_US.
Troubleshooting your Dyson 18858_OPS_MANUAL_UPDATE_US.qxd 7/1/08 16:45 Page 18 Problem Less than normal or no pickup from cleanerhead or Machine turns off in use Potential solution • If vacuuming non-delicate carpeting, ensure brush control is set on carpets mode. Note: brushbar will only spin when the handle is reclined. • Remove and check washable filter to see if it is clean (filter should be blue in color). Wash filter if necessary as shown on page 8.
18858_OPS_MANUAL_UPDATE_US.qxd 7/1/08 Limited 5 year household warranty Terms and Conditions of the Dyson 5 year limited warranty 120V 60Hz 10.5A Note your serial number for future reference: Your serial number can be found on the rating plate, which is on the base of your machine between the wheels. Page 19 Thank you for choosing to buy a Dyson.
7/1/08 16:45 Terms and Conditions (continued) Page 20 Warranty Limitations and Exclusions • Any implied warranties relating to your vacuum cleaner, including but not limited to warranty of merchantability or warranty of fitness for a particular purpose, are limited to the duration of this warranty. This limitation is not allowed by some states and so this limitation may not apply to you. • Your remedy for breach of this warranty is limited to the warranty service described above. Dyson, Inc.