Instruction Manual Bedienungsanleitung Manuel d’utilisation Manuale di Istruzioni SAFE® Select Technology, Optional Flight Envelope Protection
EN NOTICE All instructions, warranties and other collateral documents are subject to change at the sole discretion of Horizon Hobby, LLC. For up-to-date product literature, visit www.horizonhobby.com or towerhobbies.com and click on the support or resources tab for this product.
EN Box Contents Quick Start Information Transmitter Setup Dual Rates (Measure in AS3X mode only) Set up your transmitter using the transmitter setup chart Hi Rate Low Rate Ail S45mm T45mm S35mm T35mm Ele S55mm T55mm S45mm T45mm Rud 55mm 40mm Flaps Full T=55mm Half T=30mm Center of Gravity (CG) 89mm-102mm back from leading edge of wing at the fuselage.
EN SAFE® Select Technology (BNF Basic) The evolutionary SAFE® Select technology can offer an extra level of protection so you can perform the first flight with confidence. No complex transmitter programming is required. Just follow the simple bind process to make the SAFE Select system active. When activated, bank and pitch limitations keep you from over-controlling and automatic self-leveling makes recovery from risky or confusing attitudes as simple as releasing the sticks.
EN Model Assembly Landing Gear Installation 3 x 8mm button head machine Mount the Landing Gear to the Fuselage 1. Insert left landing gear assembly into the pocket on the side of the fuselage as shown. The landing gear legs mount to the aluminum block which can pivot in the pocket. 2. Thread the included two 3 x 8mm machine screws through the landing gear leg into the threaded holes in the aluminum pivot block. 3. Repeat the process to install the Right landing gear assembly.
EN Model Assembly Continued Lightweight and Heavy Stabilizer Joiners The Night Timber X includes two stabilizer joiners; a lightweight composite joiner, and a heavier steel joiner. For tame flying and maximum stability in general flight, use the lightweight joiner to keep the CG at the front of the recommended CG range. For maximum performance and stability in high alpha maneuvers, use the steel joiner to shift the CG to the rear of the recommended CG range. Horizontal Tail Installation 1.
EN Model Assembly Continued Propeller Installation 1. Remove the spinner screw (A) from the spinner (B). 2. Slide the propeller (C) propeller backplate (D) and collet (E) onto the motor shaft. C 3. Tighten the spinner nut (F) using an adjustable wrench. 4. Slide the spinner onto the shaft in front of the propeller. E 5. Secure the spinner with the spinner screw. Disassemble in reverse order. B F A D Wing Assembly 1.
EN Battery Installation and ESC Arming Battery Selection The Spektrum 2200mAh 14.8V 4S 30C Li-Po battery (SPMX22004S30) is recommended. The SPMX22003S30 battery may also be used. For maximum performance with 3 cells, a 13 X 6.5 electric propeller may be utilized. Refer to the Optional Parts List for other recommended batteries. If using a battery other than those listed, the battery should be within the range of capacity, dimensions and weight of the Spektrum Li-Po battery packs to fit in the fuselage.
EN Binding General Binding Tips • The included receiver has been specifically programmed for operation of this aircraft. Refer to the receiver manual for correct setup if the receiver is replaced. • Keep away from large metal objects while binding. • Do not point the transmitter’s antenna directly at the receiver while binding. • Once bound, the receiver will retain its bind settings for that transmitter until you re-bind. • If the receiver loses transmitter communication, the failsafe will activate.
EN SAFE® Select Switch Designation Once SAFE Select is enabled, you can choose to fly in SAFE mode full-time, or assign a switch. Any switch on any channel between 5 and 9 can be used on your transmitter. If the aircraft is bound with SAFE Select disabled, the aircraft will be in AS3X mode exclusively. WARNING: Keep all body parts well clear of the propeller and keep the aircraft securely restrained in case of accidental throttle activation.
EN Control Horn and Servo Arm Settings The table to the right shows the factory settings for the control horns and servo arms. Fly the aircraft at factory settings before making changes. NOTICE: If control throws are changed from the factory settings, the AR637TA gain values may need to be adjusted. Refer to the Spektrum AR637TA manual for adjustment of gain values.
EN Control Direction Test Switch on the transmitter and connect the battery. Use the transmitter to operate the aileron, elevator and rudder controls. View the aircraft from the rear when checking the control directions. Transmitter command Control Surface Response Elevators 2. Push the elevator stick forward. The elevators should move down, which will cause the aircraft to pitch down. Elevator 1. Pull the elevator stick back. The elevators should move up, which will cause the aircraft to pitch up.
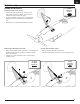
EN AS3X Control Direction Test (BNF Basic) This test ensures that the AS3X® control system is functioning properly. Assemble the aircraft and bind your transmitter to the receiver in AS3X mode before performing this test. Aircraft movement AS3X Reaction CAUTION: Keep all body parts, hair and loose clothing away from a moving propeller, as these items could become entangled. 2. Move the entire aircraft as shown and ensure the control surfaces move in the direction indicated in the graphic.
EN Flying Tips and Repairs Consult local laws and ordinances before choosing a flying location. Range Check your Radio System Before you fly, range check the radio system. Refer to your specific transmitter instruction manual for range test information. Oscillation Once the AS3X system is active (after advancing the throttle for the first time), you will normally see the control surfaces react to aircraft movement.
EN SAFE Select Flying NOTICE: If SAFE Select is active, a flap to elevator compensation can be used to minimize pitch up when flaps are deployed. However, do not use throttle to elevator mix to reduce pitch up with flaps deployed as the mix will effect the high and low speed angles with flaps deployed. For a short takeoff, apply full throttle and hold up elevator until the desired pitch attitude is reached. Continue holding up elevator until the appropriate altitude is reached.
EN Troubleshooting Guide AS3X Problem Oscillation Inconsistent flight performance Incorrect response to the AS3X Control Direction Test Possible Cause Damaged propeller or spinner Imbalanced propeller Motor vibration Loose receiver Loose aircraft controls Worn parts Irregular servo movement Trim is not at neutral Sub-Trim is not at neutral Aircraft was not kept immobile for 5 seconds after battery connection Solution Replace propeller or spinner Balance the propeller Replace parts or correctly align al
EN Slat Installation (optional) Required Adhesives A Medium CA Slats are beneficial for STOL performance but can decrease roll authority and inverted flight performance. If your Night Timber X will be primarily flown in a STOL manner, rather than for aerobatics, you may want to install them. 1. Carefully remove all the foam slat pocket covers (A) from the wing. 2. When the pocket is exposed, carefully apply medium CA to each slat pocket. 3.
EN Float Installation G H 1. Align and mount the float set assembly to the bottom of the fuselage. F 2. Secure the back section of the floats to the fuselage using the included bracket (F) and 2 screws (G). 3. Secure the front section of the floats using the two included screws (H) to secure the front support members to the bottom of the fuselage. 4. Attach the included wire from each float rudder (I) to the pull–pull horn (J) using the two included pins (K). Disassemble in reverse order.
EN DX8e, DX8 (Gen2), DX9, DX18, DX20, iX12 and iX20 TIP: It is possible to enable or disable the four servo aileron mix by assigning a switch to the P-Mix instead of setting the switch to ON during setup in steps 8 and 9. TIP: If you want to use SAFE select with the Advanced model setup, you can assign a switch to any channel 7-9 for SAFE select. Even though the AR637TA only has 6 servo ports, it can use up to channel 9 to key SAFE Select.
EN Replacement Parts Part # EFL13851 EFL13852 EFL13853 EFL13854 EFL13856 EFL3854 EFL3855 EFL5253 EFL5254 EFL5256 EFL5257 EFL5258 EFL5262 EFL5263 EFL5264 EFL5265 EFL5267 EFL5268 EFL5269 EFLM17553 SPMAR637T SPMSA332 SPMSA332R SPMXAE1060 20 Description Fuselage set :Night Timber X Wing set : Night Timber X Horizontal stab: Night timber X LED regulator : Night timber X Decal Sheet: Night Timber X Steel Stab Joiner: Timber X Leading Edge Slat: Timber X Battery Hatch: Timber Cowl: Timber Hardware Set: Timber L
EN AMA National Model Aircraft Safety Code Effective January 1, 2014 A. GENERAL A model aircraft is a non-human-carrying aircraft capable of sustained flight in the atmosphere. It may not exceed limitations of this code and is intended exclusively for sport, recreation, education and/or competition. All model flights must be conducted in accordance with this safety code and any additional rules specific to the flying site. 1. Model aircraft will not be flown: (a) In a careless or reckless manner.
EN Limited Warranty What this Warranty Covers Horizon Hobby, LLC, (Horizon) warrants to the original purchaser that the product purchased (the “Product”) will be free from defects in materials and workmanship at the date of purchase. that you may need any assistance. For questions or assistance, please visit our website at www.horizonhobby.
EN FCC Information FCC ID: BRWTIARLGTNG1 This device complies with part 15 of the FCC rules. Operation is subject to the following two conditions: (1) this device may not cause harmful interference, and (2) this device must accept any interference received, including interference that may cause undesired operation. CAUTION: Changes or modifications not expressly approved by the party responsible for compliance could void the user’s authority to operate the equipment.
©2020 Horizon Hobby, LLC. E-flite, Timber, Avian, Plug-N-Play, Bind-N-Fly, BNF, the BNF logo, DSM, DSM2, DSMX, Spektrum AirWare, EC5, IC5, AS3X, SAFE, the SAFE logo, ModelMatch, and the Horizon Hobby logo are trademarks or registered trademarks of Horizon Hobby, LLC. The Spektrum trademark is used with permission of Bachmann Industries, Inc. Futaba is a registered trademark of Futaba Denshi Kogyo Kabushiki Kaisha Corporation of Japan.