Apprentice S 15e ® Instruction Manual Bedienungsanleitung Manuel d’utilisation Manuale di Istruzioni
EN NOTICE All instructions, warranties and other collateral documents are subject to change at the sole discretion of Horizon Hobby, Inc. For up-to-date product literature, visit www.horizonhobby.com and click on the support tab for this product.
EN Introduction Congratulations on choosing the E-flite® Apprentice® S 15e airplane. Within your grasp is the most intelligent RC airplane ever offered by Horizon Hobby. Based on the renowned original Apprentice model, at its heart is groundbreaking SAFE™ (Sensor Assisted Flight Envelope) technology that makes learning to fly RC easier than ever and more fun for the experienced pilot too.
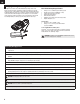
EN Charging the Flight Battery Your Apprentice S trainer comes with a DC balancing charger and 3S Li-Po battery. You must charge the included Li-Po battery pack with a Li-Po specific charger only (such as the included charger). Never leave the battery and charger unattended during the charge process. Failure to follow the instructions properly could result in a fire. When charging, ensure the battery is on a heat-resistant surface. Charge the battery pack while you are assembling the aircraft.
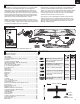
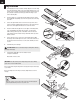
EN Landing Gear Installation 1. Remove the spinner, nut, washer, spinner back plate and propeller assembly (A). Remove 3 screws (B) and the cowling (C) from the fuselage (D). Tools are required to loosen the nut and screws. 2. Turn the model so you can see the bottom of the fuselage. 3. Under the fuselage, loosen the screw (E) in the nose gear steering arm and insert the strut (F) (flat spot facing to the front) fully in the mount (G). 4. Fully tighten the screw onto the flat spot of the strut. 5.
EN Wing Installation 1. Carefully apply the 2 strips of double-stick tape (A) to the root of the wing as shown. Assemble the wings on the carbon wing tube (B) so there is no gap. No epoxy is required to hold the wings together; however, if desired, epoxy may be used (instead of the tape) to adhere the wings to each other on the wing tube. 2. Ensure the wings are correctly aligned. Using double stick tape, install the front (C) and rear (D) wing covers in their respective slots on the wing as shown. 3.
EN Sensor Assisted Flight Envelope (SAFE) Technology Sensor Assisted Flight Envelope (SAFE) Technology SAFE technology is a revolutionary flight training system designed to give you a stable platform for safely developing your flying skills. This is not an autopilot or self-guiding robot. The sensors and software in this system help you fly the aircraft where you want to go while decreasing the risk of an out-of-control crash.
EN Sensor Assisted Flight Envelope (SAFE) Technology You control the help SAFE™ technology provides while you learn to fly. As your flying skills grow, decrease SAFE technology assistance. Change aircraft response at any time by moving the Channel 5 (SAFE Flight mode) switch on your transmitter. IMPORTANT: These instructions are for the included DX5e transmitter (or similar transmitters) with a 3-position switch for Channel 5.
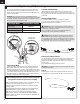
EN Transmitter Installing the Transmitter Batteries Your Spektrum DX5e comes prebound to the aircraft. Remove the battery cover, install the four included batteries (noting proper polarity) and reinstall the battery cover. Low Battery Alarm When the battery voltage drops below 4.7 volts, an alarm sounds and the voltage LEDs flash. The batteries must be replaced immediately. If this happens while flying, land your aircraft as soon and as safely as possible.
EN Transmitter Continued Explanation of DX5e Transmitter LEDs, Switches and Modes for the Apprentice. Trainer/Bind/Panic Switch (B): This switch is used as both the trainer and bind switch as well as the Panic Switch for your Apprentice S. For complete binding instructions, refer to the binding section below. When using the trainer function, connect the trainer cord (SPM6805) into the trainer port in both the master (instructor) and the slave (student) transmitters.
EN Flight Battery Installation, SAFE system and Electronic Speed Control (ESC) Arming 1. Rest the aircraft on a flat surface with the landing gear facing up and make sure the ESC switch is OFF. 2. Turn the latch (A) and open the battery hatch. 3. Lower the throttle and throttle trim, then power on the transmitter for at least 5 seconds. 4. Center and secure the flight battery (B) in the battery compartment using the hook and loop straps (C) so that the aircraft has a balanced Center of Gravity (CG).
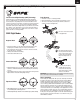
EN Control Horn and Servo Arm Settings NOTICE: Moving a linkage to another position may block the servo arm or affect SAFE technology functionality. The Illustration shows the correct hole settings in servo arms and control horns. Elevator Dual Rate High Rate Low Rate Aileron 23.0mm (0.91 in) 18mm (0.71 in) Elevator 23.0mm (0.91 in) 18mm (0.71 in) Rudder 35mm (1.35 in) 28mm (1.
EN Control Direction Test Power on the transmitter. Make sure the throttle is at 0% and that throttle trim is fully lowered on the transmitter. Power on the model. Make sure the control surfaces (rudder, elevator and ailerons) are at neutral or 0 degrees. Ideally, centering trim will center the surfaces. Refer to Control Centering instructions to adjust control surfaces.
EN Flight Control For smooth control of your aircraft, always make small control moves. All directions are described as if you were sitting in the aircraft. For example, when the aircraft’s nose is pointing toward you, left steering (rudder) will turn the aircraft left (your right while holding the transmitter). • Banking right and left: Move the aileron stick right to make the aircraft drop the wing (bank) to the right and move the aileron stick left to bank left.
EN Flight Training Simulator Use We recommend using your DX5e transmitter with the Phoenix R/C Pro Flight Simulator 4.0 (RTM4000). The simulator software includes the original Apprentice and other trainer aircraft. Use the transmitter with the simulator to practice and experiment with your aircraft without damaging your model.
EN Flight Trimming Make yourself familiar with your transmitter’s controls and the aircraft’s response before flying by performing the recommended Control Direction Test. The flight trim buttons are used to fine tune your aircraft for straight and level flight. When trimmed correctly, your aircraft flies a straight path with wings level, steadily climbs at full throttle, maintains a constant altitude at half throttle, and gently descends at low throttle.
EN Range Check Before each flying session, and especially with a new model, you should perform a range check. The DX5e incorporates a range testing system. Placing the transmitter in RANGE CHECK mode reduces the output power, allowing a range check. 1. Power on the transmitter for 5 seconds or more with the throttle stick and trim low. Power on the ESC Switch and keep the aircraft immobile for at least 5 seconds. 2. Face the model with the transmitter in your normal flying position.
EN Takeoff Ground Launch Take off from the ground in Beginner mode is recommended for first flights, however, if the ground is not hard and level, get help to hand launch your aircraft. 1. Place the aircraft on its landing gear in a large, open area with smooth asphalt or concrete. The aircraft’s nose should point into the wind (in no greater than 5–7 mph (8–11km/hr) wind). 2. Stand behind your aircraft so you can see the rudder, ailerons and elevator. 3.
EN Flying Let the aircraft climb at full throttle, into the wind, until the aircraft gets about 300 feet (91meters) above the ground, then decrease the throttle to half (50%). TIP 50% throttle In Beginner mode, when properly trimmed, your aircraft will climb at full throttle without use of elevator. Full throttle Reduced throttle Try to make only small and gentle movements of the control sticks so you can see how the aircraft responds. Your aircraft is designed to climb and turn well.
EN Post Flight NOTICE: When you are finished flying, never keep the aircraft in the sun. Do not store the aircraft in a hot, enclosed area such as a car. Doing so can damage the foam. Post Flight Checklist 1. Turn off ESC switch 2. Power off transmitter 3. Remove flight battery from aircraft 4. Recharge flight battery 5. Repair or replace all damaged parts 6. Store flight battery apart from aircraft and monitor the battery charge 7.
EN Service of Power Components Disassembly Assembly 1. Remove the spinner (A) from the spinner backplate (B), using a small amount of force. 2. Remove the hex nut (C), washer (D) and propeller (E) from the collet (F). A tool may be required to remove the hex nut. 3. Carefully remove 3 screws (G) and the cowling (H) from the fuselage. 4. Remove the collet from the motor (I). 5. Remove 4 screws (J) from the motor mount (K) and the fuselage. 6. Disconnect the motor connectors from the ESC connectors. 7.
EN Water Takeoff and Landing Using the Optional Float Set IMPORTANT: We recommend flying with floats only once you have become able to fly comfortably in Experienced flight mode. Only use the floats if you are comfortable flying your aircraft and have repeatedly taken off, flown and landed with success. Flying off water poses a higher risk to the airplane because the electronics can fail if fully immersed in water. CAUTION: Never go alone to get a downed model in the water.
EN Optional Transmitter Setup If using any DSM2/DSMX transmitter other than the included DX5e (3 pos gear switch) the radio will have to be configured correctly for the SAFE system to work properly. Refer to your transmitter’s manual for more information about transmitter setup. Refer to the Receiver Setup section of this manual to select the SAFE Flight modes you desire to use on a transmitter with only a 2 position Channel 5 switch.
EN AMA National Model Aircraft Safety Code Effective January 1, 2014 A. GENERAL A model aircraft is a non-human-carrying aircraft capable of sustained flight in the atmosphere. It may not exceed limitations of this code and is intended exclusively for sport, recreation, education and/or competition. All model flights must be conducted in accordance with this safety code and any additional rules specific to the flying site. 1. Model aircraft will not be flown: (a) In a careless or reckless manner.
EN Troubleshooting Guide for SAFE Technology Problem Possible Cause Solution Flying over recommended airspeed Reduce air speed Damaged propeller or spinner Replace propeller or spinner Imbalanced propeller Balance the propeller. For more information, view John Redman’s propeller balancing video at www. horizonhobby.com Motor vibration Replace parts or correctly align all parts and tighten fasteners as needed Loose receiver Total system failure.
EN Troubleshooting Guide Aircraft will not connect (after binding) to transmitter Transmitter too near aircraft during connecting process Aircraft or transmitter is too close to large metal object, wireless source or another transmitter Bind plug left installed in bind port Move powered transmitter a few feet from aircraft, disconnect and reconnect flight battery to aircraft Aircraft bound to different model memory (ModelMatchTM radios only) Select correct model memory on transmitter Flight battery/T
EN or call the toll free telephone number referenced in the Warranty and Service Contact Information section to speak with a Product Support representative. Inspection or Services If this Product needs to be inspected or serviced and is compliant in the country you live and use the Product in, please use the Horizon Online Service Request submission process found on our website or call Horizon to obtain a Return Merchandise Authorization (RMA) number. Pack the Product securely using a shipping carton.
EN FCC Information This device complies with part 15 of the FCC rules. Operation is subject to the following two conditions: (1) This device may not cause harmful interference, and (2) this device must accept any interference received, including interference that may cause undesired operation. CAUTION: Changes or modifications not expressly approved by the party responsible for compliance could void the user’s authority to operate the equipment.
IT Parts Contact Information • Kontaktinformationen für Ersatzteile • Coordonnées pour obtenir des pièces détachées • Recapiti per i ricambi Country of Purchase Horizon Hobby Address Phone Number/Email Address Sales 4105 Fieldstone Rd Champaign, Illinois 61822 USA 800-338-4639 Sales@horizonhobby.com United Kingdom Horizon Hobby Limited Units 1-4 Ployters Rd Staple Tye Harlow, Essex CM18 7NS, United Kingdom +44 (0) 1279 641 097 sales@horizonhobby.co.
IT Replacement Parts • Ersatzteile • Pièces de rechange • Pezzi di ricambio Part # | Number Numéro | Codice Description Beschreibung Description Descrizione EFLC3010 2-3S LiPo Balancing Charger, 0.5-3A E-flite 2-3SLiPo Balancing Ladegerät,0.5-3A Chargeur équilibreur Li-Po 2S-3S 0.5 à 3A Caricatore bilanciato 2-3S LiPo Balancing Charger, 0.
© 2014 Horizon Hobby, LLC. E-flite, Apprentice, AS3X, ParkZone, Blade, Celectra, EC3, DSM, DSM2, DSMX, Z-Foam, Bind-N-Fly, ModelMatch, SAFE, the SAFE logo and the Horizon Hobby logo are trademarks or registered trademarks of Horizon Hobby, LLC. The Spektrum trademark is used with permission of Bachmann Industries, Inc. PhoenixRC and the PhoenixRC logo are registered trademarks of Runtime Games Ltd. Futaba is a registered trademark of Futaba Denshi Kogyo Kabushiki Kaisha Corporation of Japan.