
Datasheet


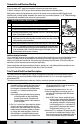

9
FR DE ENIT
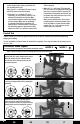
If at any time during the test the controls respond in the opposite direction, reverse/change the direction of
operation of the flight controls. Follow these steps to change the direction of the various flight controls:
1. Be certain that battery is disconnected from the battery lead of the 5-in-1 control unit and the transmitter is
turned off.
2. Push down on the appropriate digital trim button on the transmitter for the control you would like to change
the direction of. For example:
Left aileron button Aileron channel normal
Right aileron button Aileron channel reversed
Bottom elevator button Elevator channel reversed
Right rudder button Rudder channel reversed
Top elevator button Elevator channel normal
Left rudder button Rudder channel normal
3. Continue to hold the appropriate trim button while turning the transmitter on.
4. Hold the digital trim button down for approximately five seconds, until a series of beeps/tones are heard
confirming the selection.
5. Connect the battery to the 5-in-1 and complete the flight control test. Confirm that all controls operate in the
correct directions.
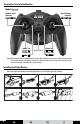
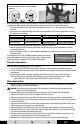
ON DIP
1 2 3 4 5 6 7 8 9
If you decide to use an E-flite LP5DSM transmitter, position your channel
reversal dip switches as the figure on the right. If you’ve confirmed proper
control operation of your Blade 120 SR, unplug the flight battery.
Channel 5 Information
Channel 5 affects rate settings of the 5-in-1 Control Unit.
If using the stock MLP4DSM Transmitter, please read page 12 of this manual for Dual Rate information.•
If using an LP5DSM Transmitter, please turn the Channel 5 knob clockwise completely for the highest control •
rates possible.
If using any other DSM2 compatible transmitter, please ensure Channel 5 output is set to full travel.•
Note: Test this by inducing full cyclic (Aileron/Elevator) input and moving the switch or knob. There’s
approximately 10–15% less servo travel if the Channel 5 position is set wrong.
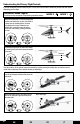
With the aileron stick pushed right, the right-
hand servo linkage should pull the swashplate
downward.
Motor Control Test
Place the helicopter on a clean and flat ground surface (linoleum, concrete or asphalt) free of obstructions. •
Always stay clear of the moving rotor blades.
CAUTION: Keep pets and other animals away from the helicopter. Animals may injure themselves if they
attack or run from the helicopter.
Move the throttle stick a small amount until rotor blades turn. DO NOT attempt to fly the helicopter. •
When viewed from the top, the main rotor blades should turn clockwise. •
When viewed from the tail rotor side of the helicopter, the tail rotor blades should turn counterclockwise. •
If either set of blades turns in the wrong direction, disconnect the flight battery and contact Horizon Customer •
Service for information.
If the tail rotor turns clockwise, tail motor wiring connectors may be disconnected. Connect the wiring at the •
motor in reverse so the tail rotor turns counterclockwise.
After confirming the rotor blades rotate in the correct direction, motor response to controls can be tested. •
Adjust the throttle to a low level of power then move the rudder (left-hand) stick a small amount to the right. •
The nose of the helicopter should move to the right.
Move the rudder stick a small amount to the left. The nose of the helicopter should move to the left. If the •
nose moves to the right, please refer to the Troubleshooting Guide.
When rotors turn correctly and respond correctly to controls, your 120 SR is ready for first flight. •