
User Manual


EN
9
Model Assembly
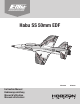
Horizontal Stabilizer Installation
1. Slide the horizontal stabilizer (A) into the opening in the rear of the fuselage.
2. Secure the horizontal stabilizer into place using the included two screws
(2 x 8mm) (B) with a Phillips screwdriver.
3. Attach the left and right clevis to the outer hole (C) on both the left and right
elevator control horns. (see intructions for clevis connection.)
4. Slide the tail cone (D) into place, and secure with the included two pieces of
tape (E) on each side.
Disassemble in reverse order.
2 x 8mm
Self-Tapping
Screw
B
A
D
E
E
C
1.
2.
3.
4.
5.
6.