
User Manual


EN
4
PT-17
Prefl ight
Transmitter Setup
SAFE
®
Select Technology
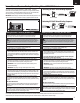
1. Remove and inspect contents.
2. Read this instruction manual thoroughly.
3. Charge the fl ight battery.
4. Setup Transmitter using transmitter setup chart.
5. Fully assemble the airplane.
6. Install the fl ight battery in the aircraft (once it has been fully charged).
7. Check the Center of Gravity (CG).
8. Bind the aircraft to your transmitter.
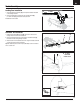
9. Make sure linkages move freely.
10. Perform the Control Direction Test with the transmitter.
11. Perform the AS3X Control Direction Test with the aircraft.
12. Adjust fl ight controls and transmitter.
13. Perform a radio system Range Test.
14. Find a safe open area to fl y.
15. Plan fl ight for fl ying fi eld conditions.
IMPORTANT: After you set up your model, always rebind the transmitter and
receiver to set the desired failsafe positions.
Dual Rates
Take fi rst fl ights in Low Rate. For landings, use high rate elevator.
NOTICE: To ensure AS3X
®
technology functions properly, do not lower rate
values below 50%. If lower rates are desired, manually adjust the position of
the pushrods on the servo arm.
NOTICE: If oscillation occurs at high speed, refer to the Troubleshooting
Guide for more information.
Expo
After fi rst fl ights, you may adjust expo in your transmitter.
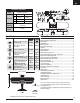
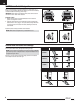
Computerized Transmitter Setup
Start all transmitter programming with a blank ACRO model (perform a
model reset), then name the model.
Set Dual Rates to
HIGH 100%
LOW 70%
Set Servo Travel to 100%
DXe Refer to spektrumrc.com for the appropriate download setup.
DX6i
1. Go to the SETUP LIST MENU
2. Set MODEL TYPE: ACRO
DX7S
DX8
1. Go to the SYSTEM SETUP
2. Set MODEL TYPE: AIRPLANE
3. Set WING TYPE: 1 AIL
DX6e
DX6 (Gen2)
DX7 (Gen2)
DX8 (Gen2)
DX9
DX10t
DX18
DX20
1. Go to the SYSTEM SETUP
2. Set MODEL TYPE: AIRPLANE
3. Set AICRAFT TYPE:
WING: NORMAL
The evolutionary SAFE
®
Select technology can offer an extra level of protection so you can perform the fi rst fl ight with confi dence. No complex transmitter
programming is required. Just follow the simple bind process to make the SAFE Select system active. When activated, bank and pitch limitations keep you from
over-controlling and automatic self-leveling makes recovery from risky or confusing attitudes as simple as releasing the sticks. In fact, with the aileron, elevator
and rudder sticks in the neutral position, SAFE Select will automatically keep the airplane in a straight and level attitude.
Expand the advantage of what SAFE
®
Select technology offers by assigning it to a switch. No transmitter programming is required and you’ll be able to turn
the system ON and OFF with the fl ip of a switch. For example, turn SAFE select ON for takeoffs to counter the torque of the propeller. Turn it OFF in fl ight for
unrestricted aerobatic performance, and turn it back ON when a buddy wants to try out your cool aircraft. Turn SAFE Select ON for landings. As you drop the fl aps,
SAFE Select reduces your workload by compensating for pitch changes automatically, regardless of throttle position. It will help keep the correct pitch attitude and
wings level during the fi nal approach. Whether you’re a beginner or an expert, SAFE Select can make your fl ights a great experience.
When the normal bind process is followed, the SAFE Select system is disabled, leaving specially tuned AS3X
®
technology in place to deliver a pure, unrestricted
fl ight experience.