
User Manual
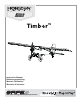


EN
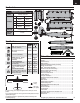
Model Assembly Continued
Wing Assembly
Slat Installation (Optional)
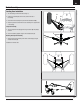
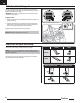
1. Carefully remove all the foam slat pocket covers (A) from the wing.
2. When the pocket is exposed, carefully apply medium CA to each
slat pocket.
3. Carefully mount the slat onto the wing with the rounded edge facing
forward. Ensure that the left and right slats are on the correct wing half.
The slat and wing halves are labeled with “L” and “R” indicators.
Wing Installation
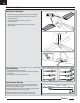
1. Slide the left and right wing halves together, as shown.
2. Secure the wing together using the wing bracket (A).
3. Guide the Flaps, Lights and Aileron servo connectors (B) into the top of the
fuselage as shown.
Tip: If needed, use hemostats or pliers to pull the servo connectors into the
fuselage.
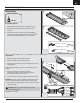
4. Connect the Flaps, and Aileron connectors to respective
Y-harnesses connected to the receiver. The left and right servos
can be connected to either side of a Y-harness.
5. Connect the two light connectors (with exposed pins) to the light harness.
IMPORTANT: The ailerons must be connected to the receiver’s AILE (#2 chan-
nel) with a Y-harness (included) for the AS3X
@
system to function properly.
6. Align the wing with the fuselage and secure into position using the included
2 nylon wing bolts (C).
CAUTION: DO NOT crush or otherwise damage the wiring when
attaching the wing to the fuselage.
Disassemble in reverse order.
Required Adhesives:
Medium CA
A
1
2
1
2
A
B
Lights
Flaps
Ailerons
C
7