
EFL11450 E-flite Opterra 1.2m BNF Basic Flying Wing Instructions


EN
12
Opterra
®
1.2M
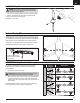
Prefl ight Checklist
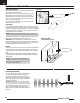
1. Find a safe and open fl ying area
2. Charge fl ight battery
3. Turn on transmitter
4. Install fully charged fl ight battery in aircraft
5. Confi rm the CG is within the recommended limits
6. Ensure the linkages move freely
7. Perform control direction test
8. Perform a range check
9. Perform the compass calibration
10. Plan fl ight for fl ying fi eld conditions
11. Verify the video display is receiving a solid signal
12. Install the propeller
13. Wait for a READY status on the OSD
14. Set home location and landing direction
15. Set a fl ight timer for 5-6 min.
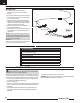
16. Launch into the wind
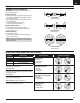
Trimming the Aircraft
Adjusting Trim in fl ight
The SAFE Plus fl ight mode switch should be set to AS3X mode (position 2)
before adjusting the trims.
Trimming is best done in calm wind conditions.
If the aircraft does not fl y straight and level at half throttle with the sticks at neutral,
fl y into the wind and adjust the trim sliders as indicated in the table until the aircraft
maintains a reasonably straight and level fl ight path.
After the aircraft is trimmed in fl ight, land the aircraft and proceed to the Manually
Adjusting Trim section to set the trim mechanically.
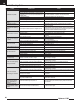
Aircraft Drift Trim Required
Elevator
Elevator Trim
Elevator Trim
Aileron
Aileron Trim
Aileron Trim
Flight Preparation
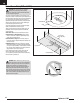
Manually Adjusting Trim
WARNING: Do not perform any maintenance with the propeller
installed on the aircraft. Serious injury or property damage could
result from the motor starting inadvertently.
The SAFE Plus fl ight mode switch should be set to Experienced mode
(position 2) before manually adjusting the trim settings.
The aircraft should be kept still while perfoming manual adjustment of trim.
With the trim settings from the trim fl ight still set in the transmitter, take note of
the positions of each of the control surfaces, one at a time.
Adjust the clevis on each control surface to position the surface the same as it
was with the trim offset.
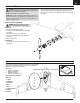
1. Remove the clevis from the control horn.
2. Turn the clevis (as shown) to lengthen or shorten the pushrod.
3. Close the clevis onto the control horn and slide the tube towards the horn to
secure the clevis.
4. Move to the next control surface.
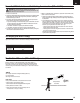
When you have all of the surface trims centered, return the trim settings on
the transmitter to neutral by pushing the trim buttons for each surface until the
transmitter emits a loud beep indicating center trim.