
EFL11460 E-flite Opterra S+ 1.2m FPV BNF Race Wing Instructions


EN
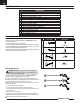
LED Indicates
Green fl ashing Waiting for GPS lock
Blue, red and
green fl ashing
GPS lock acquired, waiting for home position
Blue solid SAFE
Purple solid SAFE with ALT hold
Red solid AS3X
15
CAUTION: Keep aircraft away from magnetic sources such as
cameras, camera mounts, speakers ect. These may interfere with the
GPS system and loss of control may result.
1. Power on the transmitter.
2. Install a fully charged fl ight battery, following the instructions in the Install the Flight
Battery section. The control surfaces will go move up and down, indicating the
aircraft is searching for an RF link.
3. Once the RF link has been established, the elevator will move up and down
slowly, indicating the aircraft is searching for GPS lock.
• If you wish to change the virtual fence mode, input the transmitter stick com-
mands as described in the Virtual Fence Mode and GPS section while the
aircraft is searching for GPS lock.
• The elevator movement will speed up as satellites are located.
• The elevator will quickly move and then center to indicate GPS lock.
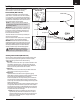
4. The ESC will arm. Place the aircraft in the desired home location, pointing into
the wind and the desired takeoff direction.
5. When in the desired location and direction, press and hold the HP/AL (bind)
button to set the home location.
• If either of the circle Virtual Fence modes are active or if virtual fence is off, all
control surfaces will wag, indicating the aircraft is ready for fl ight. Relase the HP/
AL (bind) button.
• If the Airfi eld Virtual Fence mode is active, only the ailerons will wag left
and right. Release the HP/AL (bind) button. You must then indicate where
the fl ying side of the airfi eld is in relation to the home location. The throttle
will be inactive until the fl ying side direction is set. Set the fl ying side
direction by moving the aileron stick either left or right:
- If the fl ying side is off the right wing of the aircraft as it sits in the home
location, push the aileron stick right.
- If the fl ying side is off the left wing as the aircraft sits in the home loca-
tion, push the aileron stick left.
Once the home location and fl ying location is set, all surfaces will wag, indicat-
ing the aircraft is ready for fl ight.
Power On, GPS Initialization and Establishing Home Location (BNF with FPV)
Takeoff
Set the fl ight mode switch to Beginner Mode (position 0)
for your fi rst fl ights.
Set a fl ight timer for 5-6 minutes.
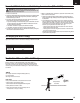
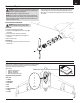
Hand Launch
Once you have established a home position and the aircraft
is ready for fl ight, use the following steps.
1. Grip the aircraft under the fuselage, behind the wing struts.
2. Slowly advance the throttle to 100%.
3. Throw the aircraft slightly nose up and directly into the
wind (less than 5–7 mph (8–11km/h)).
Slowly advance
the throttle
Wind
LED Display (BNF with FPV only)
Flight control status is shown on the external LED display in addition to the OSD.
Throttle Cut in GPS modes (BNF with FPV only)
When the aircraft is in a GPS assisted mode (Loiter, Holding Pattern, or
AutoLand), the motor will not respond to throttle stick commands. Activate
the throttle cut function to stop the motor in GPS modes. For throttle cut to
function properly, the throttle channel needs to go to -130% when throttle cut
is activated.